

Ever found yourself frustrated while trying to locate studs behind walls for your DIY projects? You know the feeling—wishing there was a tool that could make the task easier and more accurate.
Well, the Zircon HD35 Stud Finder might just be the solution you’ve been searching for. Imagine the satisfaction of knowing exactly where to drill, hang, or mount, without second-guessing or damaging your walls. You’re about to discover how this handy device can become your new best friend in home improvement.
Stick around, and you’ll learn how to use the Zircon HD35 Stud Finder efficiently, making your projects smoother and more successful than ever.
Credit: www.youtube.com
Choosing The Right Zircon Hd35 Model
Choosing the right Zircon HD35 model can make a difference in your DIY projects. This stud finder is a handy tool for locating studs, pipes, and wires. But selecting the right model ensures accuracy and ease of use. Let’s explore the factors to consider when selecting the right Zircon HD35 model.
Understanding Your Project Needs
Consider the type of walls you will work on. Different walls require different scanning capabilities. Check if the model can scan through thick surfaces. Some models are better for drywall, while others work on concrete.
Comparing Features And Specifications
Look at the features each model offers. Does it have a deep scan mode? Check for the presence of an LCD display. Some models provide more information than others. These features can enhance your scanning experience.
Evaluating Ease Of Use
Ease of use is crucial for effective scanning. Consider the user interface of the model. Is it intuitive? A model with simple controls can save time. This aspect can be important for beginners.
Checking Customer Reviews
Read reviews from previous buyers. Feedback can reveal potential issues. Reviews often highlight the strengths and weaknesses of the model. Learn from others’ experiences to make an informed choice.
Considering Budget Constraints
Budget is always a factor in decision-making. Compare prices among different models. The most expensive option is not always the best. Finding a model that fits your budget is important.

Credit: www.zircon.com
Preparing For Use
Prepare the Zircon HD35 Stud Finder by inserting the batteries correctly. Calibrate the device against a wall before scanning. Hold the stud finder flat against the surface, then move it steadily to locate studs accurately.
Before you dive into using the Zircon HD35 Stud Finder, a little preparation can go a long way. Ensuring everything is set up properly can make the difference between a successful DIY project and a frustrating experience. Let’s break down the essential steps to get your stud finder ready for action.
Checking Batteries
First things first, check the batteries. A stud finder is only as good as its power source. Open the battery compartment and ensure the batteries are fresh and properly placed. If you notice any corrosion or leakage, replace them immediately. Imagine getting halfway through a project and the device dies. Avoid that by double-checking the power supply upfront.
Calibrating The Device
Next, you need to calibrate the device. Calibration is crucial for accurate readings. Turn on the Zircon HD35 and place it against the wall without pressing any buttons. Listen for a beep or watch for a light indicator to confirm it’s calibrated. If it doesn’t calibrate, ensure it’s not on a stud or metal and try again. Does your device not beep? It might need recalibration or a battery check. Always aim for accuracy by testing the device before you start your project. Preparation might seem like a chore, but it sets the stage for success. Have you ever rushed into a task only to hit a snag because you skipped the prep work? Taking these simple steps can save you time and effort in the long run.
Basic Operation Techniques
Using a Zircon HD35 Stud Finder can simplify your home projects. This tool helps locate studs, wires, and pipes hidden behind walls. Understand its basic operation to make the most of it. Follow these techniques to get accurate readings.
Understanding The Interface
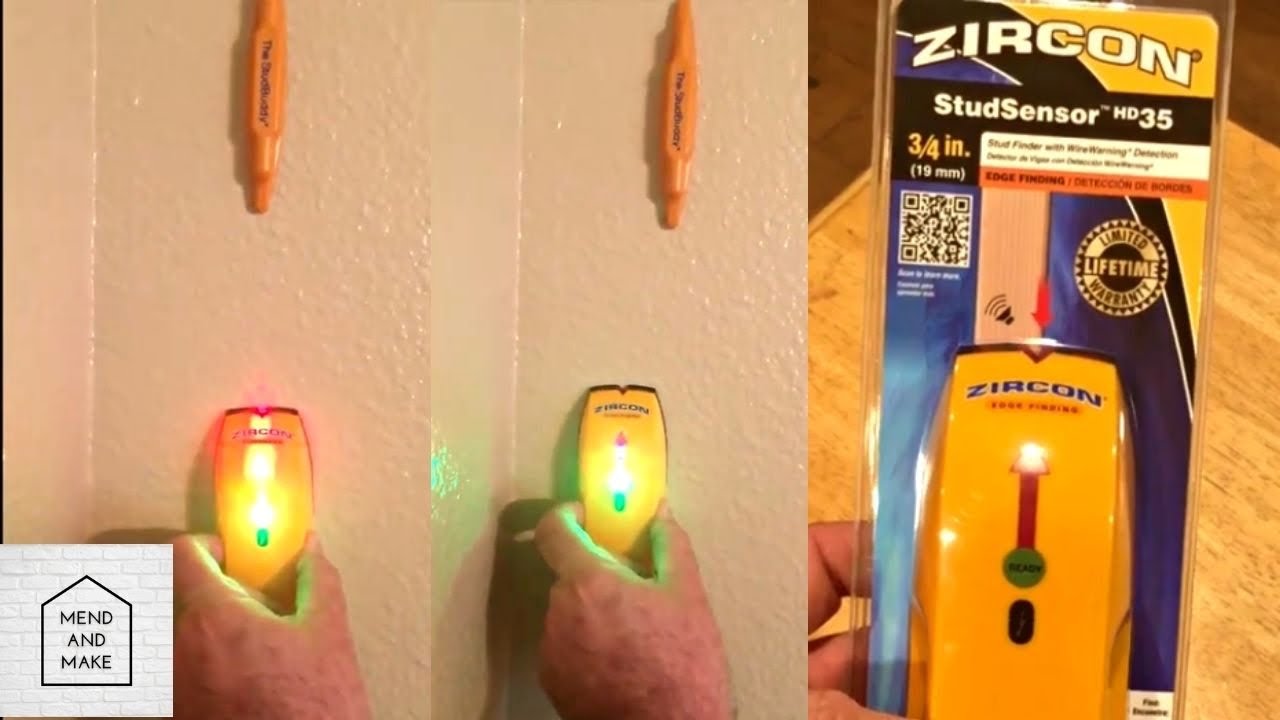
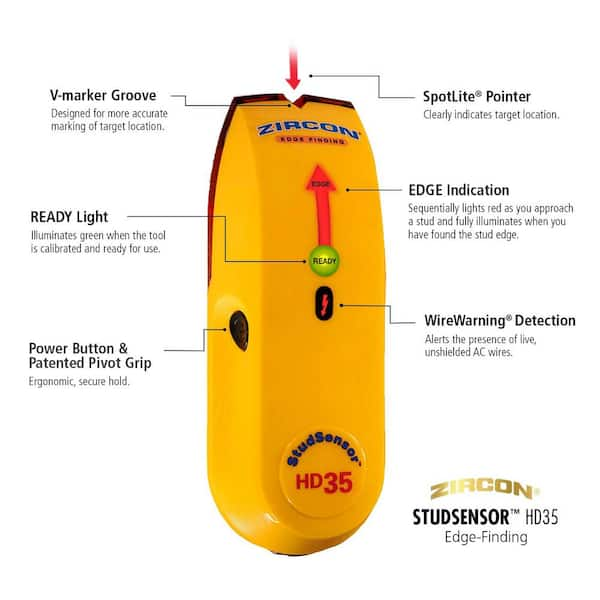
The Zircon HD35 has a user-friendly interface. The display shows different symbols. These symbols indicate the presence of studs or wires. The power button is easy to find. It’s located on the side of the device. The mode button allows switching between scan modes. Familiarize yourself with these controls before starting.
Using The Scan Modes
The Zircon HD35 offers different scan modes. These modes help detect various materials behind walls. Use the StudScan mode for standard walls. This mode finds the edges of wood and metal studs. The DeepScan mode is for thicker walls. It provides deeper scans for more accuracy.
Start by placing the device flat against the wall. Press the power button to begin scanning. Move the device slowly across the wall. Watch the display for signals. A steady signal means a stud is near. Mark the wall to remember the location.
Switch to WireWarning detection mode to find live wires. This mode detects electrical wires behind walls. It’s crucial for safety in your projects. Always use this mode before drilling or nailing.
Credit: www.homedepot.com
Advanced Features
Are you tired of the uncertainty that comes with hanging heavy items on your walls? The Zircon HD35 Stud Finder might just be the tool you’ve been searching for. This device is not only user-friendly but comes packed with advanced features that make locating studs and wires a breeze. With the right know-how, you can make your home improvement projects safer and more efficient.
Deepscan Mode
One of the standout features of the Zircon HD35 is its DeepScan Mode. This mode allows you to detect objects that are deeper within the wall, giving you more confidence in your DIY endeavors. Whether you’re mounting a TV or hanging a shelf, DeepScan Mode ensures you won’t miss a stud that’s just out of reach.
Imagine the peace of mind you’ll have knowing that your expensive TV won’t come crashing down because you’ve secured it to a stud detected by the DeepScan Mode. It’s like having a superpower in your toolkit that helps you see beyond the surface.
Wirewarning Detection
Ever drilled into a wall and hit a wire? That’s a nightmare scenario you can avoid with WireWarning Detection. This feature alerts you to live wires, helping you steer clear of electrical hazards. It’s not just about protecting your wall; it’s about safeguarding your home and your family.
WireWarning Detection is a game-changer for anyone looking to conduct safe home improvements. Picture yourself confidently drilling into a wall, assured that you’re not going to cause a blackout or worse. This feature transforms the way you approach every project by adding a layer of safety you didn’t know you needed.
Why take unnecessary risks when you can rely on technology to guide you? The Zircon HD35 Stud Finder empowers you to tackle your projects with precision and security. What could you accomplish if you knew you couldn’t fail?
Expert Tips For Accurate Detection
Using a Zircon Hd35 Stud Finder can enhance your DIY projects. Accurate detection ensures your safety and the success of your project. This section shares expert tips to make sure you get precise results.
Avoiding Common Mistakes
Many people rush the process and miss accurate readings. Start by calibrating the stud finder before scanning the wall. If you skip calibration, you might miss the stud. Hold the device steady for a clear signal. A shaky hand can lead to false positives. Scan slowly across the wall to ensure you cover the entire area. Moving too quickly can result in missed detections. Repeat scans for confirmation. Double-checking improves accuracy.
Techniques For Uneven Surfaces
Uneven surfaces require extra care. Adjust the device settings for better results on textured walls. For curved areas, follow the contour with the stud finder. This ensures consistent contact. Avoid pressing too hard, which might damage delicate surfaces. Keep the device level for accurate readings. A tilted angle can throw off the detection. Use a pencil to mark detected locations. This helps keep track of findings on tricky surfaces.
Maintenance And Care
Ensure your Zircon Hd35 Stud Finder lasts by storing it in a dry place. Clean it regularly with a soft cloth to prevent dust buildup. Handle gently to avoid damaging the sensitive sensors and battery compartment. Proper care guarantees accurate readings and extends the tool’s life.
Maintaining and caring for your Zircon HD35 Stud Finder is essential for ensuring its longevity and accuracy. Like any tool, it requires regular attention to keep it in top working condition. Neglecting maintenance can lead to unreliable results or even damage the device. So, how can you keep your stud finder in peak shape? Let’s dive into some practical tips.
Cleaning The Device
Keeping your Zircon HD35 clean is a simple but crucial task. Dust and debris can accumulate on the sensor, affecting its accuracy. Use a soft, dry cloth to wipe down the device after each use. Avoid using water or cleaning products, as moisture can damage the electronic components. A gentle shake can dislodge any trapped particles. If you notice persistent smudges, a slightly damp cloth (with water only) can help, but ensure the device is fully dry before storing. Have you noticed a decrease in performance? It might be time for a thorough cleaning.
Storing Properly
Proper storage extends the life of your stud finder. Always store it in a cool, dry place, away from direct sunlight and moisture. If your device came with a case, use it to protect against dust and accidental drops. Keep it away from heavy tools that might cause scratches or dents. Are you guilty of tossing it into a cluttered toolbox? Consider dedicating a separate spot for delicate devices like the HD35. This small change can make a big difference in maintaining its precision. By regularly cleaning and storing your Zircon HD35 correctly, you’re investing in its performance and reliability. These simple steps can help ensure your stud finder serves you well for years to come. Are you ready to make these practices a habit? Your future DIY projects will thank you.
Troubleshooting Common Issues
Using the Zircon HD35 Stud Finder can sometimes lead to common issues like false readings or difficulty locating studs. Ensure the device is calibrated correctly, and move it slowly along the wall for accurate results. Adjust settings if needed to match different wall types.
Using the Zircon HD35 Stud Finder can make your DIY projects smoother, but sometimes you might face a few hiccups. Troubleshooting common issues ensures that you get the most accurate readings, avoiding unnecessary holes in your walls. With just a little patience and understanding, you can resolve these issues efficiently.
False Positives
Occasionally, your stud finder might indicate the presence of a stud where there isn’t one. This is often due to other materials behind the wall, like pipes or electrical wires, confusing the sensor. To minimize this, try scanning the area multiple times and from different angles. Make sure the device is flat against the wall without tilting. If you face persistent issues, consider marking the spots lightly with a pencil, then check for consistency in the readings. Have you ever wondered if your wall has hidden surprises? Repeated scans can help ensure you’re not drilling into something unexpected.
Calibration Problems
Proper calibration is crucial for accurate readings. If the Zircon HD35 isn’t calibrated correctly, it may fail to detect studs or show inaccurate locations. To calibrate, place the stud finder on a flat, unobstructed section of the wall and press the calibration button until you hear a beep. It’s that simple, yet so essential. If calibration issues persist, check the battery—sometimes, a fresh one can make all the difference. Have you ever thought about how much a tiny battery can impact your entire project? Keeping spares can save you time and frustration. Remember, patience and attention to detail can transform troubleshooting from a chore into a straightforward task. Have you experienced any other challenges with stud finders? Sharing tips and tricks can benefit everyone in their DIY journeys.
Frequently Asked Questions
How Do You Calibrate Zircon Hd35 Stud Finder?
To calibrate the Zircon HD35, place it flat against the wall. Press and hold the power button until the device beeps. This ensures accurate readings by adjusting to wall density. Calibration is essential for precise stud detection.
What Surfaces Can Zircon Hd35 Detect?
The Zircon HD35 can detect studs on drywall, plaster, and wood surfaces. It uses advanced scanning technology to identify changes in density. This versatility makes it ideal for various home improvement projects.
Can Zircon Hd35 Find Live Wires?
Yes, the Zircon HD35 can detect live wires. It uses AC scanning mode to locate electrical wires behind walls. This feature enhances safety by alerting you to potential electrical hazards.
Why Is Zircon Hd35 Beeping Continuously?
Continuous beeping indicates calibration errors or dense wall material. Recalibrate the device or check for metal interference. This ensures accurate readings and prevents false alerts.
Conclusion
Mastering the Zircon Hd35 Stud Finder is simple. Its user-friendly design makes locating studs easy. Remember to calibrate before each use. This ensures accurate readings every time. Hold it steady against the wall. Move it slowly for best results. Pay attention to its signals.
They guide you to the stud’s exact location. With practice, your confidence will grow. Your projects will become smoother and more efficient. This tool is a valuable addition to your toolkit. Give it a try today. Experience precision in your home improvement tasks.


