
Are you tired of making costly mistakes while hanging shelves or mounting your TV? Uneven installations and damaged walls can be frustrating, but there’s a solution right at your fingertips.
Imagine effortlessly finding studs in your walls with pinpoint accuracy, saving both time and frustration. This is where the Franklin Sensors Stud Finder comes into play. It’s not just a tool; it’s your new best friend in home improvement. You’ll discover how to use this innovative device to transform your DIY projects.
Let’s dive in and unlock the secrets to flawless wall installations, ensuring every project is a success. Are you ready to become a pro at home improvement? Your journey starts here.
Choosing The Right Stud Finder Model
Choosing the right stud finder model is crucial for efficient wall scanning. Franklin Sensors offer various options, each with unique features. Understanding these features helps make an informed decision. Whether you’re a beginner or experienced in DIY projects, selecting the right model enhances your work efficiency and accuracy.
Features To Consider
Different models offer distinct features. Some have LED displays, providing clear visibility. Others use multi-sense technology, detecting studs with greater accuracy. Consider the size of the sensor area. Larger sensors cover more space, reducing scan time. Battery life is another key factor. Longer battery life ensures uninterrupted use. Evaluate the ease of use. Models with simple interfaces are user-friendly.
Budget-friendly Options
Finding a stud finder within budget is possible. Franklin Sensors have affordable models without compromising quality. Basic models offer essential features for standard tasks. Look for durability. Even budget models should withstand regular use. Compare prices online to find the best deals. Many retailers offer discounts on stud finders. Check customer reviews for insights into performance and reliability.

Credit: www.amazon.com
Preparing Your Workspace
Set up your workspace with the Franklin Sensors Stud Finder. This tool identifies wood and metal studs effortlessly. Make sure your work area is clear for smooth operation and accurate results.
Before you start using the Franklin Sensors Stud Finder, preparing your workspace is crucial. A well-organized area enhances accuracy and efficiency. This not only makes your task smoother but also ensures you won’t face surprises like drilling into unexpected objects.
Clearing The Area
Begin by removing any clutter from your workspace. This includes furniture, wall hangings, or any decorative items in the way. A clean area allows you to move freely and prevents accidental damage. Imagine you’re about to hang a heavy mirror. You wouldn’t want your prized vase knocked over in the process. Clearing the area ensures you have a clear path and focus on the task at hand.
Marking Reference Points
Once the area is clear, identify and mark reference points. This could be the approximate location where you intend to hang an item. Use a pencil to lightly mark these spots on the wall. Why is this important? It gives you a clear visual guide as you use the stud finder. A simple pencil mark can save you from unnecessary scanning and guesswork. Consider using painter’s tape for more prominent markings. This is especially useful if you plan to make multiple adjustments. The tape is easy to remove and won’t damage your walls. By setting these preparations in motion, you’re setting yourself up for success. How will you ensure your workspace is ready for your next project?
Operating The Franklin Sensors Stud Finder
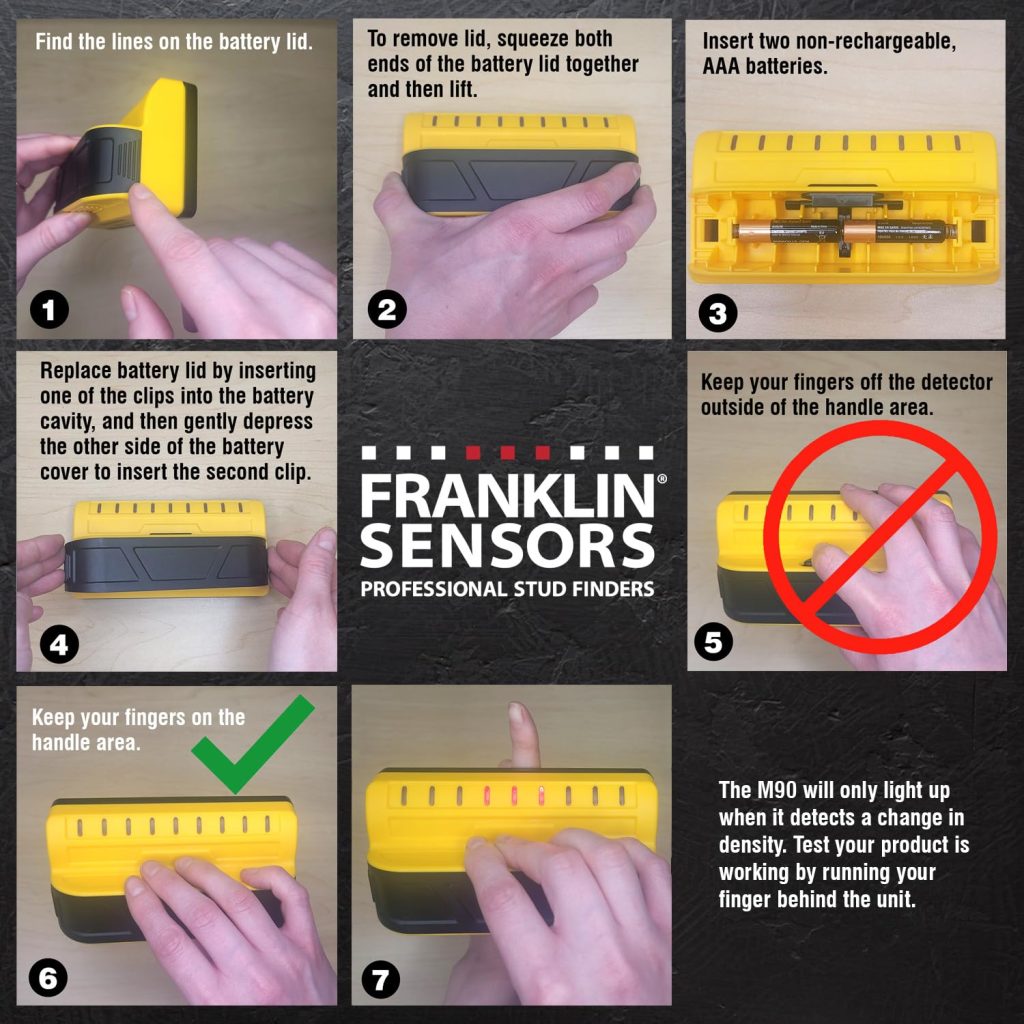
Effortlessly locate studs with the Franklin Sensors Stud Finder. Hold the device against the wall and press the button. LED lights illuminate to indicate stud locations, ensuring precision for your projects.
Operating the Franklin Sensors Stud Finder can seem daunting at first, but it’s actually quite simple and intuitive. Whether you’re hanging a picture or mounting a TV, this tool is designed to make your life easier. By understanding how to power up and calibrate the device properly, you can ensure accurate results every time.
Powering Up The Device
First things first, you need to power up your Franklin Sensors Stud Finder. It runs on AA batteries, so make sure you have a fresh pair on hand. Insert the batteries into the compartment, ensuring they’re placed with the correct polarity. Once the batteries are in, press the power button. You should hear a beep and see the LED lights flash. This indicates the device is ready for use. Isn’t it amazing how just a couple of batteries can power a tool that saves you from drilling into the wrong spot?
Calibrating For Accuracy
Calibration is key for accuracy. To do this, place the stud finder flat against the wall before turning it on. This allows the sensors to adjust to the wall’s density. Press and hold the power button while moving the device horizontally. The LED lights will indicate the location of the stud as you pass over it. Release the button once you’ve found the stud to lock in the reading. Have you ever wondered why some stud finders give false readings? It’s often because they weren’t calibrated correctly. By following these steps, you’ll ensure your Franklin Sensors Stud Finder is operating at its best. What project are you planning to tackle next? Knowing how to use this tool could be the difference between a smooth job and a frustrating experience.
Locating Studs Efficiently
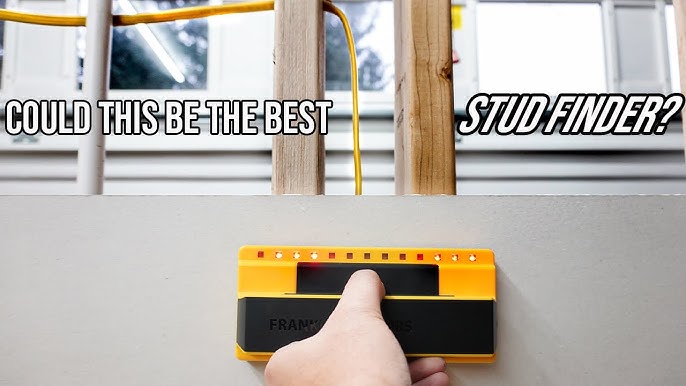
Franklin Sensors Stud Finder makes locating studs simple and accurate. Slide the device along the wall. Bright LED lights indicate the stud’s position. It’s quick and easy for any home improvement project.
Locating studs efficiently is crucial for any DIY project involving walls. Whether you’re mounting a TV, hanging a heavy picture, or installing shelves, knowing exactly where the studs are makes your job easier and safer. Using a Franklin Sensors Stud Finder can transform this task from a guessing game into a precise operation, saving you time and preventing unnecessary wall damage.
Using Visual Indicators
Franklin Sensors Stud Finder is equipped with multiple LEDs that light up to show the exact location of the stud. Each LED corresponds to a specific point, giving you a clear visual representation of the stud’s position. You don’t have to guess or make pencil marks; the bright lights do the talking. Imagine holding the device against the wall, and, like magic, the LEDs illuminate. It’s like having x-ray vision for your walls. This feature ensures you know precisely where to drill or nail, making your project straightforward and worry-free.
Techniques For Precise Detection
For accurate results, ensure the stud finder is flush against the wall. Move it slowly in a horizontal line to avoid missing any studs. The speed at which you move can affect the sensitivity, so be patient and deliberate. Holding the device with both hands can also improve stability. This keeps the sensors aligned and reduces errors. Have you ever tried using a stud finder and ended up with more holes than you’d like to admit? With this technique, you can say goodbye to unnecessary wall patching. Pay attention to the edges of the studs. Franklin Sensors Stud Finder detects the full width, but knowing the edges helps with precise placement of screws or nails. It’s the small details that make a big difference in your DIY success. What other tips can you share about using a stud finder efficiently? Your insights could be the key to helping someone else avoid common pitfalls.
Troubleshooting Common Issues
Using a Franklin Sensors Stud Finder can make your DIY projects a breeze. However, like any tool, it may occasionally present some challenges. Understanding these common issues and learning how to troubleshoot them can save you time and frustration. Let’s dive into some practical solutions to ensure your stud finder works seamlessly every time.
Handling False Positives
False positives can be confusing, especially when you’re drilling into what you think is a stud, only to hit air. To reduce these occurrences, ensure that your stud finder is calibrated correctly. Start by placing the device flat against the wall and press the button to initiate the scan.
It’s crucial that you move the stud finder slowly across the wall. A swift movement might lead to misleading signals. If you notice inconsistent readings, try scanning the same area multiple times to verify the presence of a stud. Sometimes, varying the angle or direction of the scan can provide a more accurate result.
Dealing With Interference
Interference can disrupt your stud finder’s accuracy. Electronic devices, metal objects, or even dense wall materials can cause this. Make sure to clear the area of any electronic gadgets that might interfere with the sensor.
Also, consider the wall material. Some materials like plaster or concrete can be harder to scan. If you’re working on such surfaces, adjusting the sensitivity setting on your stud finder can help. Remember, if the tool seems to struggle, check the battery as a low charge might affect performance.
Have you ever found yourself drilling into what seemed like a solid stud, only to discover a hollow space? What steps did you take to solve the issue? Share your experiences in the comments below! Your insights could help someone else facing the same challenges.
Credit: www.youtube.com
Safety Tips And Best Practices
Using a stud finder like the Franklin Sensors Stud Finder can simplify home projects. It helps locate studs behind walls, ensuring accurate and safe drilling. Yet, following safety tips and best practices is essential. This ensures efficient usage and prevents potential hazards.
Avoiding Electrical Hazards
Check for electrical wires before drilling. Walls often hide wires that pose risks. Turn off the power to the area you plan to work on. This reduces the chance of electric shock. Use the Franklin Sensors Stud Finder to scan walls carefully. It alerts you to potential electrical risks. Always keep your hands dry and stand on a stable surface.
Ensuring Structural Integrity
Identify the right studs for your project. This prevents structural damage. Use the stud finder to locate the center of the stud. Secure your fixtures on this spot for strong support. Avoid drilling near the edges of studs. This weakens the structure and may lead to damage. Double-check your measurements and markings before you start drilling.
Maintaining Your Stud Finder
Proper maintenance of your Franklin Sensors Stud Finder ensures its longevity. Regular care enhances performance and accuracy. Neglecting maintenance can lead to errors. Discover easy steps to keep your device in top shape.
Cleaning And Storage
Dirt and dust can affect your stud finder’s functionality. Clean your device regularly with a soft, dry cloth. Avoid using water or cleaning solutions. Ensure the sensors remain free from debris for accurate readings. Store the stud finder in a cool, dry place. Protect it from extreme temperatures and moisture. Proper storage prevents damage and extends its lifespan.
Software Updates
Some Franklin Sensors Stud Finders include software components. Check for updates periodically on the manufacturer’s website. Software updates may improve performance and fix bugs. Always follow the instructions for updating the device. This keeps your stud finder running smoothly and efficiently.
Credit: www.homedepot.com
Frequently Asked Questions
How To Calibrate Franklin Sensors Stud Finder?
To calibrate your Franklin Sensors Stud Finder, simply place it flat against the wall and press the button. The device will automatically calibrate itself. Ensure there is no metal near the device during calibration, as it may affect accuracy.
Does Franklin Stud Finder Detect Metal?
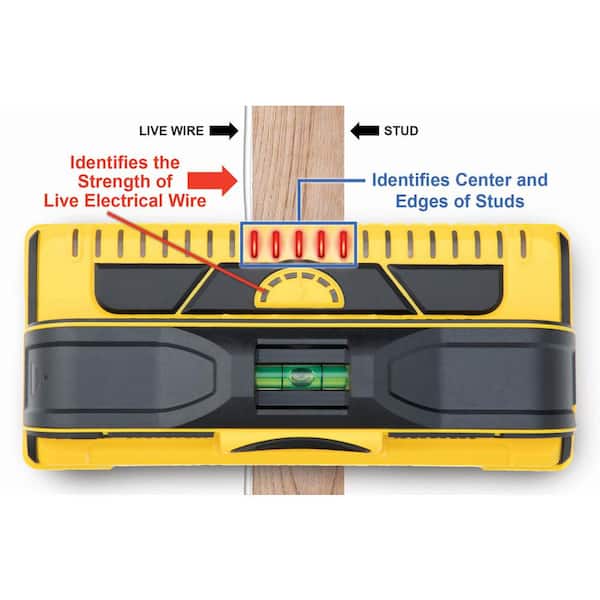
Yes, Franklin Sensors Stud Finder can detect metal objects behind walls. It uses advanced technology to identify nails, screws, and wires. This feature helps avoid damaging electrical wires or metal pipes during drilling or nailing.
Can Franklin Stud Finder Find Live Wires?
Franklin Sensors Stud Finder does not specifically detect live wires. It primarily identifies studs and metal objects. For live wires, consider using a dedicated voltage detector. Always exercise caution and consult an electrician for complex electrical work.
Is Franklin Stud Finder Easy To Use?
Franklin Sensors Stud Finder is user-friendly with straightforward instructions. Simply press the button and glide it along the wall. Its LED lights clearly indicate stud edges, making it simple for beginners and professionals alike.
Conclusion
Using Franklin Sensors Stud Finder is simple and effective. Ensure the device is calibrated. Slide it along the wall slowly. Spot the studs with precision. Mark the locations for your project. Avoid common mistakes. Follow the instructions for best results.
Practice makes perfect. Start with small projects. Gain confidence over time. This tool saves time and effort. Perfect for DIY enthusiasts. Safe home improvements made easy. A straightforward approach to finding studs. Helps avoid damage to walls. Enjoy stress-free renovations.
Franklin Sensors offers reliable performance. Make your projects successful with this handy tool.


