

Have you ever plugged in an appliance and nothing happened? It’s frustrating, right?
You might suspect that the wall socket is faulty, but how can you be sure? Testing a wall socket with a multimeter is a straightforward way to pinpoint the issue. With the right guidance, you can become confident in diagnosing electrical problems in your home.
Imagine the peace of mind knowing your sockets are safe and functional. By mastering this simple skill, you not only ensure your home’s electrical safety but also save time and money on unnecessary repairs. Dive into this article, and let’s uncover how you can effortlessly test your wall socket and take control of your home’s electrical health.
Essential Tools And Safety Precautions
Testing a wall socket with a multimeter requires essential tools and safety precautions. Ensure the multimeter is set to AC voltage. Always use insulated gloves and stand on a dry surface to prevent electrical shock.
Testing a wall socket with a multimeter is an essential skill for ensuring the safety and functionality of your home’s electrical system. Before you dive into the testing process, it’s crucial to gather the necessary tools and understand the safety precautions involved. This not only ensures accurate readings but also protects you from potential electrical hazards. Below, we’ll outline the essential tools you’ll need and the safety measures to keep in mind.
Essential Tools You Need
To test a wall socket effectively, you’ll need a digital multimeter. This handy device measures voltage, current, and resistance. It’s important to choose a multimeter that suits your needs; a basic model is sufficient for home use. A pair of insulated gloves is another must-have. They provide protection against accidental electric shocks, especially when handling live wires. Additionally, a flathead screwdriver can help you remove socket covers for better access during testing. Keep a notebook handy for jotting down readings and observations.
Safety Precautions To Follow
Safety should be your top priority when dealing with electricity. Always ensure that your hands are dry and free from moisture to prevent electric shocks. Remember to turn off the power at the circuit breaker before starting your test. This simple step can prevent accidental electrocution. Consider this: Have you ever thought about the significance of wearing safety goggles? They protect your eyes from sparks or debris, a precaution often overlooked in home electrical tasks. If you’re unsure or uncomfortable with any part of the process, it’s wise to consult a professional. Your safety is more important than saving a few dollars.
Personal Experience: The First Time I Tested A Socket
I vividly recall the first time I tested a wall socket. Armed with my multimeter, I felt like a novice electrician ready to tackle the task. My heart raced as I approached the socket, but adhering to safety precautions calmed my nerves. The multimeter readings indicated a slight fluctuation in voltage, which led me to discover a loose wire. This experience taught me the importance of precise measurements and safety awareness. Do you have any similar experiences? How did you ensure your safety while testing electrical outlets in your home? Sharing insights can help others feel more confident and prepared. By following these guidelines and using the right tools, you can safely test wall sockets and maintain your home’s electrical integrity. Stay cautious and informed, and remember, safety first!
Understanding Multimeter Functions
Testing a wall socket with a multimeter involves checking voltage levels to ensure electrical safety. Set the multimeter to AC voltage, insert probes into the socket, and read the display for accurate measurements. This process helps identify any irregularities in power flow.
Testing a wall socket might seem daunting at first, but with the right tools and knowledge, it becomes a straightforward process. One crucial tool for this task is the multimeter. Understanding multimeter functions can help you perform tests safely and accurately. Whether you’re troubleshooting or just doing a routine check, knowing how to use a multimeter effectively is essential.
What Is A Multimeter?
A multimeter is a handy instrument that measures electrical properties like voltage, current, and resistance. It’s like a Swiss Army knife for electricians. But it’s not just for professionals; you can use it too! Imagine having the power to diagnose electrical problems right at your fingertips.
Types Of Multimeters
Multimeters come in two main types: analog and digital. An analog multimeter uses a needle to display readings on a scale. It’s like the classic watch of multimeters, offering a vintage vibe. Digital multimeters, on the other hand, show readings on a digital display. They are more precise and easier to read, much like checking the time on your smartphone.
Key Functions Of A Multimeter
When testing a wall socket, you’ll primarily use three functions: voltage, current, and resistance. The voltage function lets you measure the electrical potential difference. It’s like checking the pressure in a water pipe. Current measures the flow of electricity, similar to the speed of water flowing through the pipe. Resistance checks the opposition to current flow, like figuring out the pipe’s width.
Setting Up Your Multimeter
Start by turning the multimeter dial to the appropriate function. If you’re measuring voltage, select the voltage setting. A friend once forgot this step and wondered why his readings were off—lesson learned! Ensure your multimeter probes are connected correctly. Red goes to positive, black to negative or common ground.
Safety Tips Before Testing
Safety is your top priority. Before testing, make sure the socket is not overloaded. Check for signs of damage like scorch marks or a burning smell. Remember, electricity is invisible but powerful. Would you trust a damaged parachute? Exactly. Ensure you’re wearing rubber-soled shoes and stand on a dry surface to avoid any mishaps.
Practical Application: Testing Voltage
To test the voltage, insert the probes into the socket. The multimeter will display a reading indicating the voltage present. This step is crucial for identifying whether the socket is supplying adequate power. Picture yourself getting a glass of water; you’d want to know it’s full, right? Similarly, ensure your socket is providing full power.
Analyzing Results
Once you’ve taken the measurements, analyze the results. If the voltage is too low or high, it might indicate a problem. Don’t panic, though. This is your opportunity to fix it before it escalates. You wouldn’t ignore a leaky tap, so why ignore an electrical issue? Understanding how a multimeter works empowers you to take control of your home’s electrical safety. So, next time you face a faulty socket, grab your multimeter and remember: you’ve got this!
Preparing The Multimeter
Testing a wall socket safely begins with preparing the multimeter. This essential step ensures accuracy and reliability. Before testing, ensure your multimeter is ready for use. Proper preparation reduces error chances.
Setting The Right Mode
Select the correct mode on your multimeter. For wall socket testing, set it to AC voltage. Most sockets use AC power. Ensure the dial points to the AC voltage sign. This step is crucial for accurate readings. Verify the setting before proceeding.
Checking Battery Life
A multimeter’s battery should be in good condition. Weak batteries can cause inaccurate readings. Check the battery indicator on the device. If needed, replace the battery with a new one. A fresh battery ensures reliability. Avoid testing with a low battery.
Testing For Voltage
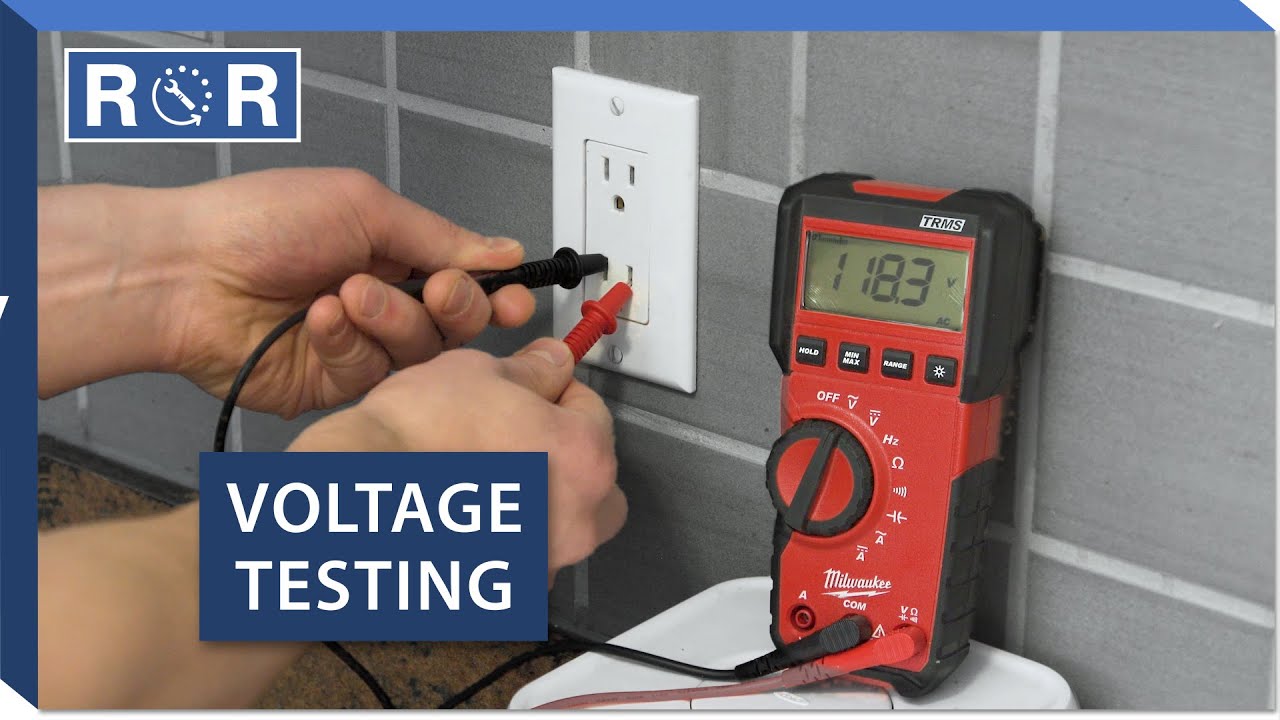
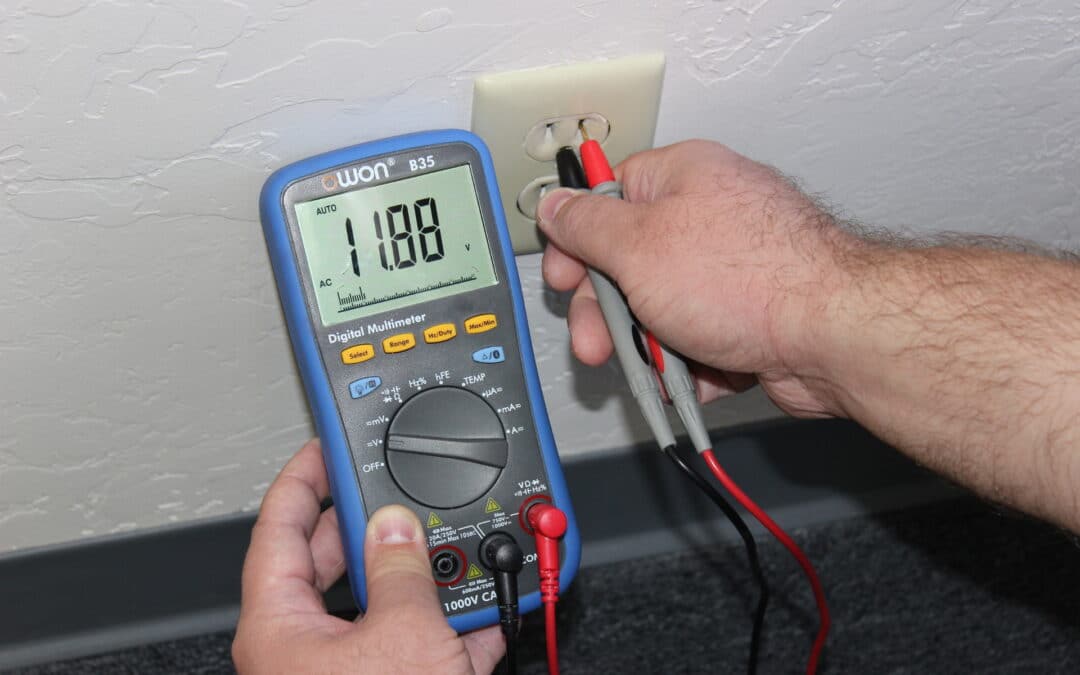
Testing a wall socket with a multimeter involves checking voltage for safety and functionality. Set the multimeter to AC voltage mode. Insert probes into socket slots to measure voltage.
Testing the voltage of a wall socket is a practical skill every homeowner should have. Knowing how to do this safely can save you time, money, and prevent potential hazards. A multimeter is your best friend for this task, allowing you to measure the voltage accurately and ensure your socket is functioning properly.
Locating The Socket Terminals
Start by identifying the terminals of the socket. Typically, a standard wall socket has three terminals: the live, neutral, and ground. The live terminal is usually on the right, the neutral on the left, and the ground at the center or bottom. Make sure the power is turned on for this procedure. Have you ever noticed how similar sockets look? It’s crucial to know the terminal placements to avoid any mishaps.
Measuring Ac Voltage
Set your multimeter to AC voltage mode. Insert the multimeter probes into the live and neutral terminals of the socket. You should see a reading between 110 to 240 volts, depending on your country’s standard. If the reading is significantly lower or higher, it might be time to call an electrician. Have you ever wondered why your appliances sometimes act up? Incorrect voltage could be the culprit. Testing for voltage is straightforward but requires caution. Always handle the multimeter carefully and avoid touching the metal parts of the probes while testing. This simple check can give you peace of mind about the safety and efficiency of your electrical system.
Checking For Continuity
Testing a wall socket with a multimeter is crucial for safety. Checking for continuity ensures electricity flows properly. This step verifies there’s no break in the circuit. It’s simple, yet essential for diagnosing electrical issues. Using a multimeter, you can easily check continuity and prevent potential hazards.
Switching To Continuity Mode
First, turn the multimeter dial to continuity mode. Look for a symbol resembling a sound wave. This mode checks if the circuit is complete. It’s vital to ensure the multimeter is set correctly. Continuity mode allows the multimeter to beep if the circuit is intact.
Touch the multimeter probes to the socket terminals. The multimeter will send a small current through the circuit. Listen for the beep or check the display. This indicates whether the circuit is continuous. A beep or reading shows the circuit is complete.
Interpreting Continuity Readings
A beep means the circuit is complete. No beep suggests a break in the circuit. This could mean a faulty socket or wiring issue. Check the multimeter display for additional readings. A zero or near-zero reading confirms continuity. A higher reading may indicate resistance or a broken connection.
If the socket fails the test, consider replacing or repairing it. Continuity testing helps identify problems early. This prevents potential electrical hazards. Understanding readings ensures accurate diagnosis and safe repairs.
Credit: www.youtube.com
Troubleshooting Common Issues
Testing a wall socket with a multimeter can reveal common issues. Troubleshooting these issues ensures your electrical system stays safe and functional. Let’s explore solutions for the most frequent socket problems.
Addressing No Voltage Readings
No voltage readings can indicate a problem. First, check the multimeter. Make sure it’s set to AC voltage. Double-check the probes. Ensure they connect securely to the socket. If the issue persists, inspect the circuit breaker. It might be tripped. Reset it and test again. Still no reading? The socket might be faulty. Consider professional help.
Handling Low Continuity
Low continuity signals a potential wiring issue. To address this, set the multimeter to continuity mode. Touch the probes to the socket terminals. Listen for a beep. No sound means low continuity. Inspect the wiring connections. Loose wires could be the cause. Tighten any loose connections. Retest for continuity. If problems continue, seek expert advice.
Maintaining Your Multimeter
Proper maintenance of your multimeter ensures its long-term efficiency. A well-maintained multimeter provides accurate readings. Regular upkeep is key. Let’s explore simple ways to maintain your device.
Cleaning The Device
Dust and debris can affect your multimeter’s performance. Use a soft, dry cloth to clean the surface. Avoid using water or liquid cleaners. They can damage the internal circuits. Check the probes for dirt or corrosion. Clean them gently with a dry cloth.
Storing Properly
Proper storage prevents damage and extends lifespan. Store your multimeter in a dry place. Avoid exposure to extreme temperatures. Use a protective case if possible. Keep it away from direct sunlight. This prevents overheating and degradation.
Credit: shockleyelectric.com
:strip_icc()/removed-outlet-voltage-test-77726753-773f780dcaf3473eb22d1c1802467f8e.jpg)
Credit: www.bhg.com
Frequently Asked Questions
How Do You Use A Multimeter On A Socket?
To test a socket, set your multimeter to AC voltage. Insert the probes into the socket holes. If working, the display shows 110-120 volts or 220-240 volts. Ensure safety by wearing insulated gloves and standing on a dry surface. Always confirm the multimeter is functioning properly before testing.
Can A Multimeter Detect Socket Problems?
Yes, a multimeter can identify socket issues. It checks voltage output to confirm if the socket is functional. If voltage is absent or irregular, the socket may be faulty. Regular testing helps ensure electrical safety and prevents potential hazards. Always follow safety guidelines during testing to avoid accidents.
What Settings Should Be On Multimeter For Socket Test?
Set your multimeter to AC voltage for socket testing. Ensure the range covers typical household voltage levels, usually 110-120 volts or 220-240 volts. Double-check settings before testing for accurate results. Proper settings ensure reliable voltage readings, confirming the socket’s functionality and electrical safety.
Why Is Socket Testing Important?
Testing sockets ensures electrical safety and functionality. Regular checks prevent electrical hazards and confirm consistent power supply. Faulty sockets can cause accidents or disrupt electronic devices. Using a multimeter for testing helps maintain safe and efficient electrical systems in your home or workplace.
Conclusion
Testing a wall socket with a multimeter is easy and safe. With clear steps, anyone can do it at home. First, ensure the multimeter is set correctly. Check for voltage and continuity. This confirms if the socket works well. Safety is key.
Always handle the tools carefully. Follow instructions to avoid accidents. Regular checks help prevent electrical issues. Keep your home safe and efficient. Now, you have the knowledge to test sockets confidently. Remember, practice makes perfect. Happy testing!


