

Have you ever wondered if your speaker is performing at its best? Or perhaps you’re troubleshooting issues with sound quality?
Knowing how to test a speaker with a multimeter can be a game-changer for you. This essential skill could save you from unnecessary replacements and even reveal hidden problems before they become major headaches. Imagine the satisfaction of solving speaker issues on your own, with just a simple tool and a bit of know-how.
You’ll learn the straightforward steps to ensure your speakers are in perfect working condition. Stick around, because what you discover might just transform how you listen to music, watch movies, or even host events. Let’s dive in and empower you with the knowledge to test your speakers like a pro.
Credit: www.youtube.com
Tools And Equipment Needed
Testing a speaker with a multimeter requires the right tools and equipment. Proper tools ensure accurate measurements and protect your speaker from damage. Knowing what to use can make the process easy and efficient.
Essential Multimeter Features
A digital multimeter is ideal for speaker testing. It should have an ohm meter feature. This measures resistance, which is crucial for checking speaker coils. The multimeter should have clear display numbers. This helps to read measurements easily. Auto-ranging is another useful feature. It adjusts the range automatically, saving time.
Additional Testing Tools
Besides a multimeter, consider using alligator clips. These clips connect the multimeter probes securely. They ensure stable readings during tests. A screwdriver may be needed to open speaker housing. This helps access the speaker terminals. Ensure you have a stable surface for testing. A flat table or workbench works well.
Having the right tools simplifies speaker testing. It ensures accurate and reliable results.
Safety Precautions
Testing a speaker with a multimeter requires careful attention to safety. Electrical components can pose risks if not handled properly. Ensuring your safety is crucial. This section covers essential precautions to take.
Handling Electrical Components
Always turn off power before testing. This prevents electric shocks. Disconnect the speaker from any power source. Avoid touching metal parts directly. Use insulated tools for safety. Verify the multimeter settings are correct. Incorrect settings can cause damage. Handle all components gently. Rough handling can lead to accidents.
Protective Gear
Wear protective gear to ensure safety. Insulated gloves are essential. They protect against electric shocks. Goggles can prevent eye injuries. Loose clothing can snag on parts. Wear fitted clothes during testing. Closed shoes protect feet from falling objects. Ensure your workspace is clean and dry. Wet surfaces can increase risk.
Preparing The Speaker For Testing
Testing a speaker with a multimeter involves checking its resistance and continuity. Start by setting the multimeter to the appropriate ohm range. Connect the probes to the speaker terminals and read the resistance value displayed on the multimeter.
Preparing a speaker for testing is a crucial step. Proper preparation ensures accurate readings from your multimeter. This process involves a few simple steps. These steps include disconnecting the speaker and cleaning the terminals. Each step is important for accurate testing. Follow these guidelines for reliable results.
Disconnecting The Speaker
First, disconnect the speaker from any power source. This prevents electrical shocks during testing. Make sure the speaker is off before starting. Unplug any wires connecting the speaker to other devices. This includes removing any cables or cords. Check the speaker’s manual for specific disconnection instructions. Following these steps ensures safety and accuracy.
Cleaning The Terminals
Next, clean the speaker terminals. Dirty terminals can affect test results. Use a soft cloth to wipe away dust and debris. Avoid using water or wet substances. A small brush can help reach tight areas. Ensure the terminals are dry after cleaning. Clean terminals ensure a clear electrical connection. This step improves testing accuracy.
Setting Up The Multimeter
To test a speaker, first set up your multimeter. Turn the dial to the ohms setting. This measures resistance. Ensure probes are connected correctly, with the black probe in the common port and the red probe in the volts/ohms port.
Setting up a multimeter is a crucial step when testing your speaker. A multimeter is your trusty sidekick in diagnosing issues and ensuring your speaker is in top shape. But how do you get it ready for action? This section will guide you through setting up your multimeter for success, so you can confidently test your speaker’s functionality.
Choosing The Correct Mode
The first step in setting up your multimeter is choosing the correct mode. Most multimeters have several modes, including measuring voltage, current, and resistance. For testing a speaker, you want to set your multimeter to the resistance mode, often represented by the symbol Ω. Why resistance? Because it helps you verify the speaker’s coil integrity. Imagine your multimeter as a translator, decoding the speaker’s electrical whispers.
Calibrating The Device
Calibration is essential for accurate readings. Have you ever tried cooking without measuring ingredients? Not fun. The same goes for testing a speaker without calibrating your multimeter. Start by checking the multimeter’s battery—low power can skew results. Next, connect the multimeter probes and turn the dial to zero if it’s not automatically calibrated. Think of this step as aligning your car’s GPS before a road trip. Now, your multimeter is all set to reveal your speaker’s secrets. Do you feel ready to uncover those hidden frequencies and ensure your speaker’s heart is beating just right?
Conducting The Resistance Test
Conducting the resistance test with a multimeter checks speaker functionality. Set the multimeter to the ohm setting. Connect probes to the speaker terminals to measure resistance.
Conducting a resistance test on a speaker with a multimeter is a straightforward process that can help you determine if your speaker is functioning properly. Whether you suspect issues or are simply curious, this test is essential. It’s like checking your pulse; it tells you if everything is as it should be. With a multimeter, you can easily gauge the health of your speaker by measuring its resistance. This is a handy skill that can save you time and money, sparing you from unnecessary replacements or repairs. Before you begin, ensure your multimeter is set to the correct mode, often indicated by the ohm symbol (Ω).
Connecting The Probes
Begin by turning off any power source connected to the speaker. This is crucial for safety and accuracy. Next, grab your multimeter and set it to measure resistance (ohms). You will use the probes to connect to the speaker terminals. Ensure the probes are clean and free of dust, as this can affect the readings. A secure connection provides the most accurate results.
Interpreting The Readings
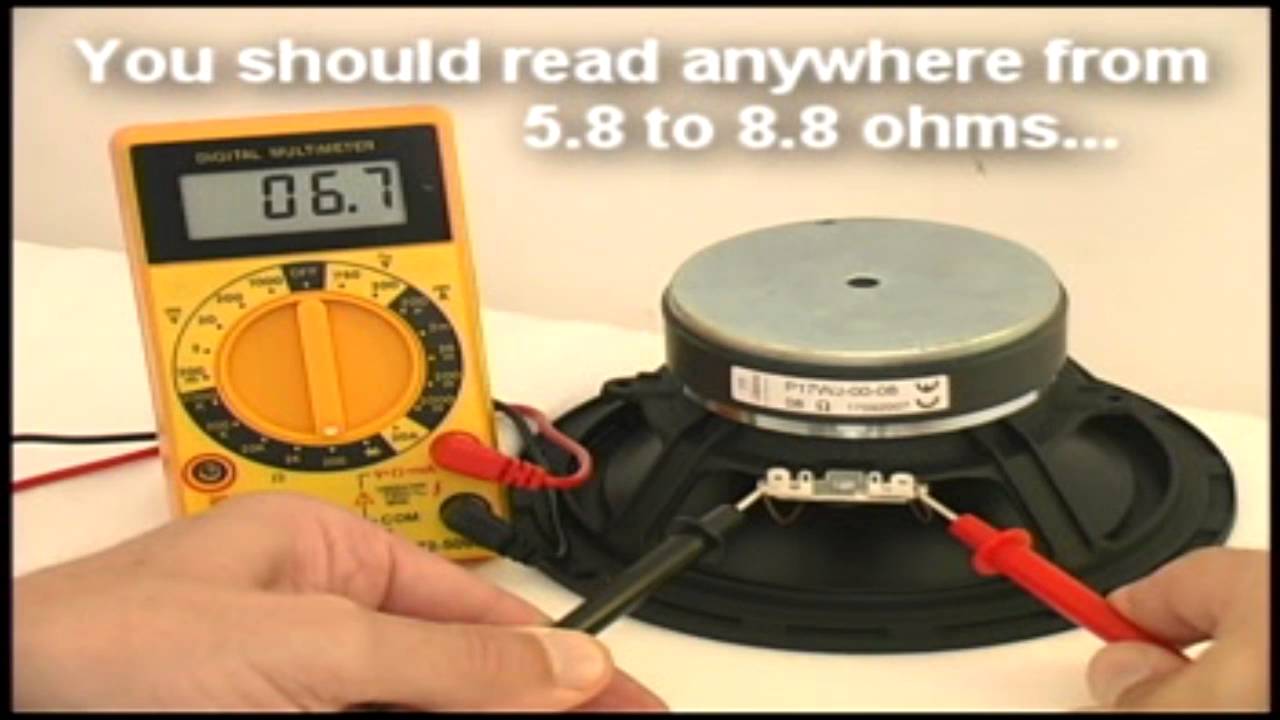
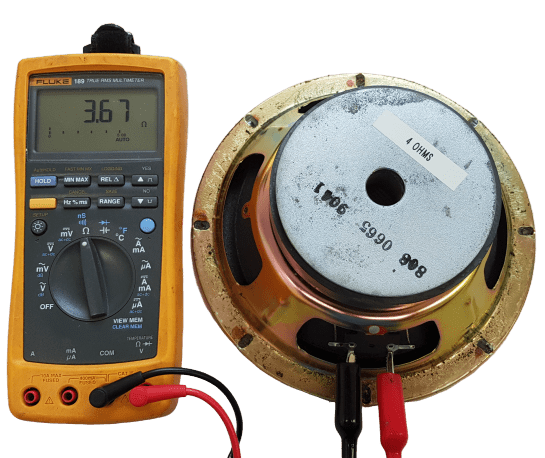
Once connected, observe the multimeter display. Ideally, your speaker should show a resistance close to its rated impedance, typically around 4, 6, or 8 ohms. If the reading is significantly higher, it could indicate a fault within the speaker. A zero or infinite reading might suggest a broken coil. Consider this: would you drive a car without knowing if the brakes work? Similarly, keeping tabs on your speaker’s resistance can prevent unexpected audio failures. Testing the resistance can pinpoint issues early, allowing you to enjoy your music uninterrupted. What insights have you gained from testing your own devices?
Testing For Continuity
Testing for continuity is a crucial step in assessing a speaker’s functionality. It confirms if the electrical path in the speaker is uninterrupted. This process helps identify any breaks in the speaker’s wiring. Using a multimeter, you can easily perform this check at home. Follow the steps below to ensure your speaker is working as expected.
Switching To Continuity Mode
First, set your multimeter to continuity mode. Locate the dial on the device. Turn it to the icon resembling sound waves or a diode. This setting will help you detect any breaks. Ensure your multimeter is turned on before proceeding.
Next, take the two probes of the multimeter. Connect them to the speaker terminals. The black probe should be on the negative terminal. The red probe goes to the positive terminal. This setup allows the multimeter to send a small current through the speaker.
Analyzing The Results
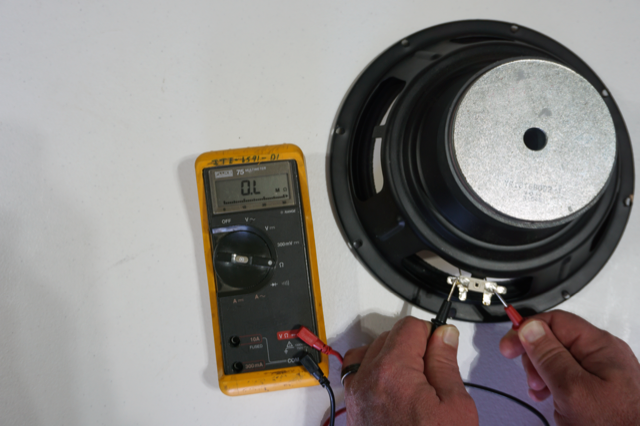
Once connected, observe the multimeter’s display. A continuous circuit will show a reading close to zero. This indicates that the speaker wiring is intact. If the multimeter beeps, it means the circuit is complete.
If the display shows “OL” or a high number, the circuit is broken. This suggests an issue with the speaker wiring. It might mean the speaker coil is damaged. In this case, consider repairing or replacing the speaker.
Troubleshooting Common Issues
Testing a speaker with a multimeter can solve many sound problems. It helps pinpoint issues before deciding on repairs or replacements. This process can save both time and money. Sometimes, common problems arise that need attention. Knowing how to troubleshoot these issues can ensure your audio system works well.
Identifying Faulty Connections
Start by checking all connections. Loose or corroded wires may cause sound issues. Use the multimeter to test the speaker’s wiring. Set the multimeter to the continuity setting. Touch the probes to the wire ends. A beep indicates a good connection. No sound means a faulty connection. Check the speaker terminals too. Ensure they are tight and clean.
Assessing Speaker Damage
Speakers can sustain physical or electrical damage. To check the speaker’s health, use the multimeter. Set it to measure resistance (ohms). Place the probes on the speaker terminals. The reading should match the speaker’s rated impedance. A very high reading signals an open circuit. This means the speaker coil might be damaged. A reading of zero suggests a short circuit. This could mean the speaker needs replacement.
Interpreting Test Results
Testing speakers with a multimeter offers insights into their functionality. Understanding the test results can help determine if your speaker is in good condition or needs attention. This guide will help you interpret normal and unusual readings from your tests.
Understanding Normal Readings
A normal reading usually falls between 3 to 8 ohms. This range indicates the speaker is functioning well. A reading in this range means the speaker’s voice coil is intact. The speaker should produce sound without distortion.
Consistency in readings across multiple tests shows stability. It confirms the speaker’s electrical components are working as intended. Always ensure your multimeter is calibrated for accurate results.
Evaluating Unusual Readings
Readings outside the 3 to 8 ohm range can signal problems. A reading above 8 ohms might mean a loose or damaged coil. It may result in poor sound quality or no sound at all.
If the reading is below 3 ohms, it could indicate a short circuit. This might cause the speaker to produce a distorted sound. Check for any visible damage or corrosion on the speaker components.
Unusual readings require further investigation. It’s crucial to address issues promptly to prevent further damage. Regular testing can help maintain the speaker’s performance.
Repair And Maintenance Tips
Maintaining a speaker can prolong its life and enhance sound quality. Regular checks and repairs ensure your speaker performs at its best. Testing with a multimeter helps identify issues early. This prevents costly repairs later. Learn simple fixes and maintenance tips to keep your speaker in top shape.
Simple Fixes For Common Problems
Speakers often have loose connections. Check the wiring first. Tighten any loose wires using a screwdriver. If the speaker crackles, inspect the cone for tears. Minor tears can be fixed with adhesive. Ensure the adhesive is suitable for speaker materials. Test the speaker again with a multimeter. Confirm that the resistance levels are normal. If resistance is too high or low, consider replacing the speaker. Sometimes, dust accumulates in the speaker. Clean it gently with a soft brush. Avoid using water or harsh chemicals.
Regular Maintenance Practices
Regular maintenance keeps speakers working efficiently. Clean the exterior to prevent dust buildup. Use a dry cloth for cleaning. Avoid moisture near electrical parts. Test the speaker annually with a multimeter. Check the resistance to ensure proper function. Listen for any unusual sounds. Inspect wires and connections often. Ensure all parts are secure. Store speakers in a cool, dry place. Avoid exposure to extreme temperatures. This prevents damage to delicate components. Regular testing and cleaning ensure long-lasting performance.
Credit: www.sweetwater.com
Credit: virtuosocentral.com
Frequently Asked Questions
How Can I Check Speaker Polarity With A Multimeter?
To check speaker polarity, set the multimeter to measure DC voltage. Connect the probes to speaker terminals. If the reading is positive, the connection is correct. A negative reading indicates reversed polarity. Ensuring correct polarity is crucial for optimal sound performance and avoiding phase issues in audio systems.
What Multimeter Setting Tests Speaker Impedance?
Set the multimeter to resistance mode (ohms) to test speaker impedance. Connect the probes to speaker terminals. The reading should match the speaker’s rated impedance, typically 4, 6, or 8 ohms. Accurate impedance testing ensures compatibility with audio equipment and prevents damage due to mismatched impedance levels.
Can A Multimeter Identify A Blown Speaker?
Yes, a multimeter can help identify a blown speaker. Set it to resistance mode and measure the speaker’s terminals. A reading of zero or infinite ohms suggests a blown speaker. This indicates a break in the coil or circuitry. Regular testing can prevent further damage to audio systems.
Is It Safe To Test Speakers With A Multimeter?
Testing speakers with a multimeter is safe if done correctly. Ensure the speaker is disconnected from power sources before testing. Use appropriate multimeter settings to prevent inaccurate readings. Handling the multimeter carefully avoids damage to both the speaker and the multimeter, ensuring safe and effective testing.
Conclusion
Testing speakers with a multimeter is simple and effective. Use it to check speaker resistance and connections. A multimeter helps find issues quickly. This tool ensures your audio system works well. Regular testing prevents unexpected problems. It keeps your speakers sounding clear and crisp.
Follow easy steps for accurate results. Safety first—unplug before testing. With practice, testing becomes second nature. Enjoy better sound quality. Share your experience with friends. Encourage them to test their speakers too. Keep your audio setup in top shape. Happy listening!


