
Are you wondering if the electrical outlets in your home are working properly? Testing a receptacle with a multimeter is a simple yet crucial task that can ensure the safety and efficiency of your electrical system.
You don’t need to be an electrician to perform this test; with just a few steps, you can verify if your outlets are functioning as they should. Imagine the peace of mind knowing that your appliances are safe from electrical faults and your home is protected from potential hazards.
In this guide, we’ll walk you through the process of using a multimeter to test your receptacles, empowering you to take control of your home’s electrical safety with confidence and ease. Keep reading to become a pro at ensuring your outlets are reliable and secure.
Tools And Safety Precautions
Testing a receptacle with a multimeter is a practical skill that can save you from potential electrical issues and ensure your home is running safely. But before diving into the process, it’s crucial to arm yourself with the right tools and understand the necessary safety precautions. This not only helps you achieve accurate results but also protects you from any mishaps. Let’s dive into the essentials that will make your testing journey safe and successful.
Essential Tools For Testing
- Multimeter:This is your primary tool. Choose one that is digital for easier reading and more accuracy. Ensure it’s in good working condition.
- Insulated Gloves:These are crucial for your safety. They protect you from electrical shocks, especially if you accidentally touch live wires.
- Screwdriver:A basic tool for removing the receptacle’s cover or any screws that might be blocking access.
Having the right tools is half the battle won. I remember once trying to test a receptacle with a faulty multimeter. The results were misleading, which taught me the importance of using well-maintained equipment.
Safety Precautions To Follow
- Turn Off the Power:Ensure the power to the receptacle is switched off at the main circuit breaker. This is non-negotiable for your safety.
- Verify Power is Off:Use the multimeter to double-check that the power is indeed off before starting your test.
- Wear Protective Gear:Insulated gloves and safety goggles should be worn to protect against any unexpected electrical discharge.
Ever thought about how often we overlook simple safety steps? Once, I skipped turning off the power and ended up with a nasty shock. It was a wake-up call to always prioritize safety.
Why Safety Matters
Testing without proper safety measures can lead to severe injuries. Electrical shocks aren’t just painful; they can be life-threatening. Are you willing to take that risk?
Always remind yourself: the few minutes spent on safety checks can prevent hours of trouble. It’s not just about your safety, but also about ensuring the reliability of the tests you conduct.
With the right tools and safety precautions, you can confidently test your receptacles. It’s about being prepared and staying safe. Isn’t peace of mind worth a little extra care?

Credit: www.wikihow.com
Setting Up The Multimeter
Setting up a multimeter is essential for testing a receptacle safely and accurately. Start by selecting the correct mode and setting the range based on the type of measurement needed. Ensure the multimeter’s probes are firmly connected and ready for use.
Setting up a multimeter may seem a bit intimidating at first, especially if you’re new to using electrical tools. However, with a little guidance, you’ll find it’s a straightforward process. Having the right setup is crucial to ensure accurate readings when testing a receptacle.
Choose The Right Multimeter
Before you begin, ensure you have a digital multimeter that’s suitable for your needs. A multimeter with voltage, current, and resistance settings is ideal for testing receptacles. If you’re uncertain, check the manual or do a quick search online for your model’s capabilities.
Inspect The Multimeter
Check your multimeter for any visible damage. This includes cracks, broken displays, or frayed wires. Using a damaged multimeter can lead to inaccurate readings or even safety hazards.
Select The Correct Setting
Turn the dial to the AC voltage setting, usually marked as “V~” or simply “ACV.” This is important because household receptacles supply AC voltage. Setting it incorrectly could result in a misleading reading or damage to the multimeter.
Connect The Probes
Insert the black probe into the COM (common) port and the red probe into the VΩmA port. This setup is standard for measuring voltage. Double-check the connections to ensure they’re secure and won’t come loose during testing.
Test The Multimeter
Before testing the receptacle, test your multimeter with a known power source. Plug the probes into a working outlet and check the reading. This step verifies that your multimeter is functioning correctly. If the reading is off, you may need to recalibrate the device or replace the batteries.
Think Safety First
Always prioritize safety when dealing with electrical equipment. Ensure your hands are dry, and you’re standing on a non-conductive surface. If you’re unsure about any step, consult an electrician or a knowledgeable friend. Setting up your multimeter correctly is the first step to confidently testing a receptacle. Are there any obstacles you’re facing with your current setup? Understanding your tools can transform a daunting task into a manageable one.
Preparing The Receptacle
Testing a receptacle with a multimeter ensures electrical safety. Begin by setting the multimeter to AC voltage. Insert the probes into the receptacle slots to measure voltage levels.
Preparing a receptacle for testing with a multimeter is a crucial step to ensure your safety and the accuracy of your measurements. It’s not just about plugging in tools and gadgets; it’s about creating a safe environment for you to work. Imagine this: you’re ready to dive into the world of electrical testing, but you haven’t made sure everything’s in place. That’s like jumping into a pool without checking if there’s water. Understanding how to prepare your receptacle will make the testing process smoother and more efficient. So, what do you need to do before you start testing? Let’s break it down.
Turn Off Power
Safety first! Always switch off the power to the circuit you’ll be working on. Locate your circuit breaker panel and find the switch connected to your receptacle. Flip it to the “off” position. This simple step prevents electrical shock, a safety measure that can’t be stressed enough.
Gather Necessary Tools
Before you start, make sure you have all your tools ready. A reliable multimeter is essential, but don’t forget other safety gear like insulated gloves. Having everything at hand prevents interruptions and keeps you focused on the task.
Inspect The Receptacle
Take a closer look at the receptacle. Are there any visible signs of damage or wear? Discoloration, cracks, or burn marks could indicate underlying issues. Identifying these signs early can save you from potential hazards or inaccurate readings.
Ensure Proper Lighting
Testing requires precision. Ensure the area is well-lit so you can see exactly what you’re doing. Good lighting reduces errors and helps you spot any anomalies in the receptacle or your readings.
Clear The Surrounding Area
Make sure the area around the receptacle is clear of any clutter. This minimizes distractions and reduces the risk of accidents. A tidy workspace is not just about aesthetics; it’s about creating a safe environment for you to work efficiently.
Verify The Multimeter Settings
Check your multimeter to ensure it’s set to the correct measurement type and range. Whether you’re testing for voltage, resistance, or continuity, using the wrong setting can lead to incorrect results. Double-checking this step can save you time and frustration. Preparing your receptacle isn’t just a formality; it’s a critical part of ensuring an accurate and safe testing process. Have you ever skipped a step and regretted it later? These preparatory actions can make a world of difference. Take a moment to prepare, and set yourself up for success.
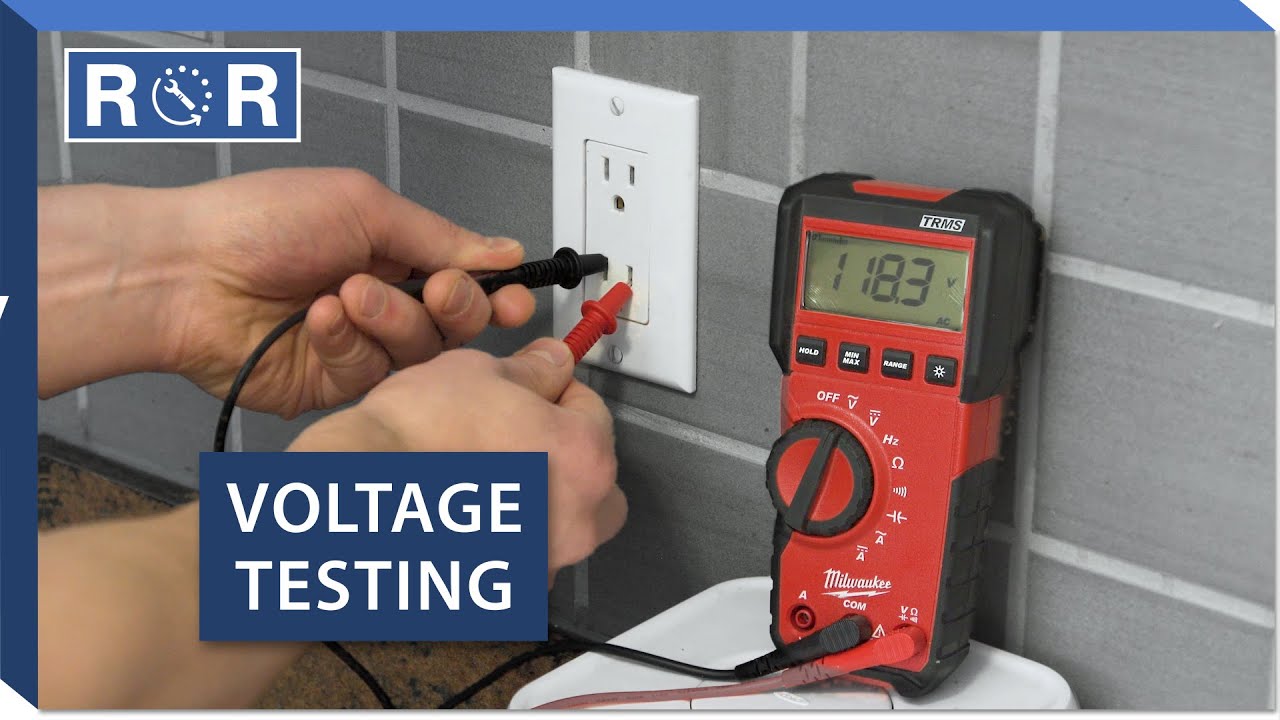
Testing For Voltage
Testing for voltage in a receptacle helps ensure electrical safety. A multimeter is the tool for this task. It provides accurate readings. You learn if the receptacle works properly. This process is simple. Follow the steps carefully. Avoid any mistakes. Let’s explore how to test voltage with a multimeter.
Measuring Ac Voltage
First, set the multimeter to AC voltage. AC stands for alternating current. Homes use AC electricity. Look for the “V” symbol on the dial. Insert the black probe into the neutral slot. The neutral slot is the larger opening. Now, insert the red probe into the hot slot. The hot slot is smaller. Check the multimeter display. It shows the voltage level.
Interpreting Voltage Readings
Reading the display is crucial. A typical outlet shows around 120 volts. This indicates normal function. If the reading is zero, something is wrong. It might be a faulty outlet or wiring. A very high reading is dangerous. Disconnect power immediately. Call an electrician for help. The multimeter helps identify issues. Proper interpretation ensures safety.
Checking For Continuity
Continuity testing helps find broken connections in electrical circuits. It ensures that electricity flows smoothly. Using a multimeter, you can easily check the continuity in a receptacle. This process helps identify faults and ensures safety.
Switching To Continuity Mode
First, set the multimeter to continuity mode. This is often marked by a sound wave symbol. This setting checks if the circuit is complete. A complete circuit lets electricity flow through. The multimeter will beep if continuity exists.
Identifying Disconnections
Place the multimeter probes into the receptacle slots. Listen for a beep. No beep means there’s a disconnection. This indicates a break in the circuit. You might need to fix or replace the receptacle. Ensure all connections are secure before proceeding.
:strip_icc()/removed-outlet-voltage-test-77726753-773f780dcaf3473eb22d1c1802467f8e.jpg)
Credit: www.bhg.com
Inspecting For Ground Faults
Inspecting for ground faults is crucial for electrical safety. Ground faults can lead to shocks or fires if undetected. A multimeter helps identify these issues efficiently. Understanding the process ensures your electrical system remains safe. Regular inspections prevent potential hazards and ensure peace of mind.
Grounding Wire Inspection
Begin by turning off the power to the receptacle. Unscrew the cover plate and expose the wires. Locate the green or bare grounding wire. Check for any visible damage or corrosion. Ensure the wire is securely connected to the grounding screw. A loose connection can cause safety risks. A visual check is the first step in preventing ground faults.
Detecting Faulty Grounding
Set your multimeter to the AC voltage setting. Insert one probe into the ground slot of the receptacle. Place the other probe into the neutral slot. A reading of zero volts indicates proper grounding. A higher reading suggests a fault in the grounding system. Test multiple outlets to ensure consistent grounding throughout. Inconsistent readings may indicate wiring issues.
Troubleshooting Common Issues
Testing a receptacle with a multimeter helps identify electrical issues. Set the multimeter to AC voltage. Insert probes into the slots and check readings. A proper reading indicates a healthy receptacle.
Testing a receptacle with a multimeter can sometimes present challenges, especially when unexpected issues arise. These common problems can leave you puzzled and unsure of the next steps. However, understanding how to troubleshoot these issues can make all the difference in resolving them efficiently.
Handling No Voltage Situations
When your multimeter shows no voltage in a receptacle, the cause might not always be straightforward. First, ensure your multimeter is set to measure AC voltage. If the setting is correct, check the circuit breaker to see if it’s tripped. Have you ever experienced a stubborn receptacle only to discover a tripped breaker was the culprit? It’s a common oversight. Resetting the breaker might just restore the power.
Addressing Inconsistent Readings
Inconsistent readings can be frustrating, especially when you’re sure everything is set correctly. Begin by checking the multimeter’s probes. Loose or damaged probes can lead to unreliable results. Double-check that the probes make firm contact with the receptacle’s contacts. Sometimes, a slight adjustment is all it takes to stabilize the readings. Have you ensured the probes are properly connected? Consider testing another receptacle to confirm the multimeter’s accuracy. If the inconsistency persists, the multimeter itself might need calibration or replacement. Have you thought about when you last checked the device’s accuracy? By tackling these common issues with a systematic approach, you can confidently navigate the troubleshooting process. What other unexpected challenges have you encountered while testing electrical outlets?
Safety Tips And Best Practices
Testing a receptacle with a multimeter involves handling electricity. Safety should be your top priority. Taking the right precautions can prevent accidents. Learn the best practices for safe testing. Follow these guidelines to protect yourself and your equipment.
Safety Gear
Wear insulated gloves and goggles. These protect against electric shocks and flying debris. Make sure your gear is in good condition. Check for any wear or damage before use.
Inspect Equipment
Examine your multimeter and test leads. Look for frayed wires or broken parts. Ensure the multimeter functions correctly. Replace damaged equipment immediately.
Power Off
Turn off the power before testing. This reduces the risk of electric shock. Confirm the receptacle is not live. Use a voltage tester for added safety.
Dry Environment
Keep your workspace dry. Water conducts electricity and increases danger. Avoid testing near sinks or damp areas. Ensure hands are dry to avoid accidents.
Follow Instructions
Read the multimeter manual. Understand its functions and settings. Follow the instructions carefully. This ensures accurate results and safe handling.
Stay Focused
Avoid distractions while testing. Concentrate on the task at hand. Double-check connections and readings. This helps prevent mistakes and ensures safety.
Credit: www.youtube.com
Frequently Asked Questions
How Do You Test A Receptacle Safely?
To test a receptacle safely, ensure the power is off first. Use a multimeter to measure voltage and continuity. Check both the hot and neutral wires. Confirm proper grounding. Follow safety precautions, wearing protective gear when necessary. Always prioritize safety during electrical testing to avoid accidents.
What Multimeter Setting For Receptacle Testing?
Set the multimeter to AC voltage for receptacle testing. Use the voltage range suitable for your outlet, typically 200V. Ensure the multimeter is working correctly. This setting helps measure the voltage in the outlet. It provides accurate readings for safe electrical assessment and troubleshooting.
Can A Multimeter Detect Faulty Receptacles?
Yes, a multimeter can detect faulty receptacles. Measure voltage to identify discrepancies or zero readings. Test continuity to check wire connections. Use the resistance setting for further analysis. Faulty readings indicate issues like bad wiring or defective outlets. Multimeters are essential tools for diagnosing electrical problems effectively.
Why Test Receptacles With A Multimeter?
Testing receptacles with a multimeter ensures electrical safety and functionality. It identifies voltage irregularities and faulty connections. Detect potential hazards before they cause issues. Multimeters provide accurate readings for troubleshooting electrical problems. Regular testing helps maintain a safe and efficient electrical system in homes and buildings.
Conclusion
Testing a receptacle with a multimeter is straightforward. Follow simple steps for accurate results. Ensure your multimeter settings are correct. Check for voltage and continuity issues. Safety is crucial; always turn off power first. Regular testing helps maintain electrical safety.
It prevents potential hazards. With practice, testing becomes second nature. It’s a vital skill for home safety. Share this knowledge with others. It empowers and protects. Keep your tools ready and your home safe.


