
Imagine cruising down the highway, enjoying the smooth ride, when suddenly, your engine starts acting up. The culprit?
It might be your knock sensor—a small yet crucial component that ensures your engine runs efficiently. If you’re experiencing engine knocking or pinging, testing your knock sensor could be the key to resolving the issue. But don’t worry; with a multimeter, you can easily check its functionality right from your garage.
Are you ready to tackle this common automotive problem head-on? In this guide, you’ll learn how to test a knock sensor with a multimeter, saving you time, money, and the hassle of unexpected engine troubles. Dive in to discover a step-by-step approach that will empower you to maintain your vehicle’s performance and keep your engine in top shape. Your car deserves the best, and so do you. Let’s get started!

Credit: www.youtube.com
What Is A Knock Sensor?
Have you ever wondered what keeps your car’s engine running smoothly without those annoying knocking sounds? That’s where the knock sensor comes in. This little device plays a crucial role in detecting and adjusting the engine’s performance to prevent damage. But what exactly is a knock sensor?
Function And Importance
The knock sensor is a vital component that monitors the engine for vibrations caused by detonation or knocking. It sends signals to the engine control unit (ECU), which then adjusts the timing and fuel mixture to optimize performance.
Without a functioning knock sensor, your engine could face serious damage over time. Imagine driving without this guardian angel—your engine might sound like a rock band having a bad day.
The importance of the knock sensor cannot be overstated. It ensures your engine runs efficiently, saving you from costly repairs and maintaining your vehicle’s longevity.
Common Signs Of Failure
Ever noticed your car losing power or the engine light flashing unexpectedly? A faulty knock sensor might be the culprit.
Other signs include poor fuel economy and strange noises coming from the engine. It’s like your car is trying to tell you something’s wrong.
If you suspect a knock sensor issue, addressing it promptly can save you from a headache and a lighter wallet. Regular checks using a multimeter can prevent unexpected failures and keep your car running smoothly.
So, what happens if your knock sensor fails? How would you test it with a multimeter to ensure it’s in good working condition? Stay tuned as we guide you through a simple step-by-step process to diagnose the health of your knock sensor. Your car—and your wallet—will thank you!
Essential Tools For Testing
Testing a knock sensor requires precise tools for accurate results. Without the right equipment, you might misdiagnose problems. This could lead to further engine issues. Choosing the correct tools is crucial. It simplifies the testing process and ensures reliable outcomes.
Choosing The Right Multimeter
A multimeter is a vital tool for testing knock sensors. It measures voltage and resistance effectively. Select a digital multimeter for more accurate readings. Ensure it can measure both AC and DC voltage. Look for one with an easy-to-read display. This helps to avoid errors during the testing process. A multimeter with an auto-ranging feature is beneficial. It automatically adjusts to the correct range, simplifying your task.
Additional Testing Equipment
In addition to a multimeter, a few other tools can be helpful. An OBD-II scanner can provide diagnostic codes. These codes help identify potential knock sensor issues. A wiring diagram of your vehicle is also useful. It helps locate the knock sensor and understand its connections. A set of basic hand tools is necessary as well. These include screwdrivers and wrenches for accessing the sensor. Having these tools ensures you are well-prepared for the task.
Safety Precautions
Testing a knock sensor with a multimeter requires precision. Safety is key. Ensuring your protection before starting is essential. Proper safety precautions prevent accidents and damage. Let’s discuss important safety measures.
Protective Gear
Always wear protective gear. Use gloves to shield your hands. Eye protection is crucial. Safety glasses prevent debris from harming your eyes. Wear shoes with rubber soles. They reduce the risk of electrical shock. Protective clothing adds an extra layer of safety.
Safe Handling Of Equipment
Handle the multimeter with care. Check it for damage before use. Ensure the leads are intact. Damaged leads can cause inaccurate readings. Keep the multimeter dry. Moisture can lead to malfunctions. Avoid using it near water. Turn off the car’s engine before testing. This prevents sudden movements. Keep the workspace tidy. A cluttered space can lead to accidents.
Preparation Steps
Gather necessary tools like a multimeter and safety gloves. Locate the knock sensor in your vehicle. Set the multimeter to the ohms setting for accurate testing.
Testing a knock sensor with a multimeter may sound technical, but with the right preparation steps, you’ll find it straightforward and rewarding. Getting things ready before diving into the actual testing process is crucial. Imagine trying to bake a cake without gathering all the ingredients first. The same principle applies here. Let’s ensure you have everything in place to make the test successful.
Locating The Knock Sensor
First things first, you need to locate the knock sensor in your vehicle. This can sometimes feel like finding a needle in a haystack, but with a little guidance, it becomes manageable. Typically, the knock sensor is situated on the engine block, cylinder head, or intake manifold. Consult your vehicle’s manual for exact details. Each car model might have a different sensor location. It’s like looking for the remote in your living room—you know it’s there, but sometimes you need guidance to find it.
Gathering Necessary Data
Before you start testing, gather all the necessary data about your knock sensor. Check the vehicle’s manual for the knock sensor specifications, such as the acceptable resistance range. This is like knowing the recipe before you start cooking. Having this information at hand ensures you can compare your multimeter readings accurately. Consider noting down or memorizing the key specifications. This way, when you’re testing, you won’t be left wondering if the readings are off or normal. Preparation is the key to success. Have you ever jumped into a task only to realize halfway that you missed a crucial step? By locating the sensor and gathering relevant data, you’re setting yourself up for a smooth testing process. Are there any tools or information you often overlook in your preparations?
Testing The Knock Sensor
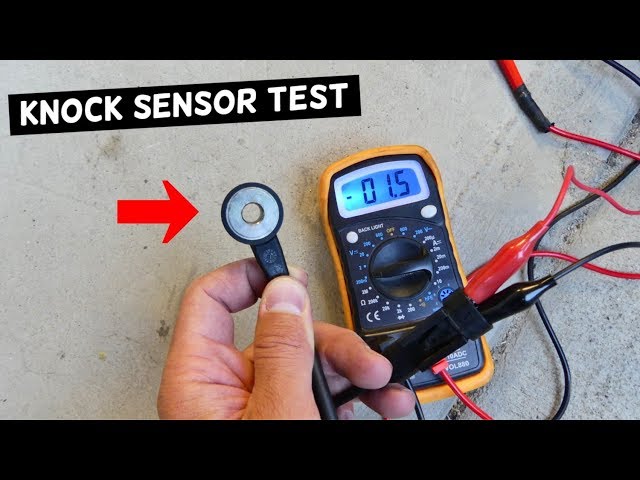
Testing a knock sensor is essential for engine health. It helps detect abnormal noises. By using a multimeter, you can assess the sensor’s functionality. This process prevents engine damage and ensures optimal performance. Follow the steps below to test your knock sensor effectively.
Setting Up The Multimeter
First, ensure your multimeter is working. Set the multimeter to the resistance or ohms setting. This is crucial for accurate readings. Connect the multimeter probes to the sensor terminals. Make sure they are securely attached.
Performing A Resistance Test
With the multimeter set, perform the resistance test. Observe the reading on the display. A functioning sensor will show a specific resistance range. Consult your vehicle’s manual for the correct range. This ensures the test aligns with manufacturer standards.
Interpreting Test Results
Analyze the resistance reading carefully. A reading within the specified range indicates a healthy sensor. If the reading is too high or low, the sensor may be faulty. Consider replacing the sensor if readings are outside the expected range.
Credit: premierautotrade.com.au
Troubleshooting Tips
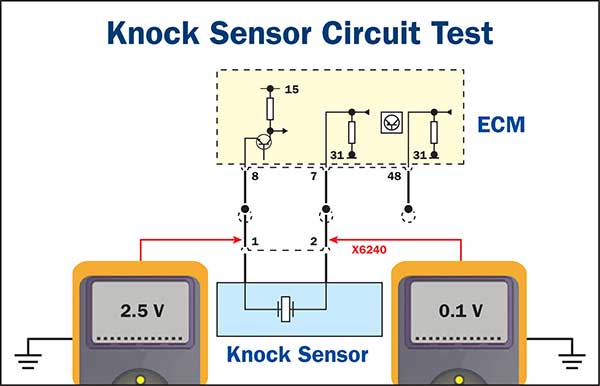
Testing a knock sensor with a multimeter helps identify engine performance issues. Start by disconnecting the sensor and setting the multimeter to measure resistance. Check the readings against the manufacturer’s specifications to ensure proper function.
Testing a knock sensor with a multimeter can be tricky, but with the right troubleshooting tips, you can tackle it like a pro. You might find yourself frustrated when results don’t seem to add up or when you’re not sure if you’ve made an error. Let’s dive into some practical solutions and insights to help you identify and address common issues.
Common Testing Errors
Testing errors often arise from incorrect multimeter settings. It’s crucial to ensure your multimeter is set to the correct mode—typically, the ohm setting for resistance tests. A simple mistake here could lead to inaccurate readings. Another common error is poor connection. Make sure the sensor’s connectors are clean and free from corrosion. A loose or dirty connection can lead to misleading results. Don’t forget to check the multimeter’s battery. A low battery might cause erratic readings, leading you to a wrong conclusion about the sensor’s health.
Addressing Inconclusive Results
If your test results are inconclusive, double-check your connections and settings. Sometimes, simply redoing the test with more attention to detail can clear things up. Consider environmental factors that might be affecting your readings. Temperature and humidity can sometimes impact the sensor’s performance, so test in consistent conditions. If you’re still facing uncertainty, compare the readings with the manufacturer’s specifications. This might require a quick internet search or a peek into your car’s manual. Have you ever been unsure if the sensor or your multimeter was at fault? Sometimes borrowing a friend’s multimeter or testing another sensor can help you pinpoint the problem. Think about the last time you fixed something yourself. Wasn’t the satisfaction worth the effort? With patience and attention, you can master the art of testing a knock sensor. Remember, every challenge is an opportunity to learn. What if your troubleshooting reveals a deeper issue with your vehicle? Wouldn’t it be rewarding to catch it before it turns into a costly repair?
When To Seek Professional Help
Testing a knock sensor can be tricky. If readings are unclear or inconsistent, it’s best to consult a professional. Experts ensure accurate diagnosis and prevent further engine issues.
When dealing with vehicle sensors, there are times when DIY solutions fall short. Testing a knock sensor with a multimeter can seem straightforward. But specific situations warrant professional help. Let’s explore when expert intervention is crucial.
Recognizing Complex Issues
Some vehicle issues are not obvious. A knock sensor problem could signal deeper engine troubles. Odd noises or performance dips might confuse. Multimeter readings may not be clear. When symptoms persist, expert analysis is vital. Technicians can identify underlying issues.
Finding A Qualified Technician
Choosing the right technician is essential. Look for certification and experience. ASE-certified professionals are trustworthy. Online reviews can guide your choice. Check local garages for reputation. Ask friends for recommendations. A knowledgeable technician saves time and money.

Credit: www.facebook.com
Frequently Asked Questions
What Is A Knock Sensor’s Purpose?
A knock sensor detects engine knocking or pinging. It helps adjust the timing to prevent engine damage. Properly functioning knock sensors ensure efficient engine performance and longevity. Testing with a multimeter can confirm its health.
How Do You Prepare For Testing?
To prepare, first disconnect the sensor from the vehicle. Ensure the multimeter is set to the correct mode. Clean contacts on the sensor before testing. This ensures accurate readings and prevents false results.
Can A Faulty Knock Sensor Affect Performance?
Yes, a faulty knock sensor can lead to poor engine performance. It may cause increased fuel consumption and reduced power. Addressing sensor issues promptly can restore optimal engine function.
What Multimeter Setting Is Required?
Set your multimeter to measure resistance, usually denoted by the ohm symbol. This setting helps check the sensor’s continuity. Correct settings ensure precise results and effective testing.
Conclusion
Testing a knock sensor with a multimeter is quite simple. Follow the steps carefully. Ensure your multimeter is set correctly. This helps detect issues early. A functional knock sensor improves engine performance. Regular checks can prevent costly repairs. Remember, safety comes first.
Always disconnect the battery before testing. Ensure you have all necessary tools ready. Consistent maintenance keeps your car running smoothly. Don’t ignore minor signs of sensor failure. They can lead to bigger problems. Proper testing saves time and money. Keep your vehicle in top shape.
Happy driving and stay safe on the road!


