
Picture this: It’s a beautiful day outside, and you’re ready to tackle the yard work with your trusty Echo Weed Wacker. But wait—how exactly do you start this powerful machine?
You might be feeling a bit overwhelmed or frustrated, especially if you’re staring at it and wondering where to begin. Don’t worry, you’re not alone. Many people find themselves in the same boat, unsure of how to get their Echo Weed Wacker up and running.
Imagine the satisfaction of effortlessly trimming your lawn edges, making your garden look picture-perfect. With just a few simple steps, you can transform your gardening experience from daunting to delightful. This guide is designed with you in mind, breaking down the process into easy-to-follow instructions that will have you mastering your weed wacker in no time. Stay with us, because understanding how to start your Echo Weed Wacker is just the beginning. We’ll empower you with tips and tricks that make you feel confident and in control. Ready to uncover the secrets to a flawless garden? Let’s dive in and ensure you never face yard work anxiety again.
Gather Your Tools
Before starting an Echo Weed Wacker, gather essential tools like fuel, oil, and safety gear. Ensure everything is ready to avoid interruptions. Proper preparation makes the process smooth and efficient.
Gathering the right tools is the first step to successfully starting your Echo Weed Wacker. Before you head out to tackle the unruly grass, ensure you’re well-prepared. Having everything you need at your fingertips not only saves time but also keeps you safe and efficient.
Necessary Equipment
To get your Echo Weed Wacker up and running, you need a few essential items. Obviously, you’ll need the weed wacker itself. Make sure it’s the right model and in good working condition. Next, have fresh fuel on hand. Echo weed wackers typically run on a specific gas-oil mix, so check your manual for the exact ratio. A spare spool of line is also handy. You never know when you’ll run out midway through your task. A small toolkit with screwdrivers and wrenches can be useful if adjustments or minor repairs are needed. Trust me, nothing is more frustrating than having to stop because of a loose bolt.
Safety Gear
Safety should never be an afterthought. Always wear protective eyewear to shield your eyes from flying debris. Even a tiny pebble can cause serious damage. Ear protection is also crucial, as weed wackers can be quite loud. Gloves can protect your hands from both blisters and unexpected sharp objects hidden in the grass. Long pants and sturdy shoes are a must. They protect your legs and feet from cuts and bruises. Consider the last time you tackled your garden without the right gear. Did you end up with a sunburn or sore hands? With the right safety gear, you can avoid these issues and focus on the task at hand. Are you ready to gather your tools and get started? Having everything prepared not only boosts your confidence but also ensures a smooth and productive gardening session.
Check Fuel Levels
Checking fuel levels is a crucial step before starting your Echo Weed Wacker. Proper fuel maintenance ensures efficient performance and prolongs the tool’s life. Regular checks help avoid unexpected interruptions during yard work. This section guides you on inspecting fuel levels effectively. Let’s dive into the specifics.
Fuel Type
Ensure you use the correct fuel type for your Echo Weed Wacker. Most Echo models require unleaded gasoline. It’s important to use fresh gasoline to prevent engine issues. Always check the manual for your specific model’s requirements. Using the wrong fuel can damage your equipment.
Proper Mixture
Mix fuel and oil in the right proportions. Typically, Echo Weed Wackers need a 50:1 ratio. This means 50 parts gasoline to 1 part oil. Use high-quality two-stroke oil for best results. Shake the mixture well before filling the tank. This ensures proper blending and engine performance.
Inspect The Weed Wacker
Starting an Echo Weed Wacker involves checking fuel levels and ensuring the switch is in the “on” position. Pull the starter cord firmly while holding the handle securely.
Inspecting your Echo Weed Wacker before starting it is crucial for smooth operation and longevity. It’s like giving your trusty gardening companion a quick check-up to ensure it’s in top shape. A few minutes of inspection can save you from unexpected hiccups and extend the life of your equipment.
Visual Inspection
Begin by giving your weed wacker a thorough visual once-over. Look at the entire body from top to bottom. Ensure that all parts are intact and properly aligned. Check if any parts have come loose or appear worn out. Pay attention to the handle, shaft, and head. These areas often bear the brunt of wear and tear. Are there any unusual stains or residues? These might indicate leaks or other issues that need addressing. Spotting these early can help you avoid more significant problems later.
Check For Damage
Next, focus on identifying any physical damage. Examine the cutting head and blades for signs of wear or breakage. Damaged blades can reduce efficiency and may be dangerous. Inspect the fuel tank and lines. Make sure there are no cracks or leaks. A small crack can lead to fuel wastage and even pose a fire hazard. Is the spark plug clean and intact? A dirty or damaged spark plug can affect the starting process. Ensuring it’s in good condition can make starting your Echo Weed Wacker much easier. Taking the time to inspect your weed wacker might seem like a chore. But these small steps can make a big difference. What if one small check could prevent a major inconvenience?
Credit: www.youtube.com
Prime The Engine
Priming the engine is essential for starting your Echo Weed Wacker. It ensures fuel reaches the carburetor, making the engine easier to start. This step is crucial for a smooth operation.
Locate The Primer Bulb
Find the primer bulb near the engine. It is usually a small, round rubber piece. Check your manual for the exact location. This bulb allows you to pump fuel into the engine.
Proper Priming Technique
Press the primer bulb gently. Do this five to six times. You should feel a slight resistance. This indicates fuel is moving into the carburetor. Avoid pressing too hard to prevent damage.
Watch for fuel in the bulb. It should fill up without overflowing. If not, check the fuel lines for any blockages. Proper priming ensures a reliable start.
Set The Choke
Starting an Echo weed wacker can be tricky for beginners. One crucial step is setting the choke properly. This helps the engine start smoothly and efficiently. Setting the choke is essential for optimal performance. It ensures the right air-fuel mix for the engine. Let’s explore how to set the choke effectively.
Choke Positioning
Locate the choke lever on your Echo weed wacker. It usually sits near the engine. The choke lever controls the air intake. When starting, move the choke to the “full” position. This allows less air and more fuel to reach the engine. It helps the engine start in cold conditions. Once the engine starts, shift the choke to “half” or “run” position. This balances the air-fuel mix as the engine warms up.
Adjusting For Weather
Weather affects engine starting. In cold weather, use “full” choke to start. The engine needs more fuel to ignite. In warm weather, start with “half” choke. Warm air helps the engine start with less fuel. Adjust the choke based on temperature changes. This ensures smooth starting in different climates.
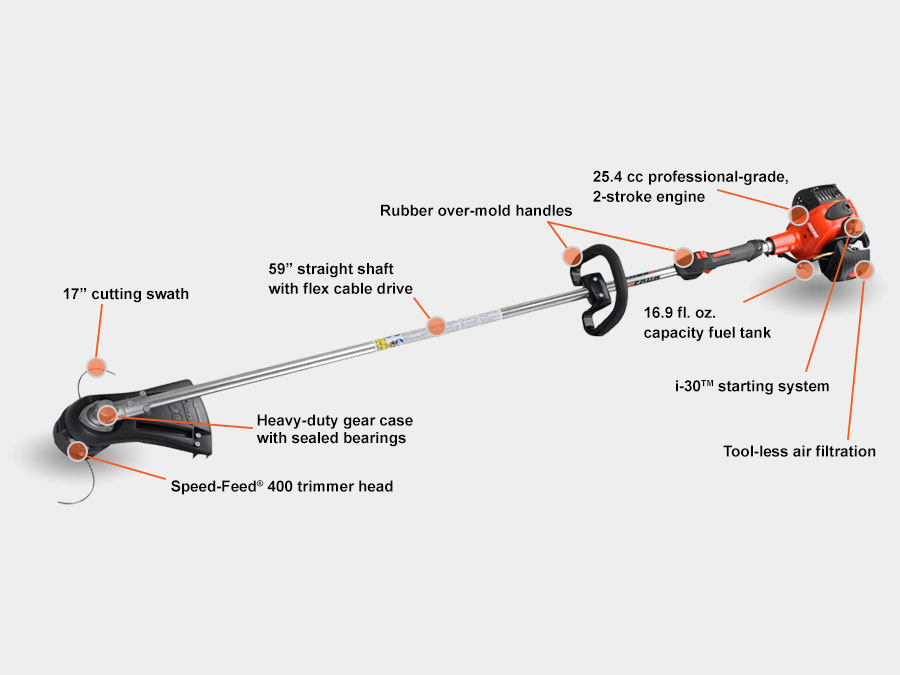
Credit: www.echo-usa.com
Position The Weed Wacker
Starting your Echo Weed Wacker involves more than just pressing buttons. Positioning the weed wacker correctly ensures safety and efficiency. A proper stance and stable ground are crucial. This guide will help you in positioning your Echo Weed Wacker.
Stable Ground
Find a flat surface. Uneven ground can cause the weed wacker to wobble. A smooth area keeps the tool steady during startup. Avoid soft soil that shifts easily. Hard surfaces like concrete or packed dirt are ideal.
Ensure the ground is dry. Wet areas can be slippery and unsafe. Dry ground provides better grip. This helps in maintaining control while starting your weed wacker.
Correct Stance
Stand with your feet shoulder-width apart. Balance is key for stability. This stance gives you control over the tool. Bend your knees slightly. A slight bend absorbs vibrations from the machine.
Hold the weed wacker firmly. Grip it with both hands for support. Keep your body relaxed but alert. This reduces fatigue and prevents accidents. Your posture should be upright and comfortable.
Position the weed wacker at your side. This prevents injury during startup. Ensure the cutting end faces away from you. Safety is important when handling power tools.
Pull The Starter Cord
Starting an Echo weed wacker is simple. First, ensure it’s filled with fuel. Then, pull the starter cord briskly to ignite the engine. This quick action helps power up your tool for effective yard work.
Starting an Echo Weed Wacker can seem challenging if you’re not familiar with the process. The starter cord plays a crucial role in getting your machine up and running. Pulling it correctly ensures the engine starts smoothly and prevents unnecessary strain on your equipment. Let’s delve into the essential steps for pulling the starter cord effectively.
Correct Grip
Hold the handle firmly. Use your dominant hand for better control. Keep your fingers wrapped around the grip securely. Avoid a loose grip to prevent slipping. A firm hold is crucial. It helps transfer force efficiently. This reduces wear on the starter cord.
Pulling Technique
Stand in a stable position. Feet shoulder-width apart for balance. Bend your knees slightly. Use your body weight to assist the pull. Pull the cord steadily. Avoid jerky movements. Jerky pulls can damage the cord. Ensure a smooth, continuous motion. This helps engage the engine properly. Mastering the starter cord pull makes starting your Echo Weed Wacker straightforward. Proper technique saves time and effort. Follow these steps for a hassle-free start every time.
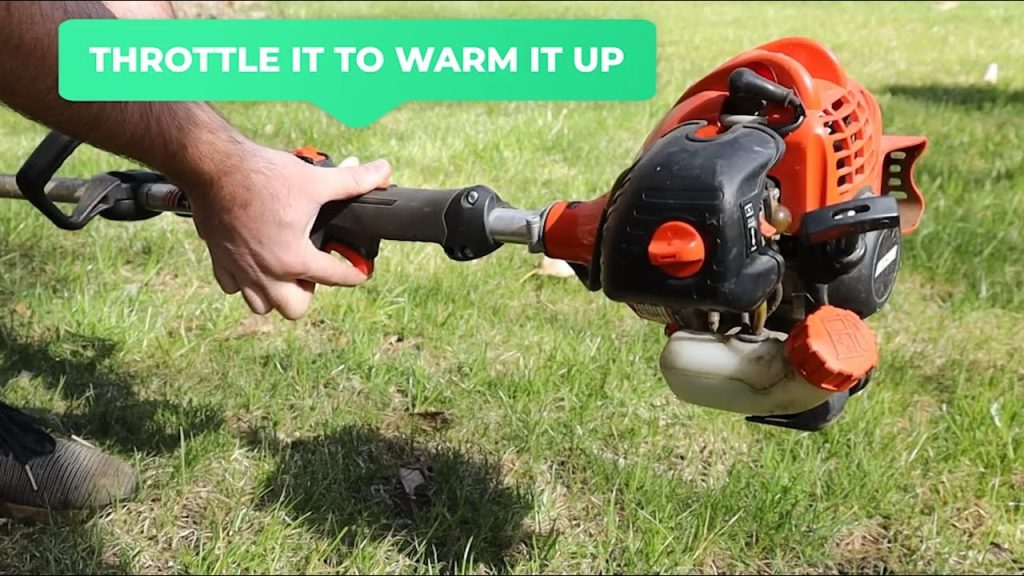
Warm Up The Engine
Starting an Echo Weed Wacker involves more than just pulling a cord. Warming up the engine is crucial for efficient performance. Proper warming ensures the engine runs smoothly and lasts longer. It also minimizes the risk of stalling during use.
Engine Idle Time
Allow the engine to idle for a few minutes after starting. This idle time lets the internal components adjust to the temperature. It ensures the oil circulates properly within the engine. During this period, listen for any unusual sounds. If any arise, stop and check the machine.
Choke Adjustment
Adjusting the choke helps regulate the air and fuel mixture. Start with the choke in the closed position. This position enriches the fuel mixture for cold starts. Once the engine warms up, move the choke to the open position. This adjustment reduces fuel and increases air in the mixture.
Ensure the choke adjustment is smooth and gradual. Abrupt changes can cause the engine to stall. Proper choke adjustment contributes to a stable engine operation.
Troubleshoot Common Issues
Starting an Echo Weed Wacker can be simple with the right steps. Ensure the fuel tank is filled, and the switch is on. Pull the starter cord firmly to ignite the engine.
Starting your Echo Weed Wacker can sometimes be challenging. Many users encounter common issues during startup. Troubleshooting these problems ensures smooth operation. Below, find solutions to frequent starting issues.
Engine Fails To Start
An engine that won’t start might need a spark plug check. Ensure the spark plug is clean and properly connected. Fuel problems can also cause startup issues. Make sure the fuel tank is full with fresh gasoline. Check the air filter for dirt or blockages. A clogged filter restricts air flow and affects engine performance. Cleaning or replacing the filter can solve this issue.
Uneven Running
Uneven running might indicate a carburetor problem. Adjust the carburetor settings for balanced air and fuel mix. Inspect the fuel lines for leaks or blockages. Damaged fuel lines can disrupt fuel supply. Clean the exhaust port to remove carbon buildup. This buildup can restrict exhaust flow and affect running. Regular maintenance prevents these issues and keeps your Echo Weed Wacker running smoothly.
Maintenance Tips
Maintaining your Echo Weed Wacker ensures its longevity and optimal performance. Regular maintenance prevents unexpected breakdowns and costly repairs. Follow these tips to keep your tool in top shape.
Regular Cleaning
Keep your weed wacker clean for better efficiency. After each use, remove debris and grass clippings. A soft brush works well for this task. Check the air filter regularly. A clean filter improves engine performance. Replace it if it’s clogged. Inspect the cutting head for tangled weeds. These can reduce cutting power and strain the motor. Wipe down the exterior with a damp cloth to remove dust and dirt.
Seasonal Storage
Proper storage extends your weed wacker’s life. Empty the fuel tank before long storage. Fuel can degrade and clog the carburetor. Clean the tool thoroughly before storing. Store in a dry place to prevent rust and corrosion. Consider covering it with a cloth to keep dust away. Check for any loose screws or parts. Tighten them to prevent damage during storage.
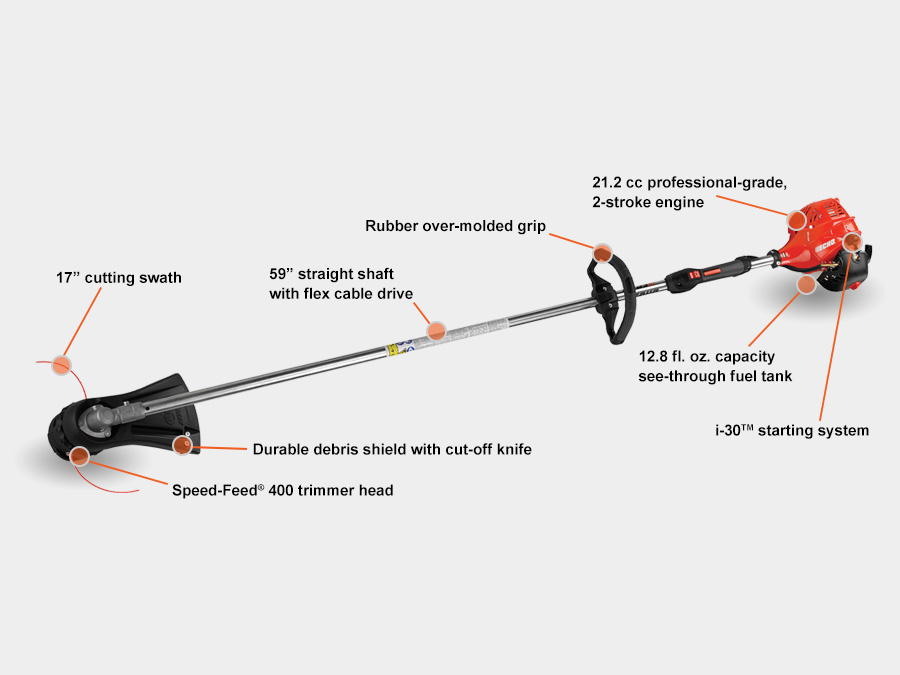
Credit: www.echo-usa.com
Frequently Asked Questions
How Do I Start An Echo Weed Wacker?
To start an Echo Weed Wacker, first ensure it has enough fuel. Set the choke lever to “Cold Start,” then press the purge bulb several times. Pull the starter rope gently until the engine fires. Once it starts, move the choke to “Run” and let it idle for a few seconds.
What Fuel Does An Echo Weed Wacker Use?
An Echo Weed Wacker uses a mix of unleaded gasoline and 2-stroke engine oil. The recommended ratio is 50:1. Use fresh fuel for optimal performance and longevity. Always ensure the gas-oil mixture is well-shaken before filling the tank.
Why Won’t My Echo Weed Wacker Start?
If your Echo Weed Wacker won’t start, check the fuel level and ensure it’s fresh. Inspect the spark plug for wear or damage. Clean or replace it if necessary. Ensure all connections are tight and the air filter is clean.
Follow the starting procedure carefully.
How To Maintain An Echo Weed Wacker?
Regular maintenance of your Echo Weed Wacker includes cleaning the air filter and checking the spark plug. Inspect and replace the trimmer line as needed. Ensure the fuel mix is correct. Regularly clean the exterior and inspect the parts for wear or damage.
Conclusion
Starting your Echo Weed Wacker is simple with these steps. Follow the guide, and you’ll be ready in no time. Ensure the switch is on and the fuel is fresh. Prime the bulb to get it started. Pull the cord steadily.
Practice makes perfect, so don’t worry if it takes a few tries. Soon, you’ll handle the Echo Weed Wacker with ease. Maintain it well for smooth operation. Enjoy your gardening tasks with confidence. Remember, safety first when using any tool.
Happy gardening!


