
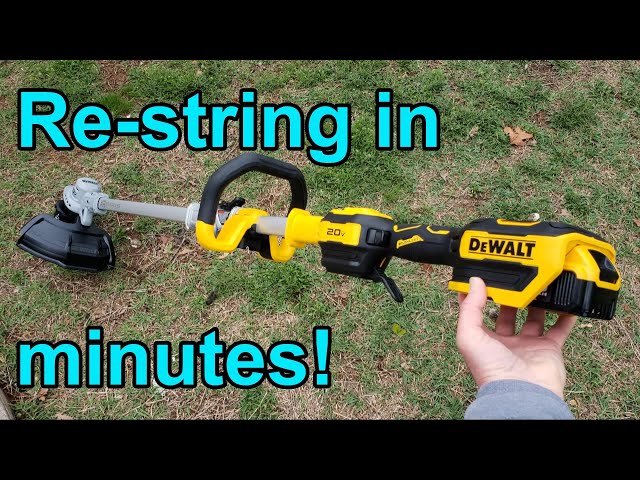
Are you tired of struggling with tangled weed wacker lines while maintaining your garden? If your Dewalt weed wacker is giving you a headache, you’re not alone.
Many homeowners find themselves perplexed when it’s time to restring their tool. But here’s the good news: mastering the art of restringing your Dewalt weed wacker is easier than you think. Imagine the satisfaction of efficiently trimming your lawn without the frustration of broken or jammed lines.
This guide is here to turn that vision into reality, offering you simple, step-by-step instructions that will have your weed wacker running smoothly in no time. So, are you ready to take control and transform your gardening experience? Dive into the full article to learn how you can effortlessly restring your Dewalt weed wacker and enjoy a beautifully manicured lawn.
Credit: support.dewalt.com
Tools And Materials Needed
Restringing a Dewalt Weed Wacker requires the right tools and materials. Having everything ready ensures a smooth process. Let’s explore what you need to get started.
Tools You Will Need
A few basic tools are essential. A pair of scissors helps cut the string. A screwdriver may be needed to open the spool cover. Having these on hand speeds up the task.
Materials Required
The main material required is the trimmer line. Make sure it fits your Dewalt model. Check the manual for the correct diameter. Also, keep the spool clean for smooth operation.
Safety Gear
Wear safety gloves to protect your hands. They prevent cuts and blisters. Safety goggles shield your eyes from debris. Always prioritize safety while working.
Safety Precautions
Restringing a Dewalt weed wacker ensures efficient garden maintenance. Yet, safety must never be overlooked. Even the simplest tasks can lead to accidents. Keep safety a priority with these precautions. Your well-being matters most.
1. Wear Protective Gear
Always wear safety goggles to protect your eyes from debris. Gloves safeguard your hands from sharp edges. Sturdy footwear prevents foot injuries. Protective clothing minimizes skin exposure.
2. Disconnect The Power Source
Ensure the weed wacker is off before starting. Remove the battery or unplug the cord. This step prevents accidental activation.
3. Work In A Safe Environment
Choose a well-lit area for restringing. Ensure the space is free from obstacles. A clean workspace reduces tripping hazards.
4. Handle The Spool Carefully
The spool can have sharp edges. Handle it with care to avoid cuts. Use gloves for additional protection.
5. Keep Bystanders At A Distance
Ensure no one stands too close. Flying debris can cause injuries. Maintain a safe perimeter around your workspace.
6. Follow Manufacturer Instructions
Read the manual for specific guidelines. Each model might have unique instructions. Following them ensures a safe restringing process.
7. Inspect The Equipment
Check the weed wacker for damage before starting. Look for loose parts or cracks. Address any issues to prevent malfunctions.
8. Secure Loose Clothing And Hair
Tie back long hair to prevent entanglement. Avoid wearing loose clothing. These can get caught in the machinery.
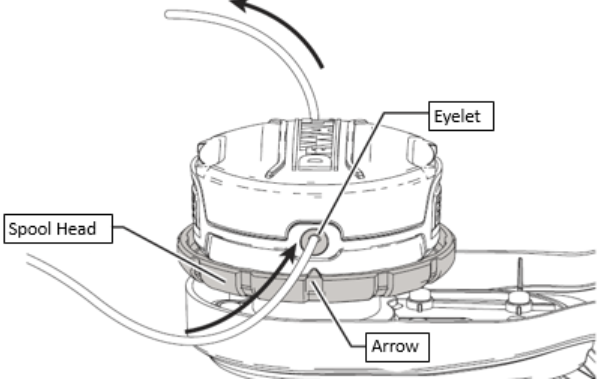
Removing The Spool
Removing the spool from a Dewalt weed wacker is the first step to restringing. Gently press the tabs on each side of the spool cover to release it. Carefully lift the spool from its housing to begin the restringing process.
Removing the spool from your Dewalt weed wacker might seem daunting at first, but it’s a straightforward task that can save you time and money. Whether you’re a seasoned gardener or a beginner, understanding this process is essential to maintaining your equipment. Let’s dive into the steps to easily remove the spool.
Gather Your Tools
Before starting, ensure you have all necessary tools. Typically, you won’t need much beyond your hands, but a pair of gloves can be helpful. Gloves protect your fingers from any sharp edges and give you a better grip.
Power Down Your Weed Wacker
Safety first! Always make sure your weed wacker is completely powered down. Disconnect it from any power source or remove the battery if it’s cordless. This step prevents accidental starts and keeps you safe.
Locate The Spool Cap
Find the spool cap, which is usually located at the bottom of the trimmer head. It’s often round and can be unscrewed or unclipped. Look for any arrows or indicators on the cap that show you the direction to turn.
Remove The Spool Cap
Once you’ve located the cap, gently twist or unclip it. If it’s tough to remove, don’t force it. Instead, check for any dirt or debris blocking the mechanism. Remember, patience is key here.
Lift Out The Spool
After removing the cap, you’ll see the spool sitting inside. It should lift out easily. If it’s stuck, gently wiggle it back and forth. A little persistence goes a long way.
Inspect The Spool And Housing
Take a moment to inspect the spool and housing for any damage or wear. This is a great time to clean out any built-up grass or debris. A clean spool ensures smooth operation.
Why Bother With Maintenance?
You might wonder why these steps matter. Regular maintenance extends the life of your tools and ensures they work efficiently. Have you ever been mid-trim and had the line snap repeatedly? Properly maintaining your spool can prevent these frustrations. With the spool removed, you’re ready for the next step: restringing your Dewalt weed wacker. Remember, taking care of your equipment makes your gardening tasks more enjoyable and less of a chore. By following these simple steps, you’ll have mastered the art of spool removal, setting the stage for a smooth and efficient restringing process. What’s your go-to tip for maintaining garden equipment? Share your thoughts in the comments below!

Credit: m.youtube.com
Preparing The New Line
Effortlessly replace the string in your Dewalt Weed Wacker by cutting the right length for your new line. Slide the new line into the spool, ensuring it fits snugly. Wind the line evenly to avoid tangles during operation.
Preparing the new line for your Dewalt weed wacker ensures smooth operation. A fresh line cuts through weeds efficiently. It also reduces wear on the trimmer. Follow these steps for a flawless setup.
Choosing The Right Line
Selecting the right line is crucial. Dewalt weed wackers need specific lines. Check your manual for recommendations. A thicker line cuts tougher weeds. A thinner line is for grass and light trimming. Ensure the line matches your trimmer model. This prevents jams and ensures smooth operation.
Cutting The Line To Size
Proper line length ensures optimal performance. Measure the length specified in your manual. Cut the line using sharp scissors or a knife. Ensure the ends are clean. Jagged ends can cause tangles. Use a firm grip to avoid uneven cutting. A precise cut makes installation easier. Double-check the length before proceeding. This avoids any need for adjustments later.
Winding The Line On The Spool
Restringing your Dewalt Weed Wacker may seem tricky, but it’s simple. One key step is winding the line on the spool properly. This ensures a smooth operation without frustrating tangles or jams. Let’s dive into the techniques for winding and securing the line.
Proper Winding Technique
Start by cutting a suitable length of line, usually about 15 feet. Locate the spool and observe the directional arrows. They guide you in the right winding direction. Align your line with these arrows. Keeping the line tight is crucial. Loose winding can cause it to unravel.
Begin winding the line evenly around the spool. Ensure each layer is neat and consistent. Avoid overlapping, as this can lead to line jams. Keep the line taut and smooth throughout the winding process.
Securing The Line
Once you reach the end of the spool, secure the line. Use the provided notches to anchor the line. This prevents it from unwinding during use. Ensure the line is firmly in place. Check for any slack or loose sections.
Finally, replace the spool into the weed wacker head. Make sure it fits snugly and securely. Double-check that the line is not protruding or loose. This ensures optimal performance and hassle-free trimming.
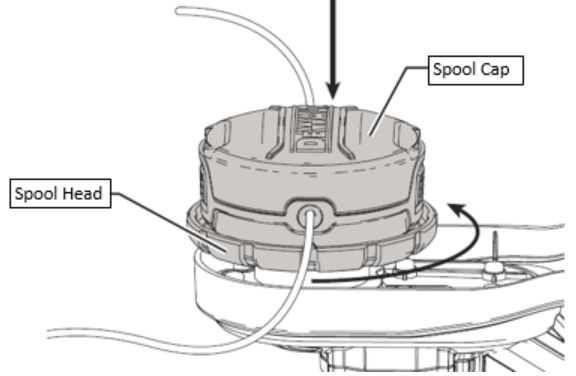
Reattaching The Spool
Reattach the spool by aligning the tabs with the slots in the weed wacker’s head. Secure it by pressing down gently until it snaps into place. Ensure the spool is firmly attached to prevent it from coming loose during operation.
Reattaching the spool in a Dewalt weed wacker can seem tricky. With the right steps, it becomes a straightforward task. This section guides you through aligning and locking the spool. Ensure your weed wacker is turned off. Safety first. Then, let’s dive in.
Aligning The Spool
Place the spool onto the hub carefully. Ensure the line faces the right way. Check the arrows on the spool. These arrows guide the proper direction. Align them with the hub’s notches. This ensures the line feeds smoothly. Proper alignment prevents jamming and breakage.
Locking The Spool In Place
Press the spool down gently. Push until you hear a click. This sound means the spool is secure. If there is no click, adjust it again. Double-check that the spool sits firmly. A loose spool can cause issues. Test by pulling the line slightly. It should offer resistance, not come loose. Secure locking ensures efficient trimming.
Testing The Weed Wacker
Learn how to restring a Dewalt Weed Wacker easily. Follow simple steps to keep your tool working efficiently. Enjoy hassle-free yard maintenance with a well-strung weed wacker.
Testing your Dewalt Weed Wacker ensures it functions smoothly. After restringing, a quick test confirms everything is set correctly. It also helps in identifying any issues early. Here’s how to effectively test your tool.
Start The Weed Wacker
Begin by powering on the weed wacker. Ensure the safety switch is off. Pull the start cord gently. Listen for any unusual sounds. The engine should hum smoothly. If it stalls, check the fuel and restringing.
Check The Line Feed
Engage the line feed mechanism. Tap the head on the ground. Ensure the line extends properly. A faulty line feed can cause uneven trimming. Adjust if the line doesn’t extend correctly.
Inspect The Trimming Action
Observe the trimming action. The weed wacker should cut evenly. Walk along the edge of your lawn. Check for any missed spots or uneven cuts. Adjust the line length if needed.
Monitor Vibration Levels
Hold the tool firmly. Notice the vibration levels. Excessive vibration might indicate a problem. It could affect the quality of the trim. Make sure the components are tightly secured.
Confirm Safety Features
Test all safety features. Ensure the guard is secure. The safety switch should work properly. This prevents accidental startups. Always prioritize safety during operation.
Credit: support.dewalt.com
Maintenance Tips
Changing the string on a Dewalt Weed Wacker is simple. First, remove the spool cap. Then, wind the new string tightly. Finally, replace the cap securely. Proper maintenance ensures efficient cutting and extends your tool’s life.
Maintaining your Dewalt weed wacker is crucial for its longevity and optimal performance. Proper care not only prevents unexpected breakdowns but also ensures your garden chores are completed efficiently. Whether you’re a seasoned gardener or just starting out, these maintenance tips can help keep your tool in prime condition and save you both time and money. Regular Inspection Regular inspections are key to maintaining your weed wacker. Before each use, check for any visible damage on the tool’s exterior and its internal components. Look out for cracked or broken parts that might affect its functionality. Pay particular attention to the string head. Ensure it’s free from debris and that the string is correctly aligned. This simple routine can prevent bigger issues down the line. Have you ever noticed a decrease in cutting efficiency? It could be due to a tangled string or worn-out parts. Address these small issues promptly to avoid costly repairs. Storage Recommendations Proper storage extends the life of your weed wacker. Always store it in a dry, cool place to prevent rust and corrosion. Moisture can damage the engine and other metal parts, so finding a safe spot is essential. Consider using a wall mount or shelf for storage. This keeps the tool off the ground and away from potential water damage. Have you ever walked into your garage and found tools scattered around? Organizing your space not only keeps your weed wacker safe but also saves you time when looking for your tools. When storing, make sure the tool is clean and dry. A quick wipe down after each use can prevent buildup of grass and grime. Do you want to keep your weed wacker in top shape? Regular cleaning and proper storage are simple yet effective practices that ensure longevity.
Frequently Asked Questions
How Do I Remove The Old String?
To remove the old string, first, turn off the weed wacker. Then, press the tabs on the spool cap to release it. Pull the spool out carefully. Remove any remaining string by unwinding it from the spool. Ensure the spool is clean before restringing with a new line.
What Type Of String Should I Use?
Use a string recommended by Dewalt, typically a 0. 080-inch diameter line. This ensures optimal performance and reduces wear on the tool. Check your user manual for specific recommendations. Using the correct string type helps in achieving efficient trimming and prolonged tool lifespan.
How Do I Wind The New String?
Cut a length of 10 feet of string. Insert one end into the hole on the spool. Wind the string evenly and tightly around the spool in the direction of the arrows. Leave about 6 inches unspooled for installation. This helps in minimizing tangles and ensures smooth operation.
How Often Should I Restring My Weed Wacker?
Restring your weed wacker when you notice reduced cutting efficiency. Typically, this is after several uses or when the string is visibly worn. Regular maintenance improves performance and prolongs the tool’s life. Monitor the string condition regularly for optimal trimming results.
Conclusion
Restringing a Dewalt weed wacker is simple with the right steps. Just follow our guide, and you’ll be trimming your yard in no time. Keep your tools organized to speed up the process. Regular maintenance extends the life of your weed wacker.
Always wear safety gear to protect yourself. With practice, you’ll become more confident in restringing. Enjoy a neat and tidy lawn with a well-functioning tool. Remember, practice makes perfect. Now, get out there and tackle that garden! Happy gardening!


