
Are you tired of the dull, worn-out blade on your circular saw slowing down your projects? Imagine slicing through wood like butter, with precision and ease.
Replacing the blade on your circular saw doesn’t have to be a daunting task. In fact, it’s easier than you might think, and doing it yourself can save you money and extend the life of your saw. This guide will walk you through the simple steps to get your saw back to its optimal performance.
You’ll feel empowered knowing you can handle this essential maintenance task on your own. So, let’s dive in and ensure your circular saw is ready for action.
Safety Precautions
Always disconnect the power before changing a circular saw blade. Use safety gloves to protect your hands. Ensure the saw blade is fully stopped and cool before handling.
Replacing the blade on a circular saw requires careful attention to safety. Ensuring safe practices can prevent injuries and accidents. Before you begin, familiarize yourself with essential safety precautions. These measures protect you and prolong the life of your saw.
Protective Gear
Wearing the right protective gear is crucial. Safety goggles shield your eyes from flying debris. Gloves protect your hands from sharp edges. Use ear protection to guard against loud noises. A dust mask can prevent inhalation of sawdust.
Power Source Disconnection
Disconnect the power source before blade replacement. Unplug the saw or remove the battery. This prevents accidental activation. Confirm the saw is off before proceeding. Double-check the power disconnection for added safety.

Credit: www.youtube.com
Necessary Tools
Replacing a circular saw blade requires a few essential tools. Having the right tools ensures safety and efficiency. Gather these before you start the process. You’ll be ready to replace the blade with ease.
Wrench Or Key
A wrench or key is essential for loosening the blade bolt. Most saws come with a specific key. This tool fits the bolt perfectly. It prevents slipping and injury. Ensure your wrench or key matches your saw.
Replacement Blade
A replacement blade is crucial for the task. Choose a blade that suits your cutting needs. Verify the size matches your saw. High-quality blades last longer and cut better. Ensure it is sharp for precise cutting.
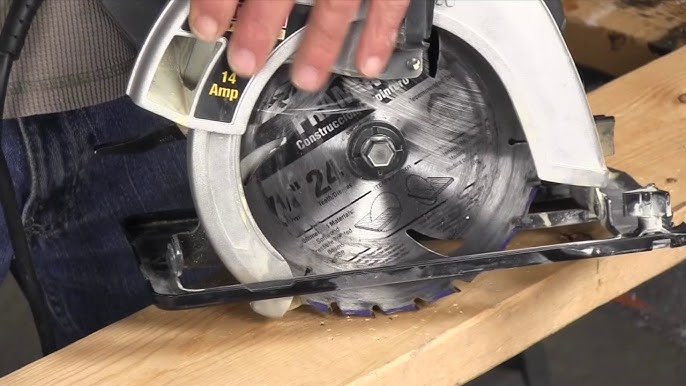
Removing The Old Blade
Changing a circular saw blade requires careful removal of the old one. First, unplug the saw to ensure safety. Use a wrench to loosen the arbor nut, then gently slide off the old blade.
Replacing the blade on a circular saw might seem daunting, but it’s a straightforward task that can extend the life of your tool and improve your cutting precision. Before you can mount the new blade, you need to safely remove the old one. This involves a few easy steps, ensuring your saw is positioned correctly and the arbor nut is loosened. If you’ve ever faced the frustration of a dull blade, you know the satisfaction of swapping it for a fresh one. Let’s dive into how you can efficiently tackle this task, starting with removing the old blade.
Positioning The Saw
First, ensure your saw is unplugged or the battery is removed to prevent any accidental start. Safety first! Place your saw on a stable surface, like a workbench, where you have ample room to maneuver. Make sure the blade guard is up, giving you full access to the blade. Laying the saw flat allows you to inspect the blade closely. Are the teeth chipped or worn? Replacing it might be the best thing you’ve done for your DIY projects this week. Remember, a stable position not only makes the process easier but also safer.
Loosening The Arbor Nut
The arbor nut holds the blade in place, and loosening it is crucial to removing the blade. Use a wrench that fits snugly on the nut. Turn the wrench counterclockwise to loosen the nut. Sometimes, the nut can be stubborn. If it resists, a little extra elbow grease or a penetrating oil can help. Have you ever found yourself struggling to loosen a nut only to realize you’re turning it the wrong way? It’s a common mistake. Double-check the direction, and you’ll have that nut off in no time. Once loose, set the nut aside where you won’t lose it—perhaps in a small container or a designated spot on your workbench. Remember, every DIY project is a learning experience. What strategies have you discovered that make tool maintenance smoother and more efficient?
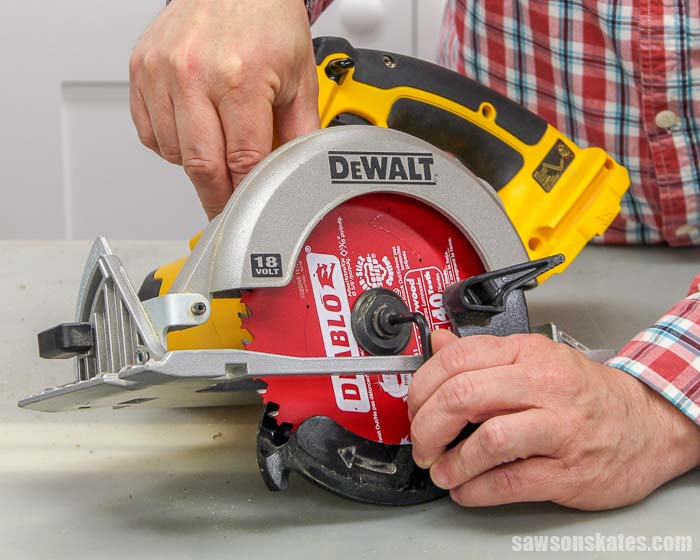
Credit: sawsonskates.com
Installing The New Blade
Replacing the blade on a circular saw is a common task. It’s crucial for maintaining smooth cuts and ensuring safety. Installing the new blade involves a few careful steps. These steps make sure the blade is placed correctly and securely. Let’s explore how to do this effectively.
Checking Blade Direction
First, check the direction of the new blade. Each blade has an arrow indicating rotation direction. This arrow should match the saw’s rotation. Look at the saw’s housing for a matching arrow. This ensures cuts are clean and the saw runs smoothly.
Securing The Blade
Once the blade direction is confirmed, it’s time to secure it. Place the new blade onto the arbor. Make sure it sits flat against the saw’s surface. Tighten the arbor nut using a wrench. Hold the blade guard back for easier access. Check that the blade is firmly in place. A loose blade can cause accidents or poor cuts.
Testing The Saw
Testing the saw is a crucial step after replacing the blade on your circular saw. You want to ensure everything is working smoothly before tackling your next project. A mistake here could lead to poor cuts or even damage to your materials. Let’s break down how you can do this effectively.
Reconnecting The Power
First, reconnect the power source to your circular saw. This can be as simple as plugging it back into the outlet or reattaching the battery if it’s cordless. Double-check that all connections are secure. Loose connections can cause the saw to malfunction.
Once your saw is powered up, give it a quick test run without cutting anything. Listen for any unusual sounds. A smooth, consistent hum usually indicates everything is in order. If there’s a strange noise, it might mean the blade isn’t installed correctly or there’s another issue.
Conducting A Test Cut
Before you begin your next big project, conduct a test cut on a scrap piece of wood. This will help ensure that the new blade is cutting as expected. Hold the wood firmly and guide the saw through it, maintaining a steady pressure.
Examine the cut closely. Is it clean and straight? A jagged or uneven cut might suggest the blade needs adjustment. Your test cut should mirror the quality you expect on your actual project. Don’t hesitate to make small adjustments if necessary.
How confident are you in your ability to recognize a proper test cut? Developing a keen eye for this can save you time and materials in the long run. Remember, each saw and blade can behave differently, so it’s essential to get familiar with your tools.
Testing the saw isn’t just about functionality; it’s about gaining peace of mind. You’ll feel more confident knowing your saw is ready for your next DIY adventure. What new projects will you tackle now that your saw is in top shape?

Credit: thegardenfrog.wordpress.com
Maintenance Tips
Maintaining your circular saw ensures it performs at its best. Proper care extends the tool’s lifespan. It also guarantees safety during usage. Regular maintenance prevents unexpected breakdowns. It’s crucial for both professionals and hobbyists. Here are some essential maintenance tips.
Regular Cleaning
Regular cleaning keeps your circular saw in top shape. Dust and debris build up over time. This affects the saw’s performance. After every use, wipe down the tool. Use a soft brush for hard-to-reach areas. Keep the air vents clear. This prevents overheating. Ensure the blade is free of residue. A clean blade cuts smoothly. It also reduces wear and tear.
Blade Storage
Proper blade storage is vital. It prevents rust and damage. Always store blades in a dry place. Moisture can cause corrosion. Use blade covers if available. They provide extra protection. Avoid stacking blades on top of each other. This prevents nicks and dull edges. Arrange them upright or in a dedicated holder. This keeps them ready for the next project.
Frequently Asked Questions
How Do I Change The Blade On A Circular Saw?
Unplug the saw and engage the blade lock. Use a wrench to loosen the arbor nut. Remove the old blade, then place the new blade onto the arbor. Tighten the arbor nut securely. Ensure the blade spins correctly before use.
Which Direction Loosens A Circular Saw Blade?
Turn the circular saw blade counterclockwise to loosen it. Most saws have a left-hand thread. Always check the saw’s manual for specific instructions before proceeding. This ensures safety and proper handling while working with tools.
What Should You Do Before Changing The Blade On A Circular Saw?
Unplug the saw and wear safety gloves. Ensure the saw is on a stable surface. Use the wrench to loosen the arbor nut. Remove the old blade carefully. Install the new blade securely.
Where Is The Arbor Lock On A Circular Saw?
The arbor lock on a circular saw is typically located near the blade housing. It is a small button or lever that secures the blade for easy replacement. Press it to immobilize the blade while changing or adjusting it. Always ensure the saw is unplugged before engaging the arbor lock for safety.
Conclusion
Replacing a circular saw blade is simple. Follow the steps carefully. Ensure the saw is unplugged. Safety first! Gather your tools and new blade. Remove the old blade gently. Place the new blade correctly. Tighten it securely. Test the saw before use.
This ensures proper installation. Regular maintenance keeps your saw effective. A well-maintained saw works efficiently. Remember, practice makes perfect. Soon, you’ll change blades easily. Enjoy your woodworking projects. Happy sawing!


