

Are you looking to unlock the secrets of your multimeter? Understanding how to read volts is a fundamental skill that can empower you to troubleshoot electrical issues with confidence.
Whether you’re a DIY enthusiast or a budding technician, mastering this tool can save you time, money, and frustration. Imagine the satisfaction of diagnosing a problem with precision, without the guesswork. In this guide, you’ll discover straightforward steps and tips to help you measure voltage like a pro.
Say goodbye to confusion and hello to clarity. Dive in, and let your newfound knowledge spark a sense of accomplishment and control. Ready to power up your skills? Let’s get started!
Choosing The Right Multimeter
Choosing the right multimeter is crucial for accurate measurements. Whether you are a beginner or an expert, understanding multimeter types and features can save you time and effort. This guide will help you make an informed choice that suits your needs.
Digital Vs Analog
Digital multimeters are popular for their precision. They display readings on an LCD screen, making them easy to read. Digital versions often offer more features. Analog multimeters use a needle to show readings. Some prefer analog for their simplicity and fast response to changes. Each type has its benefits. Consider what suits your work style best.
Key Features To Consider
Look for a multimeter with a clear display. A backlit screen can help in low light. Auto-ranging capability saves time by selecting the correct range automatically. Ensure it measures both AC and DC volts. A durable build is important for safety and longevity. Check for a strong case and secure probes. These features will enhance your multimeter experience.
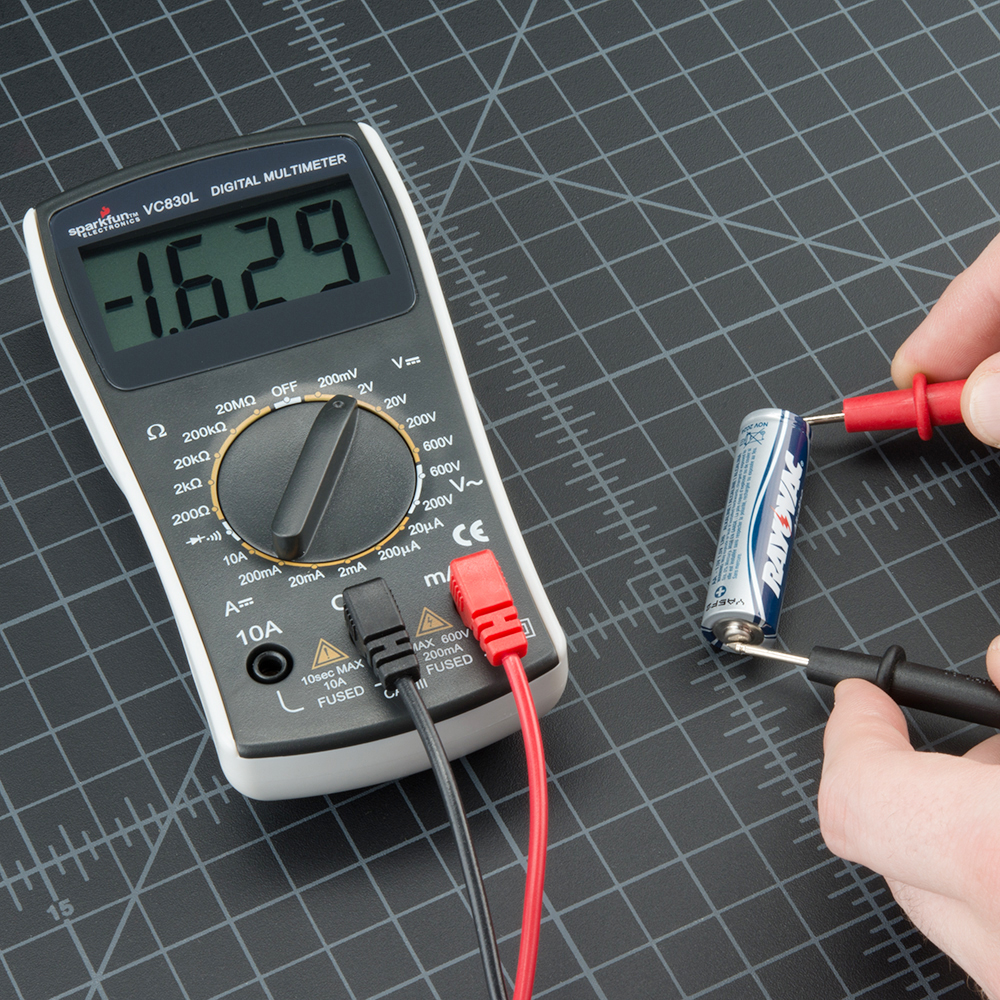
Credit: learn.sparkfun.com
Safety Precautions
Ensure safety by setting the multimeter to the correct voltage range. Use insulated probes to prevent electric shock. Keep fingers behind the probe guards while taking readings.
When it comes to using a multimeter, ensuring your safety is crucial. Even though reading volts might seem straightforward, overlooking safety precautions can lead to accidents. Let’s dive into some essential safety measures you should take before you start measuring those volts.
Personal Protective Equipment
Your safety gear is your first line of defense. Wear rubber-soled shoes to prevent electric shocks. Insulated gloves can also provide an extra layer of protection. Always keep a pair of safety goggles nearby. They can protect your eyes from unexpected sparks or debris. A friend of mine learned this the hard way when a simple voltage reading caused a small arc. Thankfully, his goggles saved him from potential injury.
Avoiding Electrical Hazards
Ensure all your equipment is dry before use. Moisture can lead to short circuits, posing a risk of electric shock. Double-check that your multimeter’s probes and wires are not damaged. Frayed wires can be hazardous and lead to inaccurate readings. Before you start, ask yourself: Are you in a safe environment? Avoid cluttered areas where tripping over a cord could cause an accident. It’s always wise to turn off the power before connecting your multimeter to a circuit. This not only keeps you safe but also protects your equipment from damage. Engage with these precautions as if they are second nature. Your diligence could prevent a costly mistake or even save your life.
Setting Up The Multimeter
Setting up a multimeter to read volts involves selecting the voltage setting and connecting probes to terminals. Ensure the device is set to the correct range for accurate readings. Always handle probes carefully to avoid errors or damage.
Setting up your multimeter correctly is the first step toward accurately reading volts. It’s a straightforward process that can empower you to handle various electrical tasks. Whether you’re a DIY enthusiast or a seasoned electrician, understanding how to set up your multimeter is crucial. Let’s break it down into simple steps.
Selecting The Voltage Measurement Mode
The first step is selecting the correct measurement mode. Turn the dial on your multimeter to the voltage setting, usually marked with a “V.” Ensure you choose either AC or DC, depending on what you’re measuring. AC is for alternating current like household electricity, while DC is for direct current like batteries. Forgetting this step is a common mistake, so double-check before proceeding.
Connecting The Probes
Next, connect the probes to your multimeter. You’ll have a red probe and a black probe. Insert the black probe into the common (COM) port. The red probe goes into the port labeled for voltage, often marked “VΩmA” or similar. Proper connection is key; a loose connection can lead to inaccurate readings. Once connected, you’re ready to measure. Have you ever wondered why the black probe is always used for common? It’s a universal standard to prevent errors, so always follow this rule. By setting up your multimeter correctly, you’re one step closer to understanding the mysteries of electricity in your home or gadgets.
Measuring Ac Voltage
Measuring AC voltage with a multimeter might sound like a task only for the tech-savvy, but it’s actually a straightforward process that you can master with a bit of practice. Whether you’re troubleshooting your home’s electrical wiring or checking the voltage on an appliance, learning how to measure AC voltage is a handy skill. Imagine being able to confidently assess if your outlets are delivering the correct voltage or identifying potential electrical issues before they turn into costly repairs. Ready to get started?
Understanding Ac Voltage
AC voltage, or alternating current voltage, is the type of electricity that powers most homes and businesses. Unlike DC voltage, which flows in one direction, AC voltage changes direction periodically. This characteristic makes AC voltage ideal for transmitting electricity over long distances. You’ll find AC voltage in your wall outlets, powering everything from your refrigerator to your lights.
Have you ever wondered why your devices need specific voltage levels? It’s because AC voltage can vary, affecting the performance of your appliances. By understanding AC voltage, you can ensure your devices are operating efficiently and safely.
Steps To Measure Ac Voltage
- Set Your Multimeter:Turn the dial to the AC voltage setting, usually labeled “V~”. This setting is crucial for accurate readings. Ever accidentally used the wrong setting and wondered why the numbers seemed off? Avoid this common mistake by double-checking your dial.
- Insert the Probes:Plug the black probe into the COM port and the red probe into the VΩmA port. These connections are vital for capturing the correct voltage. Think of them as the bridge between your multimeter and the electrical circuit.
- Test the Circuit:Touch the probes to the outlet or wire you want to measure. The red probe goes to the live wire and the black to the neutral. Read the display carefully. Have you ever felt a rush of excitement seeing those numbers? It’s the thrill of uncovering the unseen energy flowing through your home.
Why not give it a try today? Next time you plug in an appliance, consider measuring the voltage. It’s a small step that can make a big difference in understanding your home’s electrical health.
Are you ready to dive deeper into the world of electricity? Let your curiosity guide you as you explore the nuances of AC voltage measurement. Who knows, you might even discover a newfound passion for electrical engineering!
Measuring Dc Voltage
Measuring DC voltage with a multimeter is a skill that can save you time and money, whether you’re troubleshooting electronics or simply satisfying your curiosity about how things work. It might seem intimidating at first, but once you understand the basics, you’ll realize it’s quite straightforward. Picture this: your multimeter is a detective, ready to reveal the hidden secrets of voltage in your devices. Are you ready to become its sidekick?
Understanding Dc Voltage
DC voltage, or direct current voltage, is the type of electricity that flows in one direction. It’s the power source for many everyday items like batteries and solar panels. Unlike AC voltage, which changes direction periodically, DC voltage remains constant.
Think of it as the steady stream of energy that powers your flashlight or charges your phone. Knowing how to measure DC voltage is essential for anyone interested in electronics. It allows you to verify that devices are receiving the correct amount of power, ensuring they function properly.
Steps To Measure Dc Voltage
Ready to measure DC voltage? Here’s a simple guide to get you started:
- Prepare your multimeter:Set it to measure DC voltage. This is often indicated by a “V” with a straight line or dashed line above it. Ensure your multimeter’s probes are connected securely.
- Identify the test points:Locate the positive and negative terminals of the device or circuit you wish to measure. These are usually marked with ‘+’ and ‘-‘.
- Connect the probes:Touch the red probe to the positive terminal and the black probe to the negative terminal. Be precise with your placement to avoid incorrect readings.
- Read the display:Your multimeter will show the voltage reading on its screen. This number tells you how much DC voltage is present between the test points.
It’s fascinating, isn’t it? With these simple steps, you can unlock the mysteries of your gadgets. Imagine the satisfaction of seeing a correct voltage reading, knowing you’re on the right track.
Have you ever wondered why your device isn’t working? What if a voltage check could reveal the answer? Grabbing your multimeter could be the first step to understanding and fixing the issue. This skill is more than just technical know-how—it’s a gateway to solving real-world problems.
Interpreting The Results
Understanding multimeter readings helps in troubleshooting electrical issues. Set your multimeter to the volts setting. Touch the probes to the circuit points. Read the displayed voltage value.
Understanding how to read volts on a multimeter is essential for anyone dealing with electrical devices. Once you’ve connected your multimeter and taken your reading, interpreting the results is the next crucial step. This can help you diagnose potential issues or confirm that everything is functioning as expected. It’s not just about seeing a number; it’s about knowing what that number means.
Reading The Display
When you look at the multimeter display, you might see something like “5.00V” or “230.0V”. But what does this mean for your specific project? A reading of 5.00 volts might indicate the output of a USB port, while 230.0 volts could be your household power supply in certain countries. Make sure you note the decimal points and units. They are crucial. A small mistake here could lead to incorrect assumptions about the circuit’s condition.
Common Mistakes To Avoid
A common mistake is misinterpreting the decimal point. For example, reading “5.00” as “500” can lead to serious errors in your assessment. Another pitfall is ignoring unit conversions. If your multimeter reads in millivolts, forgetting to convert to volts can skew your understanding. Always double-check your multimeter settings. Switching between AC and DC modes without adjusting the settings can result in incorrect readings. Have you ever found yourself puzzled, wondering why your device isn’t working as expected? Sometimes, it’s not the device but a simple misreading of the multimeter. Taking a moment to review your setup and results can save you time and stress. Understanding these common errors ensures you get the most accurate results, making your electrical projects smoother and more successful.
Troubleshooting Tips
Reading volts on a multimeter requires careful setup. First, turn the dial to the voltage setting. Then, connect the probes to the correct terminals. A steady reading indicates success.
When you’re learning how to read volts on a multimeter, encountering inaccurate readings can be a common hurdle. Troubleshooting these issues is not just about ensuring your multimeter is functioning correctly—it’s also about developing the confidence to diagnose and fix problems on your own. Let’s dive into some practical tips that will help you become more efficient and accurate in your readings.
Dealing With Inaccurate Readings
Inaccurate readings can be frustrating, but they’re often solvable with a few adjustments. First, ensure that your multimeter is set to the correct voltage range. If you’re measuring a small voltage and the multimeter is set too high, the reading might be off. Check the test leads for any damage, like cracks or frays, as these can interfere with accurate readings. If you suspect an issue with the leads, replacing them is a simple fix that can save you a lot of headaches. Consider the environment where you’re taking measurements. Electrical noise from nearby devices can disrupt readings. Try moving to a different location to see if it makes a difference.
Multimeter Maintenance
Maintaining your multimeter is key to ensuring it provides accurate readings over time. Start by regularly checking and replacing batteries, as low battery power can lead to faulty readings. A fresh battery can make a world of difference. Keep the multimeter clean and free from dust. Use a soft cloth to wipe it down after each use, and store it in a protective case to prevent any damage. Calibration is crucial. If you find your readings are consistently off, it might be time for a recalibration. This can often be done at home with a known voltage source or by a professional if you’re unsure. Have you ever considered how often you actually use your multimeter? Frequent use without proper maintenance can lead to wear and tear, impacting its accuracy. By taking these maintenance steps, you’re not only extending the life of your device but also ensuring that your readings are reliable every time you use it.
:strip_icc()/measuring-voltage-outlet-77726753-ac9266c6cc0c4b56bf0b663bedd85883.jpg)
Credit: www.bhg.com
Advanced Techniques
Reading volts on a multimeter can be straightforward. But advanced techniques offer deeper insights. These techniques enhance accuracy and understanding. They are valuable for complex tasks. Explore using additional features and testing voltage in complex circuits.
Using Additional Multimeter Features
Multimeters come with extra features. These features expand their capabilities. For instance, the hold function. It freezes the reading for later reference. The min/max feature tracks voltage changes over time. It helps identify fluctuations. Some multimeters offer a relative mode. This mode compares two measurements. It shows the difference between them.
Understanding these features improves your skillset. They provide more precise readings. These features are useful in intricate electrical tasks. They simplify complex measurements. Using them can save time. Explore your multimeter’s manual for hidden gems.
Testing Voltage In Complex Circuits
Complex circuits present challenges. They have multiple pathways for current. Testing voltage requires careful handling. First, identify the main components. Determine their connection points. Use the multimeter probes carefully. Ensure you touch the correct terminals. Incorrect placement can lead to errors.
Check for multiple voltage sources. Some circuits have more than one. Measure each section separately. Compare readings to expected values. This ensures accuracy. Look for voltage drops across components. They indicate resistance levels. Evaluating these drops helps in diagnosing issues.
Advanced techniques simplify complex circuit analysis. They improve troubleshooting efficiency. Mastering these skills enhances your electrical understanding. With practice, testing becomes second nature.
Credit: chibitronics.com
Frequently Asked Questions
How Do I Set A Multimeter To Measure Volts?
To measure volts, turn your multimeter dial to the ‘V’ symbol. Ensure the leads are connected properly: black in COM and red in VΩ. Make sure you’re measuring in the correct range for AC or DC volts. Always double-check your connections and settings before taking measurements.
Can I Measure Both Ac And Dc Volts?
Yes, most multimeters can measure both AC and DC volts. Set the multimeter to the correct voltage type using the dial. Ensure your probes are connected properly. Double-check your settings to avoid incorrect readings. Refer to your multimeter’s manual for specific instructions on switching between AC and DC.
What Safety Precautions Should I Follow?
Always ensure the multimeter is set to the correct measurement type. Avoid touching exposed metal during testing. Use insulated probes to prevent shocks. Never exceed the voltage rating of your multimeter. Disconnect power before changing settings or connections. Always refer to the user manual for safety guidelines.
Why Does My Multimeter Show Zero Volts?
Zero volts can occur if your connections are incorrect. Ensure probes are securely connected and the multimeter is set correctly. Check for power in the circuit being measured. Ensure the multimeter’s battery is charged. If issues persist, consult the user manual or seek professional help.
Conclusion
Reading volts on a multimeter is simple with practice. Start with setting the correct dial. Connect the probes securely. Red goes to positive, black to negative. Observe the reading carefully. Understand the displayed numbers. Safety is crucial, never ignore it.
Multimeters are handy tools for many tasks. Check batteries, test circuits, and more. With these steps, you gain confidence. It’s a skill worth learning. Troubleshoot easily at home. Save money and time. Keep practicing, and you’ll improve. Share your knowledge with others.
Help them understand multimeters too. Happy measuring!


