

Imagine this: you’re all set for a refreshing bike ride, the sun is shining, the road is calling, and then—your bike won’t start. We’ve all been there, and it’s frustrating.
But what if I told you that getting your bike back on track is simpler than you think? In this guide, you’ll discover the secrets to jump-starting your bike quickly and easily. No more missed rides or headaches. You’ll learn the step-by-step process, so you can conquer this common hurdle like a pro.
Ready to get back on the road? Let’s dive in and turn that stubborn engine into a purring powerhouse.
Preparation Steps
Jump-starting a bike requires careful preparation for safety and efficiency. Preparing well ensures a smooth jump-start process. It prevents damage to your bike and any potential harm to you.
Gather Necessary Tools
Before starting, ensure you have all the essential tools. You will need jumper cables for transferring power. A fully charged battery from another vehicle is crucial. Keep a pair of gloves handy to protect your hands. Having a clean cloth can help in wiping connections.
Safety Precautions
Safety should be your top priority during the jump-start. Ensure your bike is on a stable surface. This prevents accidental movement. Turn off the ignition before connecting cables. This helps avoid sparks. Check the battery for any leaks or damage. Leaking batteries can be dangerous. Wear gloves to protect against electric shock.
Keep tools and cables organized to avoid tripping. Ensure no flammable materials are nearby. This reduces the risk of fire. Always have a fire extinguisher within reach. Safety measures protect you and your bike.

Credit: www.youtube.com
Locating The Battery
Find the bike’s battery, usually under the seat or side panel. Check your manual for exact location. Battery access is crucial for jump-starting.
Locating the battery in your bike is crucial for a jump start. It might seem challenging, but with a little guidance, it becomes straightforward. Understanding the type and location of the battery can save time and effort. Let’s explore how to locate your bike’s battery.
Battery Types And Locations
Bikes use various battery types. Lead-acid and lithium-ion are common choices. Each type affects the battery’s placement. Lead-acid batteries are heavier. They are usually found in larger compartments. Lithium-ion batteries are lighter. They might be placed in smaller spaces. Knowing your bike’s battery type is the first step. Battery locations vary by bike model. Some batteries are under the seat. Others are located near the engine. Check your bike’s manual. It will guide you to the battery’s exact location.
Accessing The Battery Compartment
Accessing the battery compartment requires basic tools. A screwdriver is often needed. Begin by removing the seat or panel. This exposes the battery compartment. Be careful not to damage any wires. Once open, inspect the battery terminals. Ensure there is no corrosion. Corrosion can hinder the jump start process. Clean the terminals if necessary. Always disconnect the negative terminal first. It prevents electrical shocks. After accessing the battery, you can proceed with the jump start. Following these steps will make the process smoother.
Connecting Jumper Cables
Jump starting a bike involves connecting jumper cables correctly. First, attach one end to the dead battery’s positive terminal. Then, connect the other end to the donor battery’s positive terminal.
Jump-starting a bike may seem daunting, especially if you’re caught in a situation where you need to get moving quickly. But with a bit of know-how, you can connect jumper cables safely and efficiently. Whether you’re a seasoned rider or a newbie, understanding this process can save you a lot of hassle. Let’s dive into the essentials of connecting jumper cables to breathe life back into your bike’s battery.
Identifying Positive And Negative Terminals
Before you connect the jumper cables, it’s crucial to identify the positive and negative terminals on your bike’s battery. The positive terminal is usually marked with a plus sign (+) and is often red. This is the terminal that connects to the bike’s electrical system to give it power. The negative terminal, on the other hand, is marked with a minus sign (-) and is often black. This completes the circuit by grounding the electrical system. Knowing which is which might sound basic, but it’s essential for avoiding a costly mistake that could damage your battery or electrical system.
Proper Cable Attachment
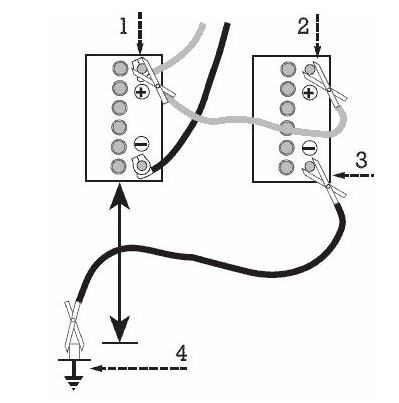
Once you’ve identified the terminals, it’s time to attach the cables properly. Start by connecting one end of the red jumper cable to the positive terminal of your bike’s battery. Next, connect the other end of the red cable to the positive terminal of the donor battery. Then, attach one end of the black jumper cable to the negative terminal of the donor battery. Connect the other end to a metal part of your bike. This could be an unpainted bolt or the engine block. Avoid connecting the black cable to the negative terminal of your bike’s battery directly. This reduces the risk of sparks and battery damage. Have you ever wondered what would happen if you connected them incorrectly? A misstep could lead to a dangerous spark or even fry your bike’s electronics. Following the right order not only ensures safety but also guarantees your bike gets the power it needs. By mastering these steps, you’re not only keeping your bike in top shape, but also cultivating a sense of independence and readiness for any road adventure.
Credit: www.randakksblog.com
Starting The Bike
Starting a bike can seem daunting for beginners. With the right steps, it becomes simple and quick. Ensuring your bike starts smoothly is crucial for a safe ride.
Turning On The Ignition
Begin by locating the ignition switch on your bike. This is usually near the handlebars. Turn the key to the ‘On’ position. You may hear a small click. This means the bike’s electrical system is activated. Ensure the battery is charged. A weak battery can prevent the bike from starting.
Checking For Engine Response
Press the start button or kickstart lever. Listen for the engine noise. Silence might indicate an issue with the starter motor. Check the fuel level and ensure the bike is in neutral. If the engine cranks but doesn’t start, there might be a fuel supply issue. Make sure the fuel valve is open. Inspect spark plugs for damage or dirt. Clean or replace them if needed.
Disconnecting Safely
Safely disconnecting cables after jump-starting a bike is crucial. Ensure the engine runs smoothly before removing cables. Always disconnect the negative cable first to prevent sparks or short circuits.
Jump-starting a bike can be an exciting yet challenging experience. Once your bike roars back to life, it’s crucial to disconnect safely to avoid any mishaps. This step ensures you, your bike, and any nearby vehicles remain unharmed. Remember, safety isn’t just about the moment; it’s about future rides too. Have you ever felt the rush of relief when your bike finally starts after a jump? I have, and the excitement almost made me forget about disconnecting the cables properly. Let’s delve into how to do this step right, so you don’t have a similar scare.
Removing Jumper Cables
First, turn off the engine of both bikes. This prevents electrical surges that might cause damage. Begin by removing the black (negative) cable from the bike that was jump-started. Next, disconnect the black cable from the donor bike. Proceed to remove the red (positive) cable, starting from the bike that was jump-started. Finally, disconnect the red cable from the donor bike. Ensure the cables do not touch each other during this process. A spark can ruin your day.
Post-jump Inspection
Inspect the battery terminals for any signs of corrosion or damage. Check that all cables and connections are secure and in good condition. Take a moment to start your bike again. This ensures everything is functioning as it should be. Have you ever skipped a post-jump inspection? I did once and ended up stranded a few miles down the road. A quick check would have saved me the hassle. Isn’t it better to spend a few minutes ensuring everything is right than to face troubles later? Your bike deserves that extra attention.
Troubleshooting Common Issues
When your bike refuses to roar to life, it can be frustrating. You may feel stranded, especially if you are far from home or deep in the countryside. Whether your battery won’t charge or your engine fails to start, understanding these common issues can save you time and effort. Let’s dive into practical solutions that will help you get back on the road.
Battery Won’t Charge
Is your battery as stubborn as a mule? You’re not alone. Many riders face this issue, especially with older bikes. First, check the battery connections. Loose or corroded terminals can prevent charging. Tighten any loose connections and clean off corrosion with a mix of baking soda and water.
Next, consider the age of your battery. If it’s over three years old, it might be time for a replacement. Batteries lose their efficiency over time. A new battery can make a world of difference. If the battery still doesn’t charge, inspect the charging system. A faulty alternator could be the culprit.
Ever been caught off guard by a seemingly charged battery that dies quickly? Check for parasitic drains. Accessories left on can silently drain your battery. Disconnect any additional gadgets when your bike is parked. Does your battery continue to fail despite your efforts? It may be worth investing in a smart charger.
Engine Fails To Start
You’ve hit the starter button, and nothing happens. It’s a scenario every biker dreads. Start by checking your fuel supply. An empty or clogged fuel tank can stop your bike from starting. Ensure the fuel valve is open and the tank has gas. A quick visual check can save lots of headaches.
Are you hearing a click but no engine roar? This might indicate a starter issue. Sometimes, tapping gently on the starter motor can get it going temporarily. Just enough to get you to a repair shop. If tapping doesn’t work, examine the starter relay. A faulty relay can prevent the engine from starting.
Finally, consider the spark plugs. Dirty or worn-out spark plugs can impede ignition. Remove them and check their condition. Cleaning or replacing them might be the solution. Have you ever thought about why your engine starts perfectly one day but not the next? Temperature and humidity can affect engine performance. Keep this in mind if you’re riding in varying climates.
Have you encountered these issues on your bike? Share your experiences and solutions in the comments. Your insights could help a fellow rider!
Maintenance Tips
Keeping your bike in top shape ensures smooth rides and long-lasting performance. Regular maintenance helps prevent unexpected breakdowns and keeps your bike ready for action. Let’s explore essential tips to maintain your bike’s battery and storage.
Regular Battery Checks
Check your bike’s battery monthly. Look for corrosion or loose connections. Clean terminals with a mixture of baking soda and water. Use a brush for stubborn grime. Ensure the battery is securely mounted. This prevents vibrations that might loosen connections. Test the battery voltage with a multimeter. Aim for a reading between 12.6 to 12.8 volts for a healthy battery.
Proper Storage Techniques
Store your bike in a cool, dry place. Avoid direct sunlight or damp areas. Use a cover to protect it from dust. Elevate the bike slightly if storing for long periods. This prevents tire deformation. Disconnect the battery if the bike won’t be used for weeks. Charge the battery every few weeks to maintain its health.

Credit: www.youtube.com
Frequently Asked Questions
How To Start A Bike With A Dead Battery?
Push-start your bike by shifting to second gear, holding the clutch, and running it forward. Release the clutch quickly while running to jump-start the engine. Ensure the bike is on a flat surface for safety. This manual start method works well for bikes with dead batteries.
Is It Possible To Jump Start A Bike?
Yes, you can jump start a bike using jumper cables. Connect the cables to a car battery or another bike. Ensure the voltages match and follow safety precautions to avoid damage. This method provides a quick solution for starting a dead motorcycle battery.
How To Jump Start A Bike Without Cables?
Push the bike to gain speed, then quickly release the clutch in second gear. Ensure the ignition is on. This method is called bump starting and works best on flat surfaces. Adjust the throttle gently as the engine catches. Practice for smoother execution.
How To Jumpstart A Bike With A Car?
To jumpstart a bike with a car, turn off both vehicles. Connect the red clamp to the bike’s positive battery terminal, then the car’s positive. Attach the black clamp to the car’s negative terminal, and the other black clamp to an unpainted metal surface on the bike.
Start the car, then the bike.
Conclusion
Jump starting a bike is simple and quick with practice. Keep your tools ready. Follow the steps carefully. Safety is crucial. Ensure the bike is off before connecting cables. Double-check connections to avoid sparks. Charge the battery properly. Test the bike before heading out.
Regular maintenance prevents future issues. By learning these steps, you’ll gain confidence. Your bike will stay reliable. Enjoy smooth rides and worry less. Practice often to get faster. Share your tips with friends. Stay safe on the road.


