
Your car’s electrical system is a complex network that relies heavily on fuses for protection. When something goes wrong, checking these fuses can be a quick way to diagnose the problem.
But how can you accurately check them? That’s where a multimeter comes in. This tool is your best friend when it comes to ensuring your fuses are in good shape and functioning properly. Imagine yourself confidently troubleshooting electrical issues, saving time and money without the need for a mechanic.
Sounds appealing, right? By learning how to use a multimeter to check car fuses, you empower yourself to tackle small issues before they become major problems. This guide will walk you through the process step-by-step, simplifying each action so you can feel at ease and in control. Stay with us as we unveil the secrets to mastering this essential skill. Your car’s health—and your peace of mind—depend on it.

Credit: kaiweets.com
Essential Tools For Fuse Testing
Checking fuses in your car is essential for maintaining electrical systems. A multimeter is the primary tool for this task. It helps you identify faulty fuses efficiently. This guide will cover the necessary tools for fuse testing.
Choosing The Right Multimeter
Not all multimeters are suitable for fuse testing. Choose a multimeter with a continuity test feature. It should have clear display readings. Ensure it can measure resistance accurately. Look for one with a durable design. Easy-to-use controls are a must. This makes the testing process smoother.
Safety Gear And Precautions
Safety is crucial when testing fuses. Wear gloves to protect your hands. Use goggles to shield your eyes. Avoid wearing loose clothing. Keep hair tied back. Ensure the car is off before testing. Check the multimeter’s condition regularly. This prevents any accidental shocks.
Locating The Fuse Box
Find the fuse box by checking the car manual or looking near the dashboard. Use a multimeter to test each fuse for continuity. This ensures all electrical components work efficiently.
Locating the fuse box in your car is the first step to checking fuses with a multimeter. This can seem like a small task, but knowing exactly where to look can save you time and frustration. Picture this: you’re in a hurry, your car’s electrical system has an issue, and you have no idea where the fuse box is. It’s a scenario you want to avoid.
Common Fuse Box Locations
Most cars have their fuse boxes in easily accessible spots. Under the Dashboard is a popular location, often on the driver’s side. Just take a quick peek beneath the steering wheel. Another common place is under the hood. Typically, you’ll find a black box marked with “Fuses” or “Fuse Box” near the battery. Don’t forget to check the trunk area, especially in larger vehicles like SUVs or trucks.
Consulting The Vehicle Manual
Your car’s manual is an underrated resource. It’s packed with information, including the location of the fuse box. Check the index for “Fuse Box” and you’ll find detailed directions. If you’ve misplaced your manual, don’t worry. Many manufacturers provide digital versions online. Keep in mind, having this guide handy can make your search much more efficient. Have you ever found yourself searching for something that seemed elusive? Locating your car’s fuse box doesn’t have to be one of those moments. With a bit of preparation, you’ll be ready to tackle any electrical issues with confidence.
Identifying The Fuse Types
Identifying the right type of fuse is essential. It ensures safety and proper functionality. Different cars use different types of fuses. Knowing these types helps in checking and replacing them efficiently. Let’s explore the common fuse types found in cars.
Standard Blade Fuses
Standard blade fuses are the most common. They are rectangular with two prongs. The plastic housing is often colored. This indicates the fuse rating. These fuses fit easily into fuse boxes. Their design makes them easy to replace.
Mini And Micro Blade Fuses
Mini and micro blade fuses are smaller than standard. They are used in compact spaces. These fuses have a similar design to standard blades. But they are more compact. Color-coded housings help identify their rating. They are vital in modern, smaller vehicles.
Cartridge And Glass Fuses
Cartridge and glass fuses are cylindrical. They are less common in modern cars. Cartridge fuses have a plastic body. Glass fuses have a glass tube. Both types have metal caps at each end. They are found in older vehicles. Identifying them is crucial for proper replacement.
Steps To Test Fuses With A Multimeter
Start by turning off the car. Next, set the multimeter to measure resistance or continuity. Test fuses by placing probes on each end of the fuse. A reading close to zero indicates a working fuse.
Checking fuses in your car with a multimeter ensures electrical safety. It helps identify faulty fuses quickly. This section will guide you through simple steps. Testing fuses with a multimeter is straightforward. Follow these steps to ensure accuracy.
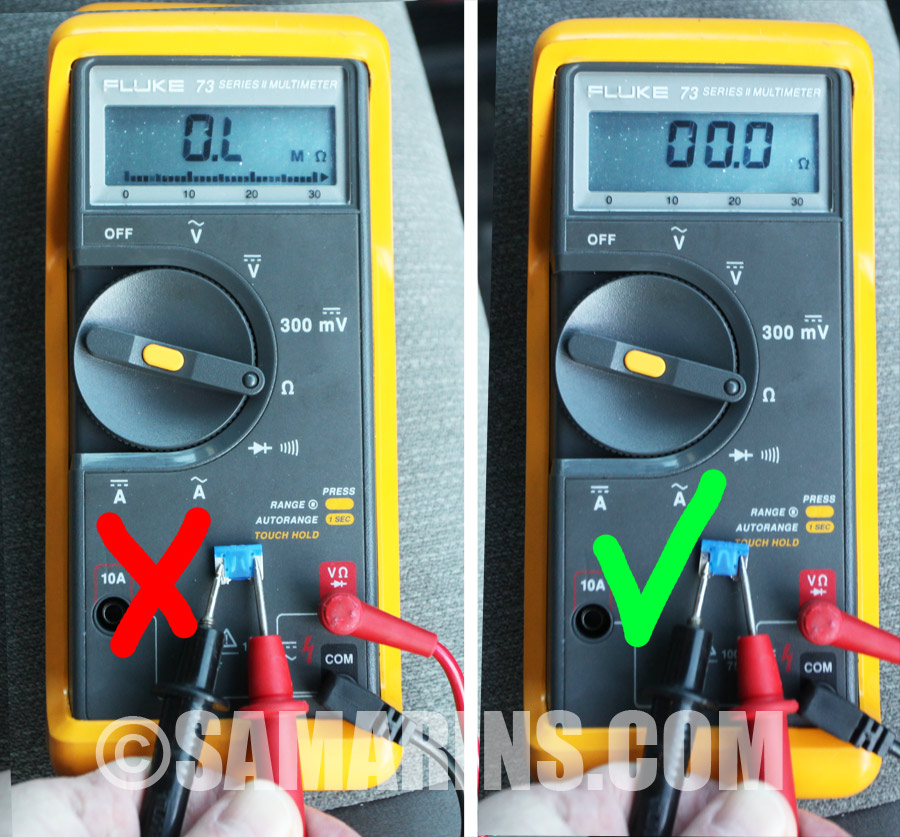
Setting Up The Multimeter
First, set your multimeter to measure resistance. Locate the dial and turn it to the ohm symbol. This symbol looks like a horseshoe. Make sure the multimeter is in a working condition. Check the battery and replace it if needed. Connect the black lead to the common port. Connect the red lead to the ohms port. This setup prepares the multimeter for testing.
Testing For Continuity
Next, remove the fuse from its slot. Hold the fuse carefully to prevent damage. Use the multimeter leads to touch both ends of the fuse. A good fuse will show a reading. A broken fuse shows no reading. This step checks if the fuse allows electricity to pass through. Ensure good contact between the leads and the fuse ends.
Interpreting Multimeter Readings
Reading the multimeter is simple. A good fuse shows low resistance. This means the fuse is intact. A broken fuse shows no reading or high resistance. Replace any fuse with no reading immediately. It ensures your car’s electrical systems work properly. Understanding these readings will help maintain your car’s safety. Regular checks prevent electrical issues and ensure smooth operation.
Troubleshooting Common Issues
When your car’s electrical system acts up, checking fuses is a smart first step. A multimeter simplifies this task, pinpointing issues swiftly. But what happens when your readings seem off or a fuse needs replacing? Understanding these common troubleshooting problems can save you time and frustration.
Dealing With Faulty Readings
Have you ever seen erratic readings on your multimeter? It’s frustrating, right? First, ensure the multimeter is correctly set to measure resistance or continuity. A common mistake is using the wrong setting, leading to misleading results.
If your multimeter shows inconsistent readings, check the battery. A weak battery can distort readings. Also, inspect the multimeter’s leads and connections—they should be secure and free from damage.
Are you still facing issues? Clean the fuse contacts gently. Dirt can hinder accurate readings. A little maintenance might be all you need to resolve this.
Replacing Blown Fuses
Identifying a blown fuse is straightforward with a multimeter. But what do you do next? Make sure you have the correct replacement fuse on hand, matching the original fuse’s amperage and type.
Don’t rush the process. Carefully remove the blown fuse using a fuse puller or tweezers. Avoid using your fingers—they can damage the fuse or surrounding components.
Once removed, insert the new fuse securely. A loose connection can cause further electrical issues. Re-test with your multimeter to ensure everything is functioning correctly.
Do you find yourself replacing fuses frequently? This could indicate a larger electrical issue. Consider seeking professional advice to prevent recurring problems.
Checking fuses with a multimeter can seem daunting at first, but with these troubleshooting tips, you’re ready to tackle common issues. Have you tried these techniques before? Share your experiences in the comments and let others benefit from your insights.
Credit: www.samarins.com
Maintenance And Safety Tips
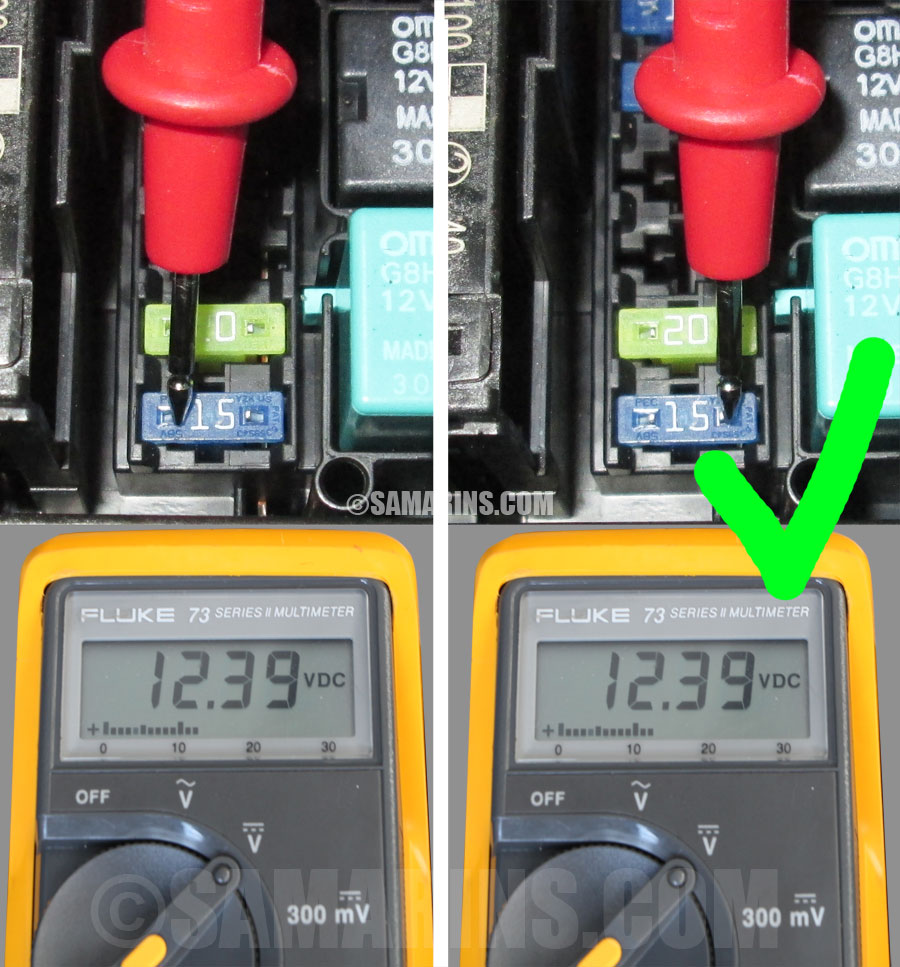
Checking fuses in a car with a multimeter ensures safety and prevents electrical issues. Start by setting the multimeter to the correct range. Then, test each fuse by touching the multimeter probes to the fuse terminals. A reading indicates a working fuse; no reading means it’s blown.
When it comes to maintaining your car, checking the fuses with a multimeter is a crucial step. Regular maintenance not only ensures your car runs smoothly but also prevents unexpected breakdowns. Safety should always be your top priority, especially when dealing with electrical components. Let’s dive into some essential maintenance and safety tips that will keep your vehicle in tip-top shape.
Regular Fuse Inspection
Inspecting your car fuses regularly can save you from potential headaches. A blown fuse can leave you stranded on the side of the road. Make it a habit to check them every few months or whenever you experience electrical issues. Imagine planning a road trip only to find out your car’s fuse for the headlights is blown. A quick inspection could prevent that scenario. Keep a multimeter in your glove box and be ready to test any suspicious fuse.
Ensuring Proper Fuse Ratings
Using the correct fuse rating is vital for your car’s safety. An incorrect fuse can lead to electrical fires or damage to the vehicle’s electrical system. Always refer to your car’s manual for the recommended fuse ratings. Consider this: you replace a blown 10-amp fuse with a 20-amp one because it’s the only one you have. This might seem like a quick fix, but it risks overheating the circuit. Ensure you have a variety of spare fuses with the right ratings on hand. Do you remember the last time you checked your car’s fuses? Taking a few minutes now can spare you from hours of frustration later. With these tips in mind, you’re better prepared to handle any fuse-related challenges. Stay proactive, and drive with peace of mind!

Credit: www.youtube.com
Frequently Asked Questions
How Do I Identify Car Fuse Problems?
To identify car fuse problems, first check for visible signs like a broken filament. Use a multimeter to test continuity. Set the multimeter to the continuity setting. Place the probes on each end of the fuse. A beep or reading indicates the fuse is good.
Can A Multimeter Test A Car Fuse?
Yes, a multimeter can test a car fuse. Set the multimeter to the continuity or resistance setting. Touch the probes to both ends of the fuse. A beep or low resistance reading indicates the fuse is functional. No beep or high resistance suggests the fuse is blown.
What Setting On Multimeter For Car Fuses?
For car fuses, use the continuity setting on the multimeter. Alternatively, you can use the ohm setting to measure resistance. A reading of zero ohms indicates a good fuse. A higher resistance or no reading suggests a blown fuse. Always ensure the multimeter is correctly calibrated.
How To Safely Remove A Car Fuse?
To safely remove a car fuse, first turn off the car’s engine. Locate the fuse box and identify the fuse needing removal. Use a fuse puller or needle-nose pliers to gently pull the fuse out. Ensure you’re not touching any metal parts to avoid short circuits or injury.
Conclusion
Checking car fuses with a multimeter is simple and effective. First, ensure safety by turning off the car. Next, set your multimeter to the correct setting. Check each fuse carefully. A working fuse shows a low reading or zero resistance.
A broken fuse shows no reading or high resistance. Replace any bad fuses immediately. Regular checks keep your car in good condition. Always consult your car’s manual for specific instructions. Practice makes the process smoother. With these steps, you can handle fuses confidently.
Keep your car running smoothly and safely.


