
Are you ready to tackle your next DIY project but find yourself stuck at the first hurdle? Changing the blade on your circular saw might seem intimidating, but with the right guidance, it can be a breeze.
Imagine effortlessly slicing through wood, knowing you’ve mastered your tool. This guide is designed just for you—whether you’re a seasoned handyman or a weekend warrior looking to boost your skills. You’ll discover simple steps to change your circular saw blade safely and efficiently, ensuring your projects run smoothly.
Don’t let a dull blade slow you down. Dive in and empower yourself with the know-how to keep your saw, and your projects, sharp and precise.

Credit: www.youtube.com
Safety Precautions
Changing a circular saw blade can be risky. Safety is essential. This guide highlights safety precautions. Follow these steps for a safe experience.
Wear Protective Gear
Always wear safety goggles. Protect your eyes from flying debris. Use gloves to prevent cuts. They offer a better grip on tools. Wearing ear protection is wise. Circular saws are loud. Protect your hearing from damage.
Disconnect Power Source
Ensure the saw is off. This prevents accidental start-up. Disconnect it from the power source. Unplug the cord if electric. Remove the battery if cordless. Double-check the saw is inactive. Safety is crucial before handling blades.
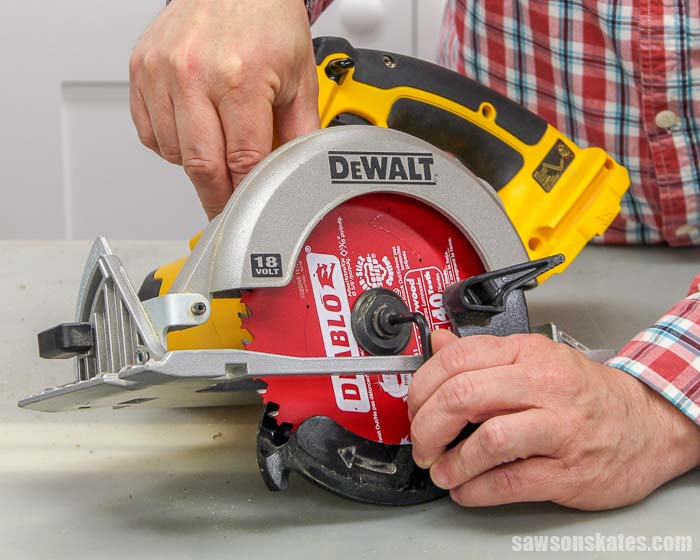
Credit: sawsonskates.com
Gather Necessary Tools
Ensure you have all the necessary tools before changing a circular saw blade. Gather a wrench, new blade, and gloves. Proper preparation makes the process smooth and safe.
Before you start changing the circular saw blade, ensuring you have the right tools at hand is crucial. Gathering necessary tools might seem like a mundane task, but it’s the foundation for a smooth and efficient blade change. Imagine being halfway through the process only to realize you’re missing a vital tool. It could lead to frustration, wasted time, and possibly damage to your saw. So, let’s dive into what you need to get started on the right foot.
Required Tools List
First, let’s outline the essential tools you’ll need. A wrench or a screwdriver is crucial for loosening the bolt that holds the blade in place. Sometimes a specific blade wrench comes with your saw; use it if available. You’ll also need a pair of gloves to protect your hands from sharp edges. Safety should always be your priority. Ensure you have a stable work surface. This could be a workbench or a sturdy table where your saw won’t wobble. A flashlight might be handy if you’re working in a poorly lit area. It helps you see the details more clearly.
Optional Accessories
While not mandatory, having a few extra accessories can make the blade change smoother. A magnetic tray can keep screws and bolts from getting lost, especially if you’re prone to dropping small parts. A blade protector can be beneficial for keeping the new blade safe when you’re not using it. This is particularly useful if you’re changing blades often. Consider a cleaning brush or cloth for removing dust and debris from the saw housing. This keeps everything clean and ready for the new blade. What’s your go-to tool that saves you time during a blade change? Share your insights below! Sometimes, it’s the unexpected tips from fellow DIY enthusiasts that make the biggest difference.
Remove The Old Blade
To change a circular saw blade, first unplug the saw for safety. Loosen the arbor nut using a wrench, then remove the old blade carefully. Ensure no debris remains before installing the new blade securely.
Changing a circular saw blade might seem daunting, but it’s a straightforward task that can save you time and ensure your cuts remain clean. The first step in this process is to remove the old blade. Whether you’re updating to a sharper blade or switching to a different type, removing the old blade is essential. With a few easy steps, you’ll be ready to move on to the next part of the process. Let’s dive into how to safely and efficiently remove that old blade.
Engage The Blade Lock
Engaging the blade lock is crucial for your safety. Locate the blade lock button on your saw—it’s typically near the blade guard. Press it to keep the blade from spinning while you work. Have you ever struggled with a spinning blade while trying to loosen the nut? Engaging the blade lock prevents this hassle, making the process smoother.
Loosen The Arbor Nut
Grab a wrench and position it on the arbor nut. The nut holds the blade in place, and you’ll need to turn it counterclockwise to loosen it. If you find it stubborn, don’t worry. A firm grip and steady pressure usually do the trick. Remember, patience is your ally here.
Slide Off The Old Blade
Once the arbor nut is loose, you can slide the old blade off easily. Hold the blade firmly and gently pull it away from the saw. Have you noticed how some blades seem stuck? Often, a gentle wiggle will free them. Always keep your fingers clear of sharp edges. Removing the old blade not only prepares your saw for a new blade but also gives you a chance to inspect the saw for any wear or damage. How often do you take the time to check your tools? This small step can prevent future issues and keep your saw running smoothly.
Install The New Blade
Installing a new blade on your circular saw doesn’t have to be a daunting task. With a little guidance, you’ll find it’s a simple process that can be done in a matter of minutes. Whether you’re a seasoned DIY enthusiast or someone stepping into the world of home improvement for the first time, replacing the blade not only enhances performance but also ensures safety. Let’s explore the steps to install the new blade with precision and confidence.
Position The New Blade
Begin by carefully placing the new blade onto the arbor. Hold the blade firmly and make sure the teeth face in the correct direction for cutting. It’s a good idea to check the manufacturer’s guide or the arrow markings on the blade itself.
Did you know using the wrong direction can lead to inefficient cuts and even damage the blade? Double-checking could save you time and money. You wouldn’t want to waste a perfectly good blade due to a simple oversight.
Tighten The Arbor Nut
With the blade securely positioned, it’s time to tighten the arbor nut. Use the wrench that came with your saw, or a suitable tool, to fasten the nut. Ensure it’s snug but don’t over-tighten; doing so could strip the threads or make future removal difficult.
Imagine the frustration of trying to remove a stubborn nut during your next blade change! A firm grip is key, but moderation in tightening ensures you won’t face this hassle later.
Ensure Proper Alignment
Finally, check the alignment of the blade. Spin it manually to ensure there’s no wobble. A misaligned blade can cause uneven cuts and even pose a safety risk. Take a moment to adjust if necessary, ensuring everything runs smoothly.
Have you ever experienced a cut that didn’t quite match your expectations? Proper alignment could be the missing link in achieving that perfect finish. A small adjustment now can mean flawless results later.
Changing a circular saw blade doesn’t just require technical skill; it demands attention to detail. Are you ready to tackle your next project with renewed confidence? Proper installation opens the door to precision and safety in your woodworking adventures.
Test The Installation
After changing the circular saw blade, testing the installation is crucial. Ensuring the blade works correctly prevents accidents and ensures clean cuts. Follow these steps to test the installation effectively.
Check Blade Stability
Ensure the blade is tightly secured. Wiggle the blade slightly to confirm stability. A loose blade can cause damage or injuries. Tighten the arbor nut if the blade moves.
Reconnect Power
Reattach the power source to the saw. This step is necessary to perform a test cut. Double-check that the saw is plugged in properly. Safety first, so keep fingers away from the blade.
Perform A Test Cut
Use a piece of scrap wood for the test cut. Start the saw and gently guide it through the wood. Check the cut for smoothness and accuracy. Listen for unusual sounds indicating improper installation.
Maintenance Tips
Maintaining your circular saw is crucial for efficient performance. Regular maintenance ensures your tool works smoothly and safely. Simple steps can extend the life of your saw blade.
Regular Blade Checks
Check your blade before each use. Look for chips or dull teeth. A damaged blade can slow your work and increase risk. Regular checks catch problems early. Replace a dull blade to keep cuts clean and accurate.
Proper Storage
Store your circular saw in a dry place. Moisture can cause rust on the blade. Use a blade case for added protection. Keep your saw and blades away from children. Proper storage extends the life of your tool.

Credit: thegardenfrog.wordpress.com
Frequently Asked Questions
Which Way To Loosen A Nut On A Circular Saw?
Turn the nut counterclockwise to loosen it on a circular saw. Use a wrench for better grip. Ensure the saw is unplugged for safety. Secure the blade firmly before attempting to loosen the nut.
Is A Circular Saw Blade Bolt Reverse Thread?
No, a circular saw blade bolt is not reverse thread. Most are standard right-hand threads, which tighten clockwise. Always check your saw’s manual for confirmation. Proper installation is crucial for safety and performance. Ensure you follow manufacturer instructions when replacing or adjusting the blade.
Where Is The Arbor Lock On A Circular Saw?
The arbor lock on a circular saw is typically located near the blade housing. Look for a button or lever on the side of the saw’s motor or body. This feature holds the blade in place, making blade changes easier and safer.
Always ensure the saw is unplugged before using the arbor lock.
What Should You Do Before Changing The Blade On A Circular Saw?
Unplug the saw to ensure safety. Engage the blade lock for stability. Use a wrench to loosen the bolt. Remove the old blade carefully. Install the new blade securely and tighten the bolt.
Conclusion
Changing a circular saw blade is simple with the right steps. Follow safety tips to protect yourself. Gather the necessary tools. Remove the old blade carefully. Install the new blade securely. Test your saw after changing the blade. These steps ensure a smooth and safe blade change.
Regular blade checks improve cutting performance. A well-maintained saw lasts longer. Now, you’re ready for your next project. Enjoy efficient and precise cuts. Keep your workspace tidy. Always wear protective gear. Happy woodworking!


