
Have you ever wondered how a multimeter measures resistance? Imagine you’re trying to fix a gadget at home or working on a DIY project.
You reach for your trusty multimeter, but you pause, curious about how this small device actually gauges resistance. Understanding this process can empower you to troubleshoot effectively and make informed decisions. You’ll uncover the fascinating mechanics behind how your multimeter functions, shedding light on its practical uses and capabilities.
Whether you’re a hobbyist or just curious, this insight might transform your approach to electronics, making each task a little easier and more efficient. Dive in, and let’s unravel the mystery together!
Basics Of Resistance
Resistance is a fundamental concept in electronics. It opposes the flow of current in a circuit. Measured in ohms, resistance determines how much energy is needed for current to flow. A multimeter measures resistance by sending a small current through a component. It calculates how much the component resists this current. Knowing resistance helps in designing circuits and troubleshooting faults.
Understanding Ohm’s Law
Ohm’s Law is crucial in understanding resistance. It states that voltage equals current times resistance. This relationship helps predict how circuits behave. If you increase resistance, the current decreases. Lower resistance means higher current flow. Ohm’s Law helps in calculating the right resistor for a circuit.
Role Of Resistance In Circuits
Resistance plays a key role in circuit design. It limits current flow to prevent damage to components. Different components have varying resistances. Resistors are used to control these differences. They ensure the circuit operates safely. Resistance also affects energy consumption. High resistance means more energy is needed for current flow. Understanding resistance helps in energy-efficient designs.
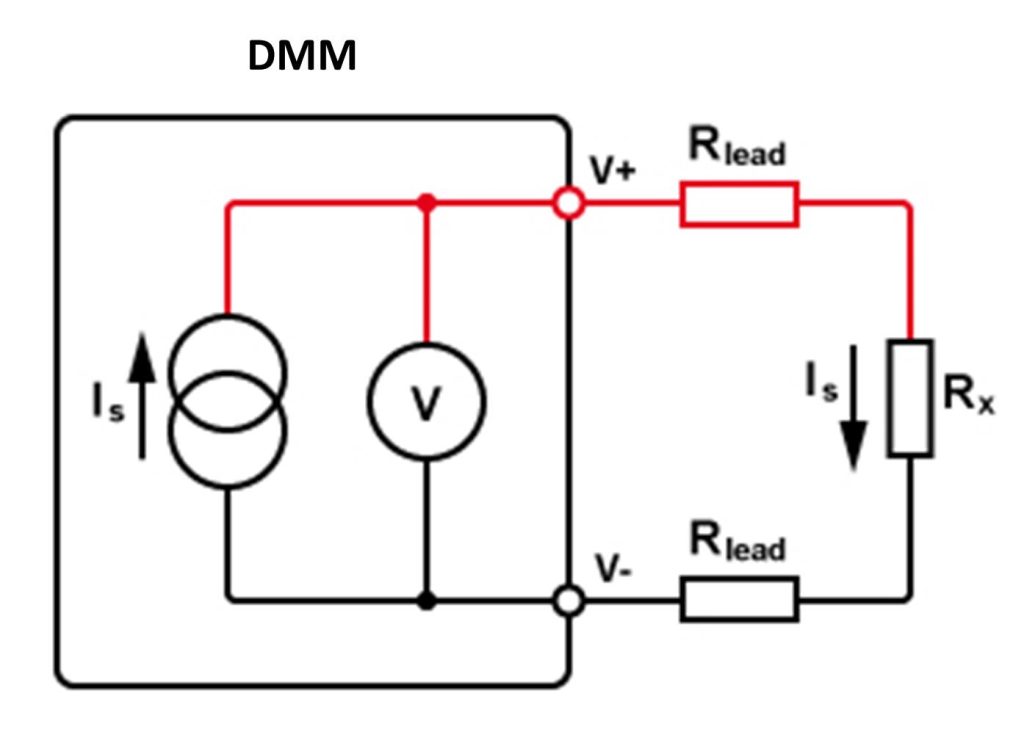
Multimeter Components
Multimeters measure resistance by sending a small current through a resistor and then evaluating the voltage drop. The device calculates resistance using Ohm’s Law, which relates voltage, current, and resistance. This process helps identify electrical issues and ensures circuits operate correctly.
Understanding the components of a multimeter can make it less intimidating and more useful. Ever wonder what makes this tool tick? By breaking down its parts, you can gain confidence in using it to measure resistance, among other things. Let’s dive into the different components and see how each plays a crucial role in its function.
Display And Controls
The display is the face of the multimeter. It shows you the readings clearly, whether you’re measuring resistance, voltage, or current. Digital displays are more common and easier to read than analog ones. Controls are your gateway to navigating the multimeter. They usually consist of a rotary dial and buttons. The dial lets you select the measurement type and range, while buttons can offer additional features like holding a reading. Using a multimeter for the first time can feel like learning to drive a car. It’s all about getting familiar with the controls. Once you know what each button and switch does, you can focus on getting accurate readings.
Probes And Ports
Probes are like the arms of the multimeter. They reach out to connect with the circuit or component you want to measure. Typically, there are two probes: a red one for positive and a black one for negative connections. The ports, often found at the bottom of the multimeter, are where you plug in the probes. Commonly, you’ll find three ports: COM (common), VΩmA (voltage, resistance, and milliamp), and 10A for higher current measurements. Choosing the right port is like picking the right tool for a job. If you plug the probe into the wrong port, your readings might be off. Always double-check your connections before taking a measurement. Have you ever found yourself puzzled by which port to use? Trust me, even seasoned users occasionally second-guess themselves. But with practice, you’ll quickly recognize which probe goes where. By understanding these components, you unlock the full potential of your multimeter. So, next time you pick up this tool, remember what each part is meant for. What will you measure today?
Setting Up The Multimeter
Setting up a multimeter is essential for accurate resistance measurements. It requires care and attention. This device needs correct configuration to ensure precise readings. Knowing how to set it up correctly can prevent errors.
Selecting The Resistance Mode
Selecting the resistance mode is the first step. Turn the dial to the resistance symbol, usually an “Ω”. This tells the multimeter you want to measure resistance. It’s a straightforward process that guides the device’s function.
Adjusting The Range Settings
Adjusting the range settings is crucial. If unsure of the resistance value, start with the highest range. Gradually reduce it for more precise readings. This helps in getting the exact resistance value without overloading the device.
Credit: www.sciencebuddies.org
Measuring Resistance
Measuring resistance with a multimeter might seem daunting at first, but it’s quite straightforward once you get the hang of it. Resistance, in simple terms, is the measure of how much a component resists the flow of electricity. If you’ve ever wondered why your flashlight doesn’t work despite a new battery, understanding resistance might just solve the mystery. With a multimeter, you can quickly check if a component in your circuit is holding back electricity more than it should. Let’s dive into how you can measure resistance effectively.
Connecting Probes To The Circuit
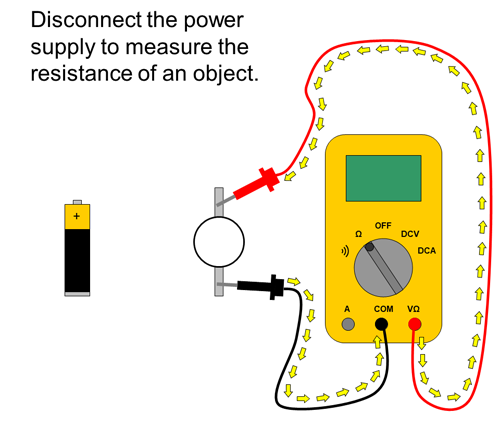
Before you start measuring resistance, ensure your multimeter is set to the resistance setting, usually marked with the Greek letter Omega (Ω). This setting is crucial, as it ensures your multimeter is ready to measure resistance accurately.
To measure resistance, you need to connect the multimeter probes to the component or section of the circuit you want to test. The black probe typically goes into the COM port, while the red probe goes into the port marked with the Ω symbol.
Imagine you’re checking the resistance of a resistor. Connect one probe to each end of the resistor. This allows the multimeter to measure how much the resistor is impeding the electrical current. But remember, the circuit must be powered off to get accurate readings.
Interpreting The Readings
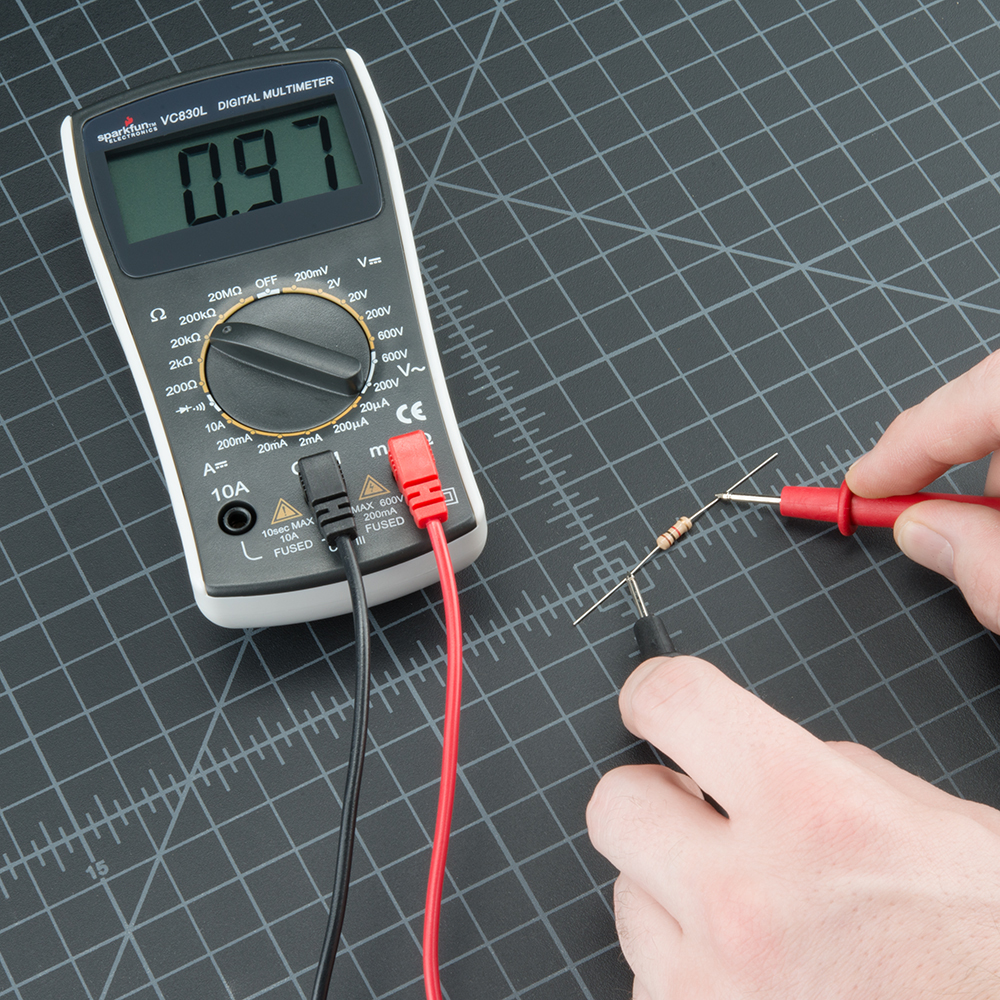
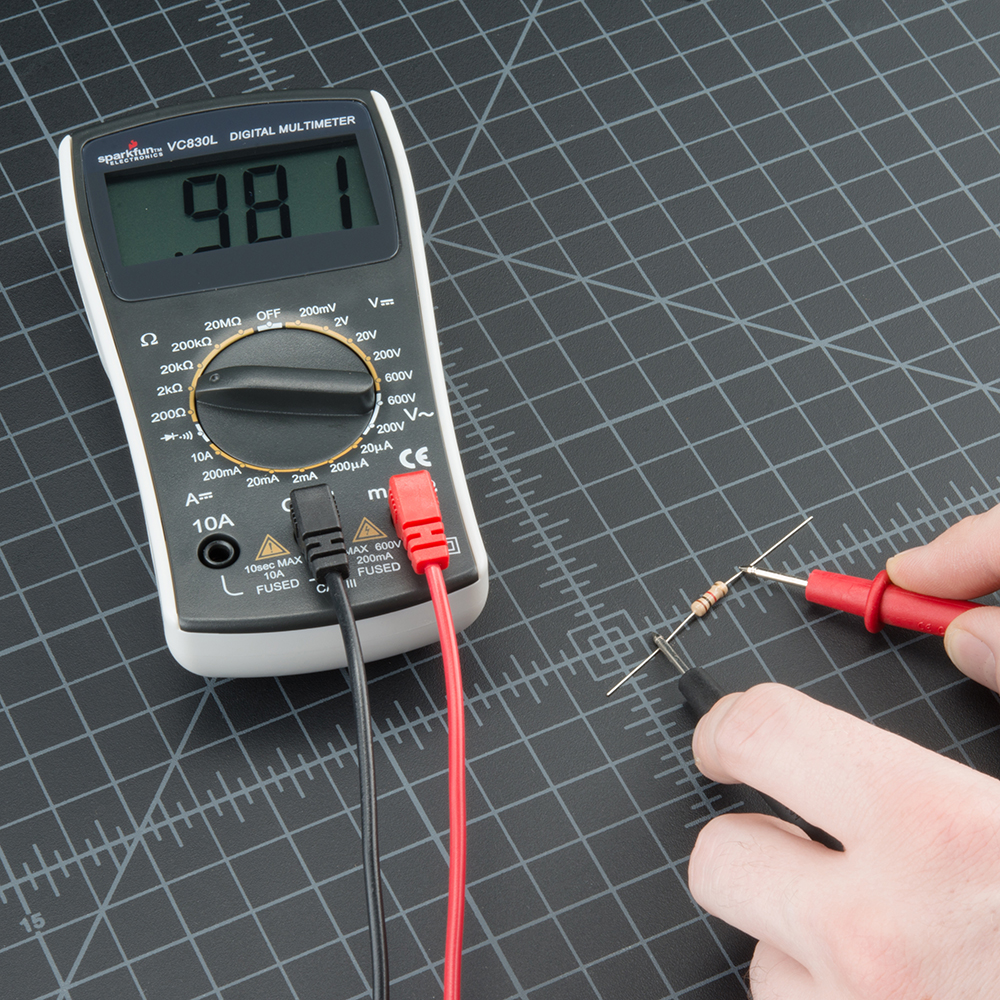
Once the probes are connected, look at the multimeter display. It will show you the resistance value in Ohms (Ω). A low reading indicates low resistance, while a high reading signifies high resistance.
Let’s say your multimeter displays a reading of 10Ω when measuring a resistor. That’s a relatively low resistance, meaning the resistor allows more current to pass through. But if you see a reading of 1kΩ or 1,000Ω, the resistor is doing a great job at resisting the electrical flow.
Have you ever checked a light bulb’s resistance? A high reading might suggest the bulb’s filament is broken, leading to a non-functional bulb. Interpreting these readings helps you troubleshoot and ensures your electrical devices work efficiently.
As you measure resistance, think about the component’s role in your circuit. Is it supposed to resist electricity, or is a high resistance a sign of trouble? Next time you’re puzzled by an electrical problem, grab your multimeter and start measuring. Who knows, you might just find the issue hiding in plain sight!
Factors Affecting Resistance Measurements
Measuring resistance with a multimeter seems straightforward, but did you know several factors can influence these readings? Whether you’re a DIY enthusiast or a seasoned electrician, understanding these factors can improve the accuracy of your measurements. From the surrounding temperature to the quality of contact between the multimeter probes and the component, each aspect plays a crucial role in getting precise results.
Temperature Influences
Temperature can significantly impact resistance measurements. Have you ever noticed how metals expand when heated? This expansion alters their resistive properties. For instance, if you’re measuring the resistance of a metal wire in a warm environment, expect the resistance to be slightly higher than when measured in cooler conditions.
Why does this happen? Because the atoms in the metal vibrate more at higher temperatures, making it harder for electrons to pass through. So, next time you take a resistance reading, consider the ambient temperature. Is your multimeter in a hot garage or a cold basement? This could be the reason your readings fluctuate.
Contact Quality
Imagine trying to measure resistance with rusty or dirty probes. The contact quality between your multimeter probes and the component is crucial. Poor contact can lead to inaccurate readings, leaving you puzzled. Ensure the probes are clean and securely attached to the test points.
What can you do to improve contact quality? Regularly clean your probes with alcohol or a specialized cleaner. Press firmly but gently to ensure good contact. Have you ever tried measuring resistance with shaky hands? Stabilize your hands or the component to avoid inconsistent readings.
Now, think about the times you’ve got unexpected readings. Did you check the contact quality or the temperature? These small adjustments can make a big difference in your multimeter experience. How will you adapt your approach next time you measure resistance?
Credit: learn.sparkfun.com
Troubleshooting Common Issues
Using a multimeter to measure resistance involves setting the device to the resistance mode. Connect the probes to the component, and the multimeter displays the resistance value. Ensuring proper connection and settings helps avoid inaccurate readings.
Troubleshooting common issues with your multimeter can feel like a daunting task. But it doesn’t have to be. With a clear understanding of how to handle inaccuracies and identify faulty components, you can enhance your troubleshooting skills and get reliable readings.
Dealing With Inaccurate Readings
Have you ever wondered why your multimeter shows unexpected numbers? This is a common issue and can stem from several causes. First, ensure your multimeter’s batteries are fresh. Weak batteries can lead to erratic readings. Replace them regularly to maintain accuracy. Next, check the test leads for damage. Frayed wires or loose connections can skew results. Regularly inspect and replace them if necessary. Is your multimeter properly calibrated? Manufacturers usually recommend periodic calibration to ensure precision. Follow their guidelines to keep your device in top shape. Lastly, ensure you’ve selected the correct measurement setting. It sounds simple, but selecting the wrong setting can lead to confusion and inaccurate results.
Identifying Faulty Components
Sometimes, the issue isn’t with your multimeter but with the component you’re testing. A faulty resistor, for example, can throw off your entire reading. Start by checking the component visually for any signs of damage. Burnt marks or physical deformities are tell-tale signs of issues. Use the continuity setting on your multimeter to test components like resistors or capacitors. A continuous beep indicates a good connection, while silence suggests a fault. Are you testing in a circuit? Ensure the circuit is powered off to avoid any misleading readings. Live circuits can impact the accuracy of your results. Have you ever found yourself frustrated by repeated errors? It’s crucial to approach each problem methodically. This way, you can isolate the issue and address it effectively. By understanding these common issues, you can troubleshoot with confidence. What’s the most unexpected challenge you’ve faced while using a multimeter? Share your experiences and tips in the comments below!
Safety Precautions
Understanding safety precautions is crucial when using a multimeter to measure resistance. Mistakes can lead to injury or device damage. Always prioritize safety to ensure accurate readings and personal protection.
Avoiding Electrical Hazards
Ensure the multimeter is switched off before connecting to a circuit. This prevents accidental short circuits. Always use the correct range settings. Incorrect settings can cause electrical shocks. Check the leads and probes for wear and tear. Damaged leads can expose you to live circuits. Never use a multimeter on a powered circuit, especially with high voltage. Keep your hands dry to avoid conductivity. Work in a dry environment to reduce risk.
Proper Handling Of The Multimeter
Handle your multimeter with care to maintain its accuracy. Store it in a protective case. This prevents physical damage. Clean the probes after each use. Dirt can affect the readings. Calibrate your multimeter regularly for precise measurements. Follow the manufacturer’s instructions closely. Never exceed the multimeter’s voltage limit. This can damage the device and cause injury. Familiarize yourself with all the multimeter functions. Understanding its features ensures safe operation. Always wear protective gear, like gloves and goggles, when necessary.
Advanced Techniques
Welcome to the world of advanced techniques for measuring resistance using a multimeter! Whether you’re tackling complex circuits or exploring differential resistance, mastering these techniques will enhance your understanding and skills. Let’s dive into the intricacies that will transform your multimeter experience.
Using A Multimeter With Complex Circuits
Have you ever faced a web of wires and wondered how to measure resistance accurately? Complex circuits can be daunting, but they offer a rewarding challenge. Start by identifying the components involved.
Use your multimeter to isolate sections of the circuit. This helps prevent interference and ensures precise readings. Think of it like solving a puzzle—each piece matters.
Consider using a schematic diagram. Mapping out the circuit can make it easier to pinpoint where to place your probes. Don’t rush; patience is key.
When I first tackled a complex circuit, I realized the importance of labeling each part. It saved me time and reduced errors. How do you organize your approach?
Differential Resistance Measurement
Curious about differential resistance? It’s a technique that can reveal more about a component’s behavior under different conditions. Let’s break it down.
Begin by measuring the resistance at two different points. This helps you understand how the component performs under varying voltage or current.
Use this technique to compare results across different scenarios. It’s like seeing how a friend reacts to different situations—each response tells a unique story.
In my experiments, differential measurements shed light on hidden anomalies. It was like uncovering secrets within a circuit. What surprises might you find in your measurements?
Advanced techniques are within your reach. By embracing complexity and curiosity, you can elevate your multimeter skills to new heights. What challenges are you ready to conquer today?
Credit: learn.sparkfun.com
Frequently Asked Questions
What Is A Multimeter Used For?
A multimeter is a tool used to measure electrical properties such as voltage, current, and resistance. It’s essential for diagnosing electrical issues in circuits, devices, and appliances. By measuring resistance, it helps identify circuit continuity or potential faults, ensuring efficient troubleshooting and maintenance.
How Does A Multimeter Measure Resistance?
A multimeter measures resistance by sending a small current through the circuit or component. It calculates the resistance based on the voltage drop. The device displays the resistance value in ohms, allowing users to determine if the component is functioning correctly or requires replacement.
Why Is Resistance Measurement Important?
Resistance measurement is crucial for ensuring electrical components function properly. It helps identify faults, breaks, or shorts in a circuit. Accurate resistance readings prevent potential electrical failures, ensuring safety and efficiency. Regular resistance checks maintain optimal performance of electrical systems, reducing downtime and maintenance costs.
Can A Multimeter Measure Resistance Of Any Material?
A multimeter can measure resistance in most conductive materials. However, it may not accurately measure very high-resistance materials or insulators. Specialized equipment might be needed for those. For typical electrical components and circuits, a multimeter provides reliable resistance readings essential for diagnostics and repairs.
Conclusion
Understanding resistance measurement with a multimeter boosts your electrical skills. It’s simple, yet crucial for circuits. Follow the steps carefully. Check connections. Ensure the multimeter settings are correct. Practice makes perfect in learning to measure resistance. Remember to switch off power sources before starting.
Safety first, always. Regular use helps build confidence. You’ll soon handle multimeter tasks with ease. Keep learning, keep exploring. Troubleshooting becomes straightforward as you gain experience. Multimeters are essential tools in electrical work. Embrace their use and enhance your abilities.
Happy measuring!


