

Imagine you’re in the middle of a crucial DIY project or trying to fix a stubborn electrical issue, only to find that a fuse might be the culprit. You don’t have to be an electrician to solve this puzzle.
With just a multimeter and a bit of guidance, you can unravel the mystery of whether a fuse is blown or not. Picture the satisfaction of saving time, money, and the hassle of trial-and-error. You’ll discover the simple steps to test a fuse with a multimeter, empowering you to tackle electrical challenges with confidence.
Ready to transform confusion into clarity? Let’s dive in and get your fuse testing skills on point!
Credit: www.samarins.com
Tools Needed
A multimeter and a fuse holder are essential for testing a fuse. Ensure the multimeter is set to measure resistance. This setup helps confirm if the fuse is intact or blown.
Understanding how to test a fuse with a multimeter is a handy skill that can save you time and money. Before you dive into testing, it’s essential to gather the right tools. Having the proper tools not only makes the process smoother but also ensures accurate results. Let’s explore what you’ll need to get started.
Multimeter Types
When selecting a multimeter, you’ll encounter a few types, each with its own benefits. Digital Multimeters are user-friendly and provide clear digital readings, making them ideal for beginners. Analog Multimeters, with their moving needle, offer a visual representation of measurements and are favored by some seasoned electricians for their simplicity. Consider what you feel more comfortable with. If precision is your priority, a digital multimeter might be your best choice. However, if you appreciate understanding the fluctuation in readings, an analog multimeter could be more suited to your needs.
Understanding Fuse Functionality
Before testing, it’s helpful to grasp how a fuse works. Fuses act as safety devices that protect electrical circuits from overcurrent. They contain a thin metal strip that melts if the current is too high, breaking the circuit and preventing damage. Recognizing a blown fuse is crucial. A multimeter will help you determine if the fuse is still functional or needs replacing. If the thought of dealing with electrical components makes you nervous, remember that using a multimeter is straightforward with a bit of practice. Do you have any experiences where a simple tool saved you from a potentially complex problem? Testing a fuse with a multimeter might just be another one of those valuable skills.
Safety Precautions
Testing a fuse with a multimeter is crucial for maintaining electrical safety, but it’s essential to prioritize safety precautions during the process. Ensuring that you handle fuses and multimeters correctly can prevent accidents and protect both you and your equipment. Are you confident in your ability to test a fuse safely? Let’s explore the necessary safety precautions.
Handling Fuses Safely
First, always turn off the power supply before touching any electrical components. Never assume a fuse is safe to handle just because it’s small. They can hold residual power that might surprise you.
Wear insulated gloves to protect yourself from potential shocks. This simple step can make a big difference in ensuring your safety.
Remember, fuses can get hot. Let them cool before handling. If you’ve ever burned your fingers on a hot fuse, you know this is advice worth following!
Using A Multimeter Properly
Set your multimeter to the correct measurement setting. Choose the ohm setting to measure resistance. This is crucial for accurate readings.
Ensure the multimeter probes are properly connected. A loose connection might give incorrect readings, leading to wrong conclusions.
Test the multimeter on a known working fuse first. This ensures that your multimeter is functioning correctly and you’re getting reliable results.
Lastly, don’t forget to calibrate your multimeter periodically. This keeps it accurate and extends its lifespan.
Have you ever overlooked a small safety step and faced unexpected consequences? Even the smallest precaution can save you from big trouble.
Preparing The Multimeter
First, ensure your multimeter is set to measure resistance. This setting helps identify if the fuse is functional. Place the probes on both ends of the fuse, observing the display for a zero or low reading, indicating a good fuse.
Before diving into testing a fuse with a multimeter, it’s crucial to prepare your multimeter properly. Imagine this: You’ve got your tools ready, but if your multimeter isn’t set up correctly, you could end up with misleading results. So, let’s ensure your multimeter is ready for action.
Setting The Mode
Start by turning on your multimeter. Locate the dial or button that allows you to select the measurement mode. You’ll want to set it to measure resistance, typically indicated by the omega symbol (Ω). Make sure the mode is set to the lowest resistance setting, which is often 200 ohms. This setting will help you accurately measure the fuse’s condition. Have you ever used a multimeter in a hurry, only to realize the mode was wrong? That simple oversight can lead to confusion. Double-checking the mode saves time and ensures accuracy.
Testing The Multimeter
Before testing the fuse, it’s a smart idea to check if your multimeter is working correctly. Connect the test leads to the appropriate jacks—usually, the black lead goes into the COM port, and the red lead into the VΩ port. Touch the metal tips of the test leads together. The multimeter should read zero or very close to zero ohms. This step confirms the multimeter is functioning well and the leads are in good condition. If the reading is off, consider replacing the battery or checking the leads for damage. This quick test could save you from misdiagnosing a fuse’s condition. Have you ever thought a fuse was blown, only to realize the multimeter was at fault? Testing the multimeter first can prevent such mix-ups. By preparing your multimeter properly, you’re setting yourself up for accurate results and avoiding any unnecessary confusion. So, have you ensured your multimeter is ready for the task ahead?
Removing The Fuse
Testing a fuse with a multimeter involves setting the device to measure resistance. Place the multimeter probes on each end of the fuse. A low resistance reading indicates the fuse is good, while a high reading means it’s blown.
Removing a fuse might seem like a daunting task, especially if you’re not an experienced DIYer. But with some basic guidance, you’ll discover it’s not as complicated as it appears. Before you can test a fuse with a multimeter, you need to safely remove it. This ensures you’re working in a secure environment and prevents any potential electrical mishaps. Let’s dive into the steps of locating and extracting a fuse efficiently.
Locating The Fuse
First, you’ll need to identify where the fuse is located. This might sound straightforward, but it’s crucial to get it right. In most vehicles, the fuse box is typically found under the dashboard or in the engine compartment. At home, fuse boxes are often located in basements or utility rooms. Take a moment to refer to your vehicle’s manual or your household circuit guide. This will help you pinpoint the exact location of the fuse you’re looking to test. Remember, understanding your fuse box layout can save you a lot of time and frustration.
Safely Extracting The Fuse
Now that you’ve found the fuse, it’s time to remove it safely. Always ensure the power is off before you begin. This is a critical safety step. If you’re working on a car, turn off the engine and remove the key from the ignition. For household fuses, switch off the main power supply. Use a pair of needle-nose pliers or a dedicated fuse puller to gently extract the fuse. These tools offer precision and help prevent accidental damage to the fuse or its surroundings. Make sure you have a firm grip on the fuse but don’t apply too much pressure. You want to pull it out smoothly without bending or breaking it. Have you ever felt the satisfaction of fixing something on your own? Successfully removing a fuse is a small victory that boosts your confidence for the next steps. Once the fuse is out, you’re ready to test it with your multimeter. By taking these simple yet effective precautions, you ensure a safe and hassle-free experience. So, are you ready to master the art of fuse testing?
Testing The Fuse
Testing a fuse with a multimeter ensures that it’s functioning correctly. A blown fuse can disrupt electrical circuits, leading to failures. Knowing how to test a fuse saves time and prevents unnecessary replacements. You need a multimeter to check the fuse condition accurately. Follow these steps to test the fuse effectively.
Checking Continuity
Set the multimeter to continuity mode. This mode checks if the circuit is complete. Place the multimeter probes on each end of the fuse. A good fuse shows continuity. Listen for a beep or check the display for a reading. No beep means the fuse is blown.
Interpreting Multimeter Readings
A multimeter shows numbers or symbols when testing. A zero or a very low number indicates a good fuse. If the multimeter shows a high number, the fuse is blown. An infinite reading also means the fuse is not functioning. Understanding these readings helps determine fuse health quickly.
Analyzing Results
Testing a fuse with a multimeter involves checking for continuity. First, set the multimeter to the continuity mode. Next, touch the probes to each end of the fuse. If the multimeter beeps or shows a reading, the fuse is good.
If not, the fuse is blown and needs replacement.
Analyzing results after testing a fuse with a multimeter is crucial. It helps determine if the fuse is functioning properly. This process involves understanding the readings on the multimeter. Accurate interpretation ensures the safety of electrical systems. Below, we delve into identifying a good fuse and detecting a blown one.
Identifying A Good Fuse
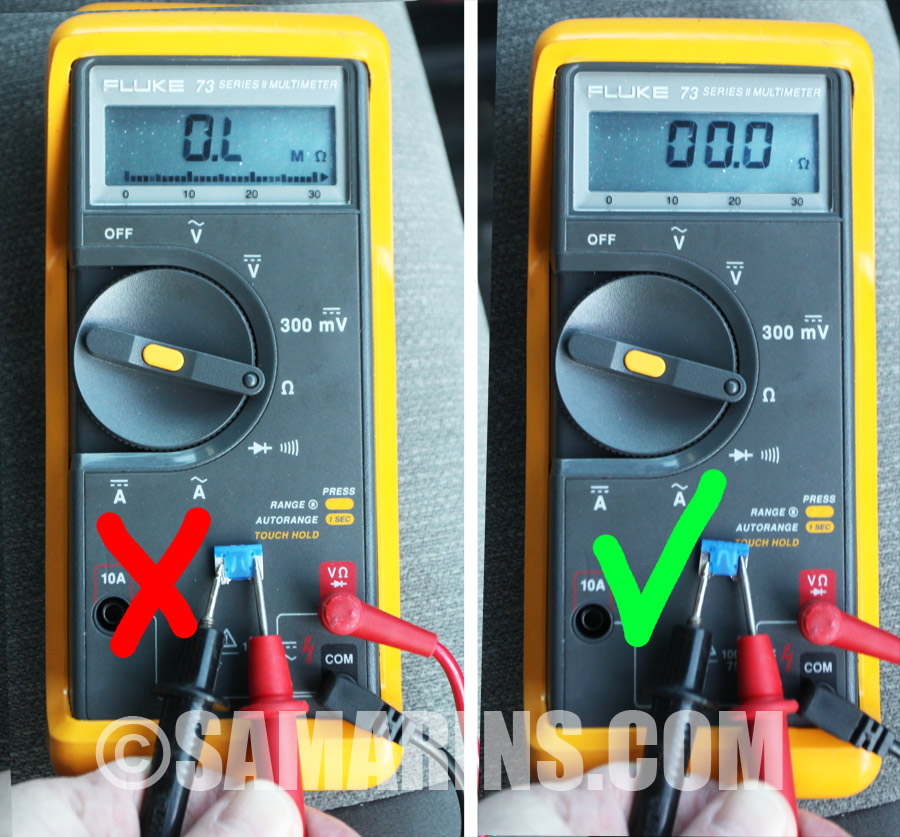
A good fuse allows electrical current to flow smoothly. When testing, the multimeter should show a low resistance reading. Typically, this ranges between 0 to 5 ohms. This indicates the fuse is intact. Consistent readings imply reliable electrical performance. In such cases, no further action is needed.
Detecting A Blown Fuse
A blown fuse disrupts electrical flow. The multimeter displays ‘OL’ or infinite resistance. This means the circuit is open. No current can pass through. Replace the fuse immediately. Ignoring it could lead to malfunction. Regular checks prevent electrical hazards.
Replacing The Fuse
Testing a fuse with a multimeter is straightforward. First, set the multimeter to measure resistance. Next, touch the probes to each end of the fuse. A reading close to zero indicates the fuse is good; if the multimeter displays ‘OL’ or a high number, the fuse is blown and needs replacing.
Replacing a fuse can seem like a daunting task, especially if you’re not familiar with electrical components. However, with a bit of patience and the right information, you can do it safely and efficiently. After testing a fuse with a multimeter and confirming it’s faulty, the next step is replacement. This process is crucial to restore functionality and ensure the safety of your electrical system. Let’s explore how to do it right.
Choosing The Right Fuse
Selecting the correct fuse is vital. Fuses come in various shapes, sizes, and ratings. A common mistake is choosing a fuse with the wrong amperage rating. Check the specifications on the old fuse. It will have a number indicating its amp rating. Make sure the new fuse matches this rating to avoid potential hazards. Using a fuse with a higher rating might seem like a good idea, but it can lead to overheating and damage. Always stick to the recommended specifications.
Proper Installation
Once you’ve chosen the right fuse, installation is straightforward. Start by turning off the power to the circuit where the fuse will be installed. Safety first! Carefully insert the new fuse into its holder. Ensure it’s seated properly and not loose. A snug fit is crucial for optimal performance. Power the circuit back on and check if everything is functioning correctly. If the problem persists, there might be an underlying issue that requires professional attention. Remember, replacing a fuse is not just about swapping out a part. It’s about ensuring your system runs smoothly and safely. Have you ever experienced the frustration of a blown fuse? It’s a reminder of the importance of choosing and installing the right one.

Credit: www.youtube.com

Credit: thefuseshop.com
Frequently Asked Questions
How To Check If A Fuse Is Blown?
To check if a fuse is blown, set your multimeter to continuity mode. Place the probes on each end of the fuse. If the multimeter beeps or shows a reading, the fuse is good. If there’s no sound or reading, the fuse is blown and needs replacement.
Can You Test A Fuse Without Removing It?
Yes, you can test a fuse without removing it using a multimeter. Set the multimeter to continuity mode and touch the probes to the exposed metal ends of the fuse. If the multimeter gives a reading or beeps, the fuse is intact.
No sound or reading indicates a blown fuse.
What Multimeter Setting For Testing Fuses?
Use the continuity setting on your multimeter to test fuses. This setting checks if the fuse allows current to pass through. If the multimeter beeps or shows a reading, the fuse is functioning. If there’s no beep or reading, the fuse is likely blown and needs replacement.
Why Use A Multimeter For Fuse Testing?
A multimeter is precise for testing fuses. It shows if current can pass through the fuse, indicating its condition. Continuity mode helps confirm if the fuse is intact or blown. Multimeters are reliable and easy-to-use tools for this purpose, providing accurate readings quickly.
Conclusion
Testing a fuse with a multimeter is simple and essential. This process helps ensure safety in electrical devices. First, set your multimeter to the correct setting. Then, connect the probes to the fuse. A good fuse shows zero or low resistance.
A bad fuse shows no continuity. Regular testing prevents electrical issues. It also saves time and money. Proper maintenance keeps your devices running smoothly. Now, you can confidently check fuses at home. Practice makes the process easier. Stay safe and informed!


