
Is your garden hose leaking, kinked, or simply not working like it used to? You might feel frustrated when water gushes out from unexpected places or when your hose refuses to spray evenly.
Don’t worry; you don’t have to buy a new one just yet. Repairing your garden hose can be easier than you think, saving you money and hassle. Imagine the satisfaction of turning a worn-out hose into a reliable tool again.
You’ll discover simple steps to breathe new life into your garden hose, ensuring it works efficiently every time you need it. Let’s dive in and get your garden hose back in action!
Identifying Common Hose Problems
Garden hoses are essential tools for every gardener. But they can face problems. Identifying common hose problems is crucial for maintaining efficiency. Let’s dive into typical issues you might encounter.
Leaking Connections
Leaking connections often arise at the hose’s ends. This occurs due to worn-out washers. Replacing the washer usually solves the issue. Make sure the connection is tight. Loose fittings can cause leaks too. Check and tighten them regularly.
Punctures And Holes
Punctures can reduce water pressure significantly. They often result from sharp objects. Patch kits are available for easy fixes. A simple patch can restore functionality. Ensure the patch is secure and covers the hole completely.
Kinks And Twists
Kinks and twists block water flow. This can weaken the hose over time. Always store the hose properly to avoid this. Use a reel or hanger for neat storage. Untwist any kinks immediately to prevent damage.

Credit: www.amazon.com
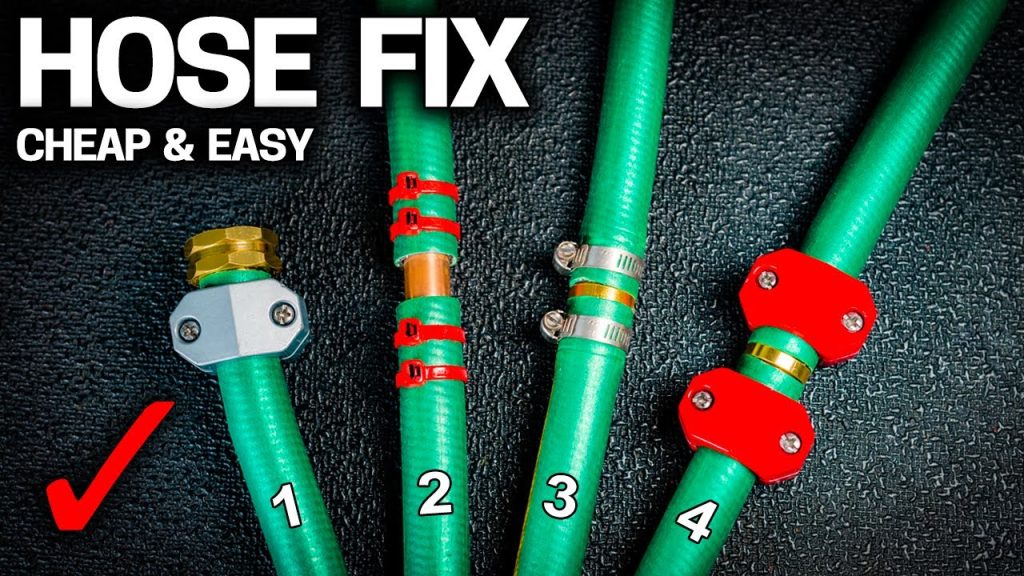
Essential Tools For Hose Repair
Fixing a garden hose requires a few essential tools. Scissors or a sharp knife help cut the damaged part. Hose repair kits simplify the process, providing necessary connectors and seals to restore functionality.
When your garden hose springs a leak or its nozzle breaks off, it can feel like a small gardening crisis. But fear not! With the right tools, you can fix your hose in no time. Knowing which essential tools to have on hand can save you time and hassle. Plus, it’s a great way to feel empowered in maintaining your garden equipment. So, let’s dive into the tools you’ll need for a successful hose repair.
Basic Repair Kit
A basic repair kit is your first line of defense against common hose issues. These kits often include items like hose connectors, clamps, and gaskets. They are easy to use and can tackle minor leaks and breaks. You can find basic repair kits at most home improvement stores. The kits are affordable, usually under $20. This makes them an economical choice for most gardeners. Having a basic repair kit means you’re always ready for minor fixes. It’s like having a first-aid kit for your hose. A few minutes of repair can save you the cost of a new hose.
Specialized Tools
Sometimes, a basic kit just won’t cut it. That’s where specialized tools come in. They are designed for more specific problems, like kink removal or end replacement. One example is a hose mender tool. It allows you to cut out damaged sections and rejoin the hose. This tool is invaluable if you’ve got a long hose with multiple issues. Another handy tool is a hose cutter. It gives you clean cuts, making rejoining easier. Clean cuts ensure a better fit for connectors and prevent future leaks. Remember the time when I had to cut out a five-foot section of hose? A hose cutter saved the day, providing a clean cut and a perfect fit for the new connector. Would you have thrown the hose away, or tackled it with the right tools? Keep these specialized tools in your gardening arsenal. They can make the difference between a temporary fix and a long-term solution. Having them on hand means you’re always prepared for whatever your garden throws at you. By equipping yourself with these essential tools, hose repair becomes a simple, manageable task. So, what tools do you already have, and which ones will you add to your collection?
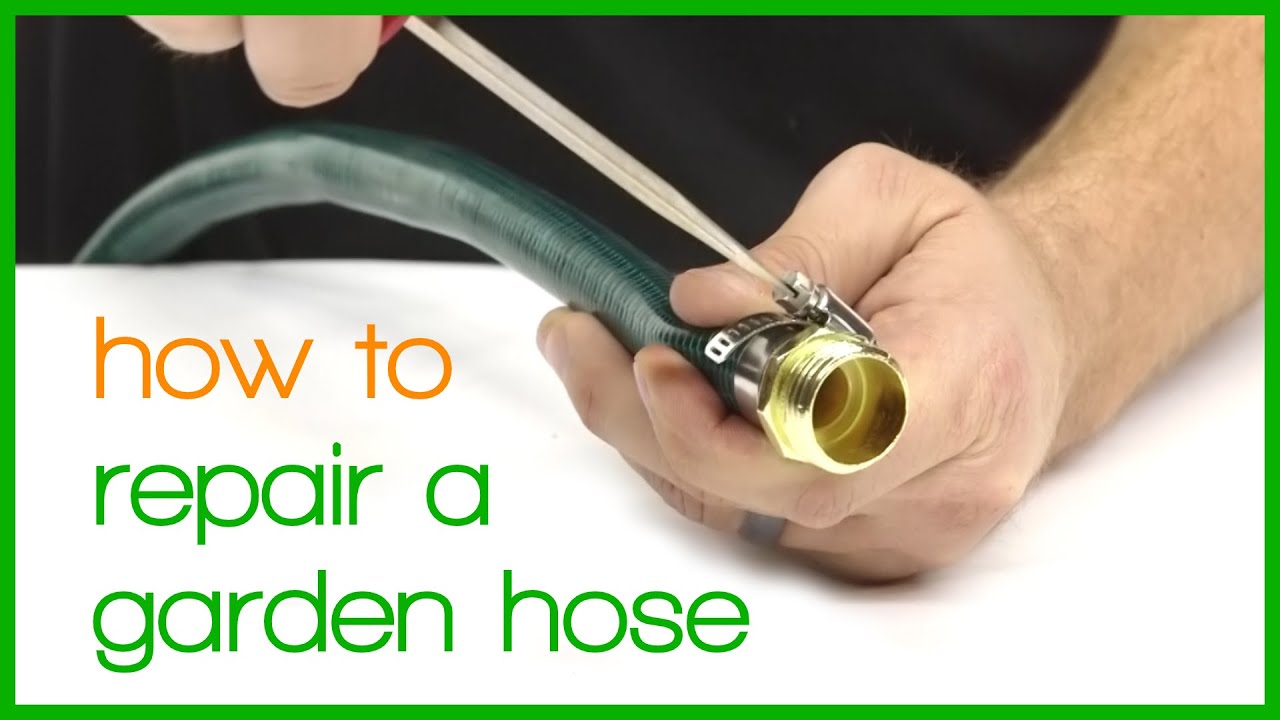
Fixing Leaky Connections
Garden hoses often develop leaks at the connections. These leaks can waste water and reduce pressure. Fixing leaky connections is easy and saves money. Addressing the problem quickly prevents further damage.
Inspecting The Fittings
Start by examining the hose fittings. Check for cracks or damage. Look for loose screws or parts. Tighten any loose connections. If the fittings are damaged, replace them. Use pliers for a better grip.
Replacing Washers
Old washers can cause leaks. Remove the fitting and check the washer. If it’s cracked or worn, replace it. Choose a rubber washer for a tight seal. Make sure it fits snugly. Reassemble the fitting carefully.
Repairing Punctures And Holes
Fixing a garden hose involves identifying the puncture or hole and using a patch kit or tape for repairs. Start by cleaning the damaged area thoroughly, ensuring the surface is dry. Apply the patch or tape, pressing firmly to seal the leak effectively.
Repairing a garden hose might seem daunting, but with a few simple tools, you can easily fix punctures and holes to extend its life. Whether it’s a small hole or a larger tear, there are efficient ways to mend your hose. Imagine the satisfaction of restoring your garden hose instead of tossing it away. Let’s dive into practical techniques to repair those pesky punctures and holes.
Using Hose Repair Tape
Repair tape is a quick fix that can be surprisingly effective for small punctures. Start by ensuring the hose is clean and dry. Wrap the tape tightly around the punctured area, overlapping each layer to create a strong seal. You might feel like a modern-day handyman, saving the day with just a roll of tape. Consider using specialized hose repair tape for better results. This tape is designed to withstand water pressure and outdoor conditions. Check for leaks after applying the tape by turning on the water. If you notice any drips, add another layer. This method is perfect for temporary repairs or minor issues.
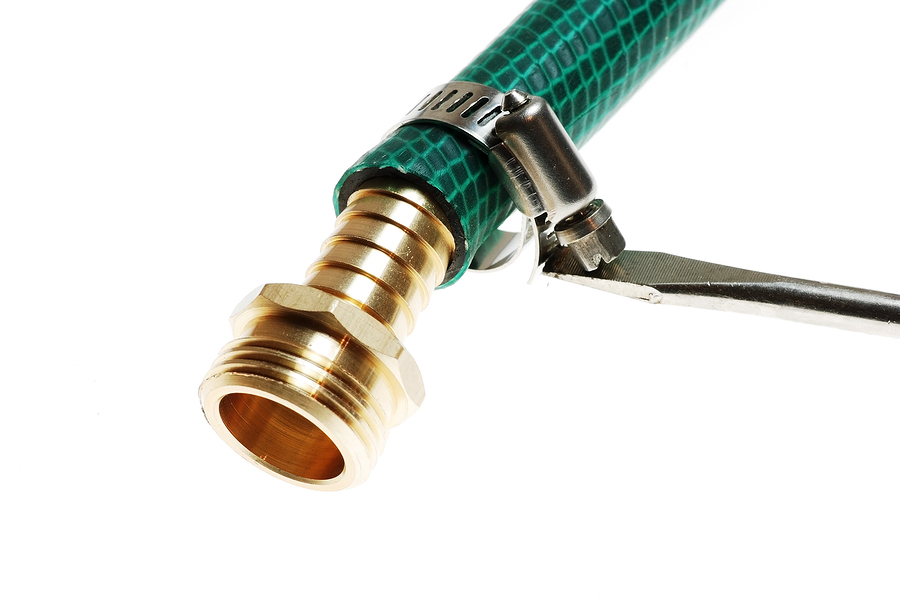
Installing Hose Menders
For more serious holes, hose menders are your best bet. Cut out the damaged section of the hose using a sharp knife. A clean cut is crucial for a seamless repair. Have you ever marveled at how something so simple could be so effective? Slide a hose mender into both ends of the cut hose. Secure it with clamps to ensure a tight fit. You might find yourself surprised at how easy it is to give your hose a new lease on life. With hose menders, you get a permanent fix that withstands high water pressure. Before you start, ensure you have the right size mender for your hose. Test the repair by turning on the water and checking for leaks. If it’s secure, you can confidently continue watering your garden without worries. Repairing your garden hose can be an empowering task. Have you thought about how many hoses end up in landfills each year? By repairing instead of replacing, you’re not only saving money but also contributing to environmental sustainability.
Resolving Kinks And Twists
Garden hoses are indispensable tools for any gardener, yet they often fall victim to kinks and twists that make watering a tedious task. You might find yourself untangling and straightening your hose more than actually using it. So, how can you resolve these annoying kinks and twists once and for all?
Preventing Future Kinks
One proactive step is to invest in a kink-resistant hose. These hoses are designed to be more flexible and durable, reducing the chances of twists and tangles. It might cost a bit more, but think of the time you’ll save.
Another tip is to lay your hose out straight in the sun before using it. The heat helps to relax the material, making it less likely to kink as you water your garden. When was the last time you tried this simple hack?
Consider the way you pull the hose. Avoid pulling it around sharp corners or rough surfaces. This can damage the hose and make it more prone to twisting. How often have you found yourself wrestling with a hose around a corner?
Storing The Hose Properly
Proper storage is crucial in preventing kinks. Always coil your hose neatly after use. A hose reel can be a great investment to ensure it stays organized and free from damage.
Make sure you store your hose in a cool, dry place. Leaving it in direct sunlight or extreme temperatures can weaken the material, leading to more kinks. Have you considered the impact of weather on your hose?
Hanging your hose on a hook or bracket can help maintain its shape. This keeps it off the ground and prevents twists. Are you using any special storage solutions that have worked well?
Addressing kinks and twists in your garden hose doesn’t have to be a daunting task. With these practical tips, you can enjoy a smoother watering experience. What other clever tricks do you use to keep your garden hose in top shape?
Credit: greenwoodhardware.com
Maintenance Tips For Longevity
Maintaining a garden hose ensures it serves you well for years. With proper care, you can avoid frequent repairs or replacements. Simple maintenance routines can greatly extend the life of your hose. Below, find essential tips to keep your garden hose in top shape.
Regular Cleaning Practices
Rinse the hose after each use to prevent dirt buildup. Use a soft brush to remove stubborn grime or debris. Ensure water flows through the hose to clear any blockages. Inspect the nozzle for any dirt or residue. Clean the nozzle with warm, soapy water if needed.
Check for leaks or cracks periodically. Repair small leaks with waterproof tape. Replace damaged sections to prevent further issues. Store the hose coiled to prevent kinks and tangles. Avoid dragging the hose over rough surfaces.
Winterizing The Hose
Prepare your hose for winter to prevent damage. Drain all water from the hose before storing. Coil the hose neatly and store it indoors. Avoid leaving the hose in freezing conditions. Freezing water can cause cracks or burst the hose.
Cover the hose ends to keep out debris. Use caps or plastic bags for protection. Check the hose before spring use for any signs of wear. Repair or replace as necessary to ensure optimal performance.
Credit: www.youtube.com
Frequently Asked Questions
How To Fix A Leaking Garden Hose?
To fix a leaking garden hose, first identify the leak’s location. Use a hose repair kit to replace damaged sections. Cut out the damaged part and insert connectors. Tighten clamps to secure the connection. Test the hose for leaks after repair to ensure it’s properly sealed.
What Tools Are Needed For Hose Repair?
To repair a garden hose, you’ll need a utility knife, screwdriver, and hose repair kit. The kit usually includes connectors and clamps. These tools help cut out damaged sections and secure new fittings. Always ensure you have the right size connectors for your hose diameter.
How To Repair A Hose With Holes?
To repair a hose with holes, locate the damaged area and cut it out. Use a hose repair kit to insert connectors. Secure them with clamps to ensure a tight fit. This method effectively stops leaks and extends the hose’s life.
Regular inspection can prevent further damage.
Can Duct Tape Fix A Garden Hose Leak?
Duct tape can provide a temporary fix for small leaks. Clean the area and wrap the tape tightly around the leak. However, this is not a permanent solution. For long-lasting repairs, use a proper hose repair kit. Regular maintenance will help prevent recurring issues.
Conclusion
Repairing a garden hose is simple with the right steps. First, find the leak or cut. Next, choose a repair method that suits the damage. Use a hose repair kit for easy fixes. For larger issues, replace the affected section.
Always check for tight connections to avoid future leaks. Regularly inspect your hose for wear and tear. This ensures it lasts longer. A well-maintained hose keeps your garden thriving. Don’t let a small leak cause big problems. With these tips, garden hose repair becomes straightforward.
Enjoy a hassle-free gardening experience. Keep your tools in great shape.


