
Are you staring at a silent 24-volt system, wondering how to bring it back to life? We’ve all been there.
Whether it’s in a truck, a boat, or another heavy-duty machine, dealing with a non-responsive system can be frustrating. You might feel like you’re stuck, but don’t worry. Understanding how to jump start a 24-volt system can save you time, money, and a lot of stress.
Imagine the satisfaction of hearing that engine roar back to life. You’ll gain not only the practical skills but also the confidence to tackle similar challenges in the future. This guide will walk you through the essential steps, ensuring that you perform the task safely and effectively. Ready to turn the key on your expertise? Let’s get started!
Safety Precautions
Jump-starting a 24-volt system requires careful attention to safety. Ensuring the safety of yourself and those around you is crucial. It’s essential to follow specific precautions to prevent accidents and injuries. This section outlines vital safety measures to consider.
Personal Protective Equipment
Wearing the right gear is important. Use gloves to protect your hands from electrical shocks. Wear safety goggles to shield your eyes from sparks. A sturdy pair of boots can protect your feet from falling objects. These items reduce the risk of injuries during the process.
Avoiding Sparks And Flammable Materials
Sparks can cause fires. Keep flammable materials far from the battery area. Ensure no gasoline or oil is nearby. Check for any leaks before starting. Make sure all connections are tight and secure. Loose connections can produce dangerous sparks.
Ensuring Proper Ventilation
Batteries release harmful gases. Conduct the jump-start in a well-ventilated area. Open windows or doors to allow fresh air to flow. Avoid enclosed spaces to reduce gas buildup. Proper ventilation prevents inhalation of toxic fumes. Your health is important, so ensure the air is clean.
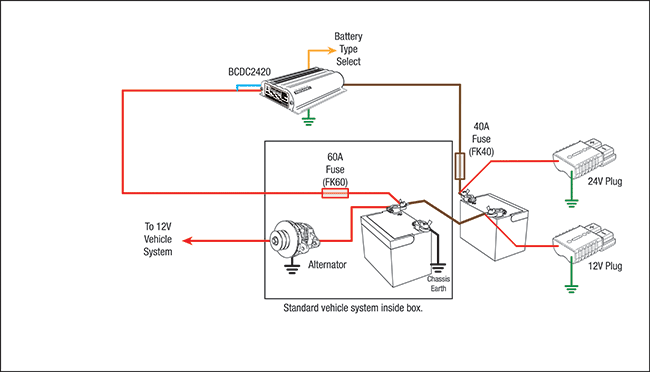
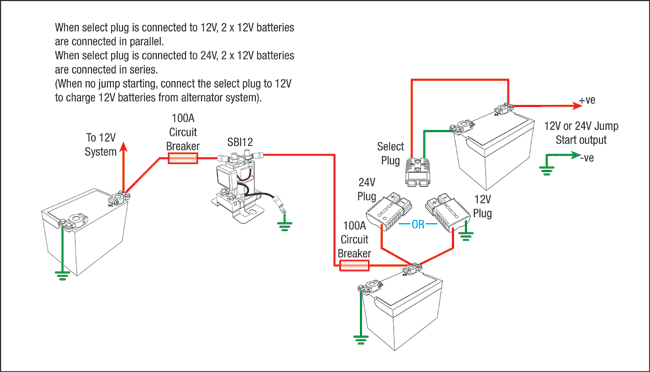
Credit: www.redarcelectronics.com
Required Tools And Equipment
Jump starting a 24-volt system requires specific tools. Essential items include two 12-volt batteries, heavy-duty jumper cables, and a reliable multimeter. Ensure all connections are secure for safety and efficiency.
Jump-starting a 24-volt system requires specific tools and equipment. Using the right tools ensures safety and efficiency. Let’s explore the essentials needed for this task.Jumper Cables Specifications
Jumper cables for a 24-volt system must be heavy-duty. They should handle high current loads. Look for cables with thick insulation. This prevents overheating. The cables should be at least 20 feet long. Longer cables provide flexibility. Ensure the clamps are sturdy. They should have a strong grip to ensure a stable connection.Donor Vehicle Requirements
The donor vehicle must also have a 24-volt system. Using a vehicle with a different voltage can cause damage. Ensure the donor vehicle’s battery is fully charged. This ensures it can provide enough power. The engine of the donor vehicle should be running. This provides a continuous power supply.Voltage Tester
A voltage tester is crucial for safety. It confirms the voltage of both batteries. This ensures compatibility before connecting. Always test the batteries before proceeding. A simple handheld tester works well. It should display clear readings. This helps avoid errors and ensures a successful jump start.Identifying Battery Configuration
Jump-starting a 24-volt system can seem daunting if you’re unfamiliar with battery configurations. It’s crucial to identify how your batteries are set up before proceeding. Understanding the difference between series and parallel setups can mean the difference between a successful jump-start and a frustrating experience.
Series Vs Parallel Setup
Have you ever wondered why some systems use multiple batteries? The key lies in series and parallel configurations. In a series setup, batteries are connected end-to-end, increasing the voltage but keeping the same capacity. Imagine stacking batteries to power a higher voltage system.
On the other hand, a parallel setup connects batteries side-by-side, doubling the capacity while maintaining the same voltage. This is perfect for systems requiring longer runtimes without needing a higher voltage. So, which configuration does your system use?
Locating Battery Terminals
Finding battery terminals can be like searching for hidden treasure in your vehicle. Knowing where to look makes all the difference. Battery terminals are typically at either end of the battery, marked with positive (+) and negative (-) signs.
Imagine the frustration of wasting time connecting cables incorrectly. To avoid this, check your vehicle manual or look for clear markings on the batteries. Have you ever misidentified a terminal, only to realize your mistake after trying to jump-start the system?
Understanding these setups and locations helps you confidently tackle a jump-start. Have you found the right configuration for your needs? Why not inspect your system today and ensure you’re ready for any jump-start situation?
Preparation Steps
Jump starting a 24 volt system requires careful preparation. Proper preparation ensures safety and efficiency. Follow these steps for a smooth start.
Vehicle Positioning
Park both vehicles on stable ground. Position them close, but not touching. This makes cable connection easier. Ensure both vehicles are in park or neutral. Engage the parking brakes for safety. Check that there are no obstructions around.
Turning Off All Electrical Systems
Turn off all electrical systems in both vehicles. This includes lights, radio, and air conditioning. Prevents electrical surges during jump start. Ensures focus on the battery system. Reduces the risk of damage to sensitive electronics.
Inspecting Battery And Cables
Inspect the battery for damage or corrosion. Ensure the battery terminals are clean. Check cables for any wear or fraying. Use cables that are designed for a 24 volt system. A good inspection prevents accidents and ensures a safe jump start.
Connecting The Jumper Cables
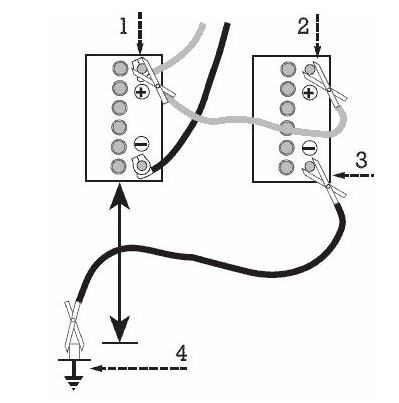
Jump starting a 24-volt system involves connecting jumper cables correctly. Attach the positive cable to the positive terminals first. Then, connect the negative cable to the negative terminals. Ensure all connections are secure before starting the vehicle.
Connecting the jumper cables is crucial for jump starting a 24-volt system. Proper connection ensures a safe and efficient process. Incorrect connections may damage the system or cause injury. Follow the steps carefully to connect the cables correctly. This section guides you through each step.Positive Cable Connection
First, locate the positive terminals on both batteries. They are usually marked with a plus sign (+). Attach one end of the positive cable to the positive terminal of the dead battery. The other end goes to the positive terminal of the charged battery. Ensure the clamps are secure. Loose connections can lead to sparks.Negative Cable Connection
Identify the negative terminals on the batteries. They are marked with a minus sign (-). Connect one end of the negative cable to the negative terminal of the charged battery. Do not connect the other end to the dead battery’s negative terminal. Instead, attach it to a metal part of the vehicle. This reduces the risk of sparking near the battery.Sequence Of Connections
Always follow the sequence to connect the cables. Start with the positive cable on the dead battery. Then, connect the positive cable to the charged battery. Next, attach the negative cable to the charged battery. Finally, connect the negative cable to a metal part of the vehicle. Following this sequence ensures safety and effectiveness.Starting The Vehicles
Jump starting a 24-volt system requires two 12-volt batteries and jumper cables. Connect the positive terminal of the first battery to the positive terminal of the second battery. Attach the negative cable to a metal surface on the vehicle. Start the donor vehicle, then the one with the dead battery.
Jumping a 24-volt system can seem daunting, but it’s a straightforward process if you know what you’re doing. Imagine you’re in a remote area with a stalled vehicle, and there’s no help in sight. This is where understanding how to jump start becomes invaluable. Here’s how you can efficiently start the vehicles involved in the jump start process, ensuring a smooth operation.Starting The Donor Vehicle
First, position the donor vehicle close to the dead vehicle without touching it. Make sure both vehicles are turned off before you start connecting cables. Once you’ve connected the jumper cables, start the donor vehicle. Let it run for a few minutes; this allows the electrical current to stabilize. During this time, keep an eye on the donor vehicle’s gauges to ensure everything is functioning properly.Starting The Dead Vehicle
After a few minutes, attempt to start the dead vehicle. Turn the ignition key and listen for the engine’s response. If the vehicle starts, let it idle for a while. This helps recharge its battery and stabilize the power. In case it doesn’t start, double-check the cable connections and try again. Sometimes, it’s just a matter of securing the connections.Monitoring Gauges And Indicators
While the dead vehicle is idling, pay attention to the gauges and indicators. Ensure the battery light is off and the voltmeter reads correctly. Check for any unusual readings that may indicate further issues. This proactive monitoring can prevent future battery problems. As the vehicles settle into their rhythm, ask yourself: How prepared are you for unexpected situations like these? Understanding these steps can save your day, and possibly your vehicle.Disconnecting The Jumper Cables
Remove jumper cables carefully after jump starting a 24-volt system. Disconnect the negative cable first, then the positive. Ensure no cables touch each other to prevent sparks or accidents.
Disconnecting the jumper cables from a 24-volt system needs careful attention. Incorrect disconnection can harm the electrical system. After a successful jump start, disconnecting properly is crucial. It ensures the safety of all components and people involved.Order Of Disconnection
First, turn off both vehicles. This step prevents accidental sparks. Begin by removing the negative cable from the chassis ground of the vehicle that was jump-started. Next, detach the negative cable from the power source vehicle. Then, remove the positive cable from the power source. Finally, remove the positive cable from the jump-started vehicle.Checking For Proper Operation
Start the vehicle that received the jump. Let it run for a few minutes. This helps recharge the battery. Observe the dashboard for warning lights. Listen for unusual noises. Ensure all systems are working well. If the vehicle starts and runs without issues, the operation was successful. If any problems persist, seek professional help.Post Jump-start Steps
Jump-starting a 24-volt system requires connecting two 12-volt batteries in series. First, ensure both vehicles are turned off. Connect the positive terminal of the first battery to the positive terminal of the second. Then, connect the negative terminals in a similar manner.
Jump-starting a 24-volt system can be a lifesaver when your vehicle’s battery decides to call it quits. However, the process doesn’t end once the engine roars back to life. The post jump-start steps are crucial to ensuring that your battery and charging system are in good health. These steps can prevent future breakdowns and save you from the hassle of repeat jump-starts.Allowing The Engine To Run
Letting the engine run for a while after jump-starting is essential. It helps recharge the battery using the alternator. You might wonder, “How long should I let it run?” Typically, 20 to 30 minutes is ideal. This time allows the battery to gain enough charge for the next start. You can use this time to check other essentials like fuel levels and oil, making sure everything is in order.Inspecting The Charging System
Once the engine is running smoothly, it’s time to inspect the charging system. A faulty alternator can lead to repeated battery issues. Check if the battery light on your dashboard is on. This is a quick indicator of charging system problems. Consider using a voltmeter to measure the voltage output. It should read around 28 volts for a 24-volt system. If not, you might have an alternator issue that needs professional attention.Testing The Battery
Testing the battery ensures it’s holding the charge effectively. A load test can determine the battery’s health. This involves checking its ability to maintain voltage under a load. You might find yourself repeating jump-starts if the battery is weak. A simple tool like a multimeter can help in checking the resting voltage, which should be around 24 volts. If it’s consistently low, it might be time for a replacement. These post jump-start steps are not just technical routines. They’re practical checks that ensure your vehicle is reliable and ready for the road. Have you ever skipped these checks and regretted it later? Share your experiences in the comments!Troubleshooting Common Issues
Jump-starting a 24-volt system requires connecting two 12-volt batteries in series. Ensure cables are properly attached to terminals. Start the vehicle by turning the ignition key. Make sure to disconnect the cables after the engine starts to prevent any electrical issues.
Jump-starting a 24-volt system can be tricky, especially when you encounter unexpected hiccups. Imagine you’re ready to get your machine up and running, but nothing happens. Frustrating, right? Understanding common issues could save you time and energy. Let’s explore some typical problems you might face and how to tackle them.Unsuccessful Start Attempts
One of the most common issues is an unsuccessful start. You’ve connected everything, but the engine remains silent. First, check your connections. Are the jumper cables securely attached to the battery terminals? Sometimes, corrosion can interfere with the connection. Clean the terminals if needed. Double-check the cables to ensure they are in good condition and not frayed.Battery Not Holding Charge
Has your battery been charged recently, but it still doesn’t hold power? You might have a faulty battery. Batteries can wear out over time, losing their ability to hold a charge. Consider testing the battery with a multimeter. A healthy 24-volt battery should show around 24 volts when fully charged. If it’s significantly lower, replacing the battery might be necessary.Alternator Problems
Sometimes, the issue isn’t the battery but the alternator. The alternator charges the battery when the engine is running. If it fails, the battery can’t recharge. To test this, start the engine and measure the voltage across the battery terminals. It should read above 24 volts if the alternator is working properly. If not, it might be time to have the alternator checked or replaced. When facing these issues, patience and a methodical approach will serve you well. Have you ever had to deal with a stubborn battery or faulty alternator? Share your experience and how you resolved it. It might just help a fellow reader!
Credit: www.youtube.com
Credit: www.randakksblog.com
Frequently Asked Questions
Can You Jumpstart A 24 Volt System With A 12 Volt System?
You can’t jumpstart a 24-volt system with a 12-volt system. Voltage mismatch can damage components. Use a compatible 24-volt source for jumpstarting. Always prioritize safety and consult a professional for guidance.
How Do You Charge A 24 Volt System With Two Batteries?
Connect the batteries in series to form a 24-volt system. Use a 24-volt charger. Attach the charger’s positive lead to the first battery’s positive terminal and the negative lead to the second battery’s negative terminal. Ensure the charger matches the system’s voltage requirements for safe charging.
How Do You Charge A 24 Volt System?
Use a 24-volt charger specifically designed for your system. Connect the positive lead to the positive terminal and the negative lead to the negative terminal. Ensure all connections are secure and follow the manufacturer’s instructions for charging duration and safety precautions.
Regularly monitor the charging process to prevent overcharging.
How To Jump Start A Truck With Two Batteries?
Connect the positive cable to the first battery’s positive terminal. Attach the other end to the second battery’s positive terminal. Connect the negative cable to the second battery’s negative terminal, then to a metal part on the truck. Start the donor vehicle, then the truck.
Remove cables in reverse order.
Conclusion
Jump starting a 24-volt system can be simple and safe. Follow each step carefully. Use the right tools and safety gear. Check all connections before starting. Always connect cables in the right order. Remember to disconnect them correctly too. Regular maintenance prevents problems.
Keep your battery and cables in good condition. Know your system’s requirements and limitations. Practice these steps to gain confidence. With practice, it becomes easier. Always prioritize safety. A well-maintained system lasts longer. Keep learning and stay informed for better results.


