

Is your car’s battery giving you trouble, and you’re not sure whether the alternator is the culprit? Knowing how to check your alternator with a multimeter can save you a trip to the mechanic and some hard-earned cash.
You don’t need to be a car expert or have a garage full of tools to do this. With a multimeter and a few simple steps, you can diagnose your alternator’s health quickly and efficiently. In this guide, you’ll discover how to use a multimeter to check your alternator, ensuring your vehicle runs smoothly without unexpected breakdowns.
Get ready to empower yourself with practical knowledge that can prevent future car hassles.
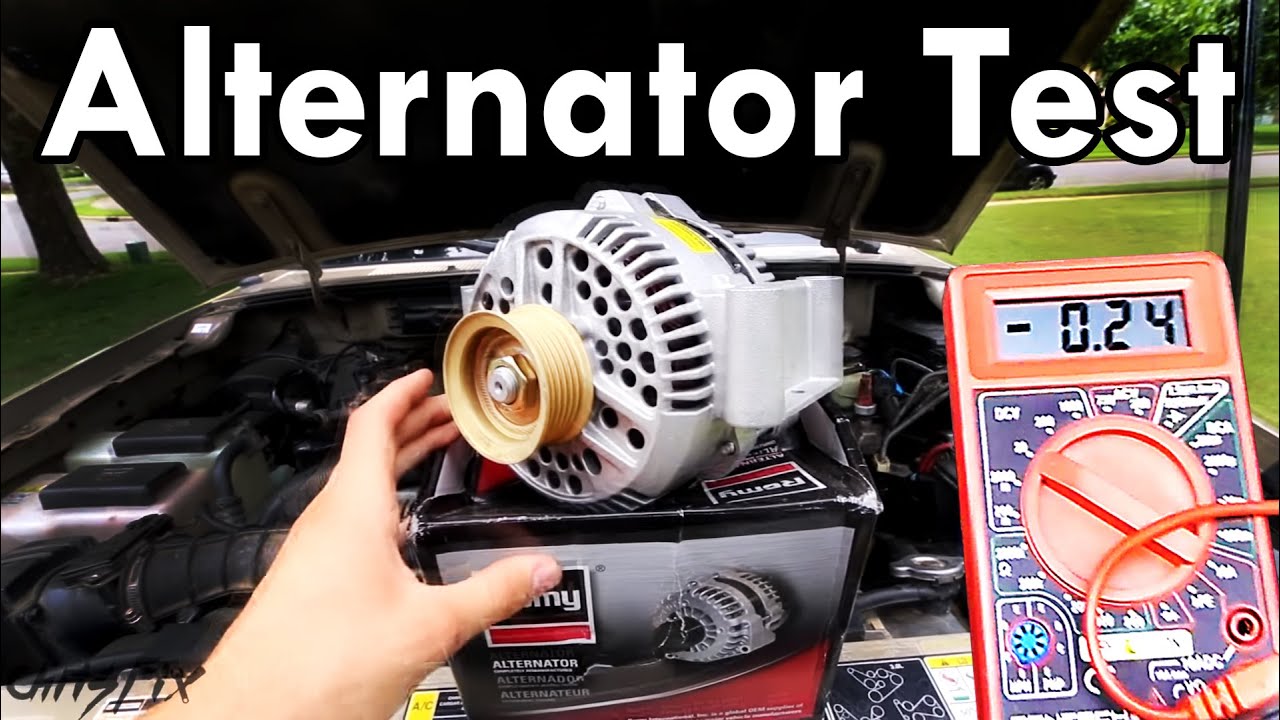
Credit: www.youtube.com
Tools And Materials Needed
A multimeter, safety gloves, and a wrench are essential for checking an alternator. These tools help measure voltage and ensure safe handling. A clear workspace aids in efficient testing.
Checking your alternator with a multimeter is a straightforward task that can save you time and money. Before you dive into the process, it’s essential to gather the right tools and materials. Having everything at hand ensures a smooth and efficient check-up.
Multimeter
First and foremost, you need a reliable multimeter. This handy tool measures voltage, current, and resistance. Ensure it’s set to measure DC voltage, as this is crucial for testing your alternator. Choose a multimeter with a clear display for easy reading. If you’re new to using one, practice measuring simple electrical components beforehand.
Protective Gear
Safety should always be your priority. Wearing protective gear like gloves and goggles can prevent accidents. Handling electrical components can be hazardous, so take precautions. You don’t want a simple check-up to turn into a trip to the emergency room.
Vehicle Manual
Your vehicle manual is an invaluable resource. It contains specific information about your car’s electrical system. This can guide you on where to locate your alternator and how to access it. If you’re unsure about any steps, referring to the manual can clarify things.
Basic Toolkit
A basic toolkit will make your task easier. You might need screwdrivers, wrenches, or pliers to access the alternator. Having these tools ready can save you from frustrating trips back and forth to the garage. A toolkit can also be handy for other minor repairs in the future.
Flashlight
Working under the hood can be challenging without proper lighting. A flashlight helps you see clearly, especially in dimly lit areas. It ensures you don’t miss any crucial connections or details. This small tool can make a big difference in your work efficiency.
Battery Charger
Your battery might need a boost during the alternator check. A battery charger can ensure your car starts without hiccups. It’s a simple yet effective way to avoid unnecessary complications. Just think of it as a backup plan for your battery.
Memory Saver Tool
If your vehicle has complex electronics, using a memory saver tool can be wise. This device keeps your car’s settings intact while the battery is disconnected. It prevents the loss of radio presets, clock settings, and more. Imagine the frustration of reprogramming everything after a simple check-up. As you prepare to test your alternator, consider this: Do you have all these tools ready? Missing one can delay your process and affect accuracy. Preparing thoroughly ensures you tackle the task confidently and efficiently.
Safety Precautions
Testing an alternator with a multimeter requires careful safety measures. Ensure the vehicle is off, and wear protective gloves. Check connections securely to prevent electrical shocks.
Ensuring your safety is crucial when working with car electronics, especially when using a multimeter to check your alternator. Electricity can be dangerous if handled improperly, so taking the right precautions can protect you from potential hazards. Let’s dive into some key safety measures to keep in mind.
Wear Protective Gear
Always wear safety goggles and gloves. They protect your eyes from sparks and your hands from any unexpected electrical shocks. A simple slip of a wire can lead to serious injury, so don’t skip this step. It might sound basic, but it’s a fundamental part of staying safe.
Work In A Safe Environment
Ensure you’re working in a well-lit and dry area. Water and electricity are a dangerous mix, and poor visibility can lead to mistakes. If you’re working in your garage, make sure it’s free from clutter to avoid tripping or accidental contact with other car parts.
Turn Off Your Car
Before you start, turn off your car and remove the keys from the ignition. This simple step can prevent unexpected electrical surges. It might sound obvious, but you’d be surprised how often it’s overlooked in the rush to get things done.
Double-check Your Multimeter Settings
Set your multimeter to the correct setting for measuring voltage. Using the wrong setting can damage the multimeter or give inaccurate readings. It’s a small detail, but it ensures you get reliable results while keeping your equipment in good condition.
Be Mindful Of Battery Terminals
When connecting the multimeter, be cautious around the battery terminals. Connect the red probe to the positive terminal and the black probe to the negative terminal. A mix-up here can lead to incorrect readings and potential short-circuits.
Keep A Fire Extinguisher Handy
Have a fire extinguisher nearby, specifically one rated for electrical fires. While it’s rare for things to escalate to this level, being prepared can make all the difference. It’s one of those precautions that you hope never to use, but it’s essential. By following these safety precautions, you ensure a smooth and secure process when checking your alternator. What safety tips have you found useful in your DIY car projects?
Locating The Alternator
Locate the alternator near the engine’s front or side. Recognize it by its belt-driven pulley. Ensure the engine is off before checking with a multimeter.
Locating the alternator in your vehicle is the first step to checking it with a multimeter. This might seem like a daunting task, especially if you’re not accustomed to tinkering under the hood. However, with a bit of guidance, you’ll find it’s easier than you might think. Once you know what to look for, the process becomes straightforward and manageable. Don’t worry if you’re not a car expert—by the end of this, you’ll have the confidence to locate the alternator on your own.
Identifying The Alternator
The alternator is typically found at the front of your engine. It’s usually mounted near the top for easy access. Look for a small, metallic device with a pulley and several wires attached. It often has a fan-like appearance, which can help you spot it quickly. Remember that it’s not the largest component, so keep an eye out for something that’s smaller yet significant in its position.
Common Locations For Different Vehicles
In most vehicles, the alternator is located at the front of the engine. However, its exact position can vary. In some cars, it might be on the driver’s side, while in others, it could be on the passenger’s side. For example, in a compact car, the alternator might be tucked away, requiring you to look a bit deeper. In larger vehicles, it might be more accessible. Checking your vehicle’s manual can give you a precise location, which can save you time and effort.
Tools Needed To Access The Alternator
To locate and inspect the alternator effectively, you’ll need a few tools. A flashlight is essential, especially if you’re working in a dimly lit garage. A basic set of wrenches might be necessary if you need to remove any parts to get a better view. Wearing gloves can protect your hands from sharp edges or hot surfaces. Ensuring you have the right tools on hand can make the process smoother and more efficient.
Safety Precautions Before You Start
Before you dive under the hood, safety should be your priority. Make sure the engine is off and cool to the touch. Working on a hot engine can lead to burns or other injuries. Disconnect the battery to prevent any electrical shocks. This small step can make a big difference in keeping you safe. Taking these precautions helps ensure that your DIY adventure doesn’t turn into a trip to the emergency room.
Why Knowing Your Alternator’s Location Matters
Understanding where your alternator is located can save you time and money. Imagine being stuck on the side of the road, unsure of what to do. If you know where the alternator is, you can quickly check if it’s the source of your problem. It empowers you to take charge of minor repairs and maintenance. This knowledge can be a confidence booster, making you feel more in control of your vehicle’s health. So, are you ready to find your alternator and take the first step in checking it with a multimeter?

Credit: tameson.com
Setting Up The Multimeter
Setting up the multimeter is crucial before checking an alternator. First, connect the multimeter’s probes to the battery terminals. Adjust settings to measure voltage, ensuring accurate readings during the test.
Setting up a multimeter is crucial for checking your alternator. You need to ensure the multimeter is ready to provide accurate readings. This process involves selecting the right mode and adjusting the settings correctly. Let’s break down each step to make sure your multimeter is set up perfectly.
Choosing The Correct Mode
First, you need to choose the right mode on your multimeter. Most multimeters have a dial or button for mode selection. To check an alternator, set the multimeter to measure DC voltage. This mode is typically marked with a “V” and a straight line. Make sure it is not set to AC, which is used for household electricity. DC voltage is crucial for automotive components like alternators.
Adjusting The Settings
After selecting the mode, adjust the multimeter settings. Ensure the range is suitable for the alternator’s voltage. Most car alternators output between 12 to 14 volts. Set the multimeter to a range that covers this voltage. Some multimeters auto-range, but others need manual adjustment. Check your multimeter’s manual if unsure. Proper settings guarantee accurate readings, which are essential for diagnosing alternator issues.
Testing Battery Voltage
To check an alternator with a multimeter, first set the multimeter to DC voltage. Next, place the positive probe on the alternator’s output terminal and the negative probe on the ground. A healthy alternator should read between 13. 5 to 14.
5 volts while the engine is running.
Testing the battery voltage is crucial for alternator checks. A multimeter helps verify if the alternator charges the battery properly. Follow these steps for a straightforward testing process.
Initial Voltage Check
Start with a fully charged battery. Set your multimeter to DC volts. Attach the red probe to the positive terminal of the battery. Connect the black probe to the negative terminal. Ensure the engine is off during this test. Note the voltage reading displayed on the multimeter screen.
Interpreting The Results
A good battery shows a voltage between 12.4 and 12.6 volts. If the reading is lower, the battery may be undercharged. Check for signs of corrosion on the terminals. A higher reading indicates a possible surface charge. This can happen if the battery was recently charged. Let it rest for a few minutes, then test again. If the voltage remains high, the battery might be overcharged. This could indicate an alternator issue.
Testing Alternator Voltage
Using a multimeter, quickly check your alternator’s voltage for issues. First, set the multimeter to DC volts. Then, connect the probes to the battery terminals. A healthy alternator should read between 13. 8 to 14. 4 volts.
Testing the alternator voltage in your vehicle is crucial to ensure it’s functioning correctly. If your car’s battery keeps dying or the headlights dim unexpectedly, you might suspect an alternator issue. Checking the alternator with a multimeter is a simple task that can save you time and money. So grab your multimeter, and let’s dive into how to measure and analyze the alternator’s voltage output effectively.
Measuring Alternator Output
Begin by setting your multimeter to the DC voltage setting. Make sure your car is off before connecting the multimeter leads to the battery. Connect the red lead to the positive terminal and the black lead to the negative terminal of the battery. Start your car and let it idle. The multimeter should read between 13.8 to 14.4 volts if the alternator is charging correctly. If the reading is below 12.6 volts, the alternator might not be charging the battery effectively. This is a straightforward way to assess whether your alternator is working.
Analyzing The Voltage Reading
Now that you’ve got your voltage reading, it’s time to analyze it. A healthy alternator should maintain a steady voltage. If your reading fluctuates significantly, it could indicate a problem. Consider the age and condition of your battery and alternator. A brand-new alternator should provide a more stable voltage compared to an older one. If you notice any irregularities, it might be time to consult with a professional mechanic. Think about this: when was the last time you checked your alternator? Regular checks can prevent unexpected breakdowns. By understanding and analyzing your voltage readings, you can ensure your vehicle remains in top condition. So, what’s your reading saying about your alternator’s health?
Testing Alternator Diodes
Checking alternator diodes with a multimeter involves testing for continuity and voltage drops. Set the multimeter to the diode setting. Connect it to the diode terminals to check for proper readings. This helps identify faulty diodes that can affect your vehicle’s charging system.
Testing alternator diodes is a crucial step in ensuring your vehicle’s electrical system runs smoothly. Diodes play a vital role in converting AC current to DC, which is essential for charging your car battery. If a diode fails, it can lead to battery drainage or even more severe electrical issues. Understanding how to check these diodes with a multimeter can save you from future headaches and costly repairs. But how exactly do you get started?
Setting Multimeter To Diode Mode
Before you begin, ensure your multimeter is set to the correct mode. Most modern multimeters have a diode mode, usually indicated by a small diode symbol. Turn the multimeter dial to this setting. If you’re unsure, consult the user manual of your multimeter. Setting it correctly ensures accurate readings, so don’t skip this step.
Checking For Diode Failure
With your multimeter ready, it’s time to test the alternator diodes. Connect the multimeter probes to the diode terminals, red to the positive and black to the negative. A healthy diode should show a forward voltage drop between 0.5V to 0.8V. If the reading is outside this range or if it shows zero or infinite resistance in both directions, the diode might be faulty. Have you ever wondered why your car battery dies unexpectedly? A failed diode could be the culprit. By checking the diodes with your multimeter, you can pinpoint the issue early. Testing diodes might sound technical, but it’s an easy process once you get the hang of it. Do you have any diode testing experiences to share? Your insights could help others troubleshoot more effectively.
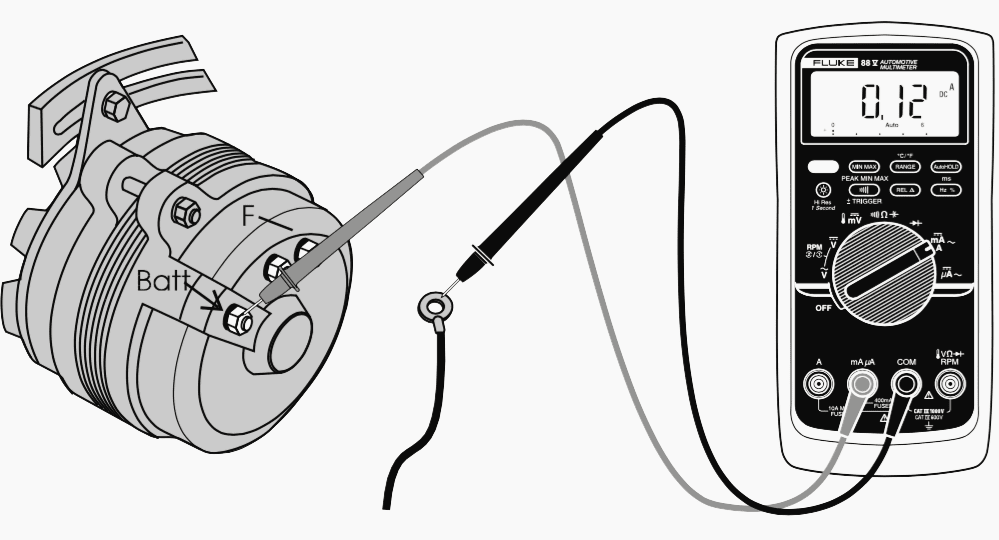
Credit: electrical-engineering-portal.com
Troubleshooting Common Issues
Testing your alternator with a multimeter can prevent vehicle issues. Start by checking the battery voltage. Then, measure the alternator’s output. Ensure it reads between 13. 8 to 15 volts. A lower reading might indicate a faulty alternator, requiring repair or replacement.
Regular checks can help maintain your vehicle’s electrical system health.
Troubleshooting common issues with your vehicle’s alternator can save you time and money. By understanding how to check the alternator using a multimeter, you can diagnose problems before they become serious. Have you ever felt stranded due to a car that just won’t start, even though the battery seems fine? It’s a frustrating experience, but checking your alternator can help prevent this scenario. Below, we’ll explore practical steps to identify common alternator issues using a multimeter.
Low Voltage Output
A low voltage output from your alternator can lead to various electrical problems in your car. To check for this issue, set your multimeter to DC voltage. Place the red probe on the positive terminal of the battery and the black probe on the negative terminal. Start the engine and observe the reading. Ideally, it should be between 13.5 to 14.5 volts. If the voltage is consistently lower, your alternator may not be charging your battery properly. You might notice dim headlights or a slow power window response as a result. Consider checking the alternator belt for wear or tension. This simple step might resolve the issue without further intervention.
No Voltage Output
Finding no voltage output might indicate a serious issue with your alternator. Begin by setting your multimeter to DC voltage. Connect the probes to the battery terminals as described earlier. With the engine running, if you see no voltage increase, the alternator may have failed completely. You could be facing a dead battery soon. Before jumping to conclusions, ensure that all connections are secure and free of corrosion. Sometimes, a loose wire can mimic a failing alternator. It’s a quick fix that can save you from costly repairs. Troubleshooting your alternator with a multimeter empowers you to understand your vehicle better. Have you checked your alternator recently? What steps did you take to resolve any issues? Share your experiences and help others learn from your insights.
When To Seek Professional Help
Checking your alternator with a multimeter can save you time and money. Sometimes, though, the process can get complicated. Knowing when to seek professional help is crucial. This ensures your vehicle remains in top condition and avoids further damage.
Signs That Indicate Professional Help Is Needed
If your vehicle’s electrical system shows frequent issues, it might be time for expert advice. Strange noises from the alternator can signal deeper problems. Flickering lights or a dead battery are also red flags. These signs often mean the alternator needs a detailed inspection.
Complex Electrical Problems
Alternators can have complex issues that a multimeter can’t detect. If the car stalls or electronic devices malfunction, expert help is necessary. Professionals have tools and expertise to diagnose these intricate problems.
Lack Of Experience With Multimeters
Using a multimeter can be tricky for beginners. Incorrect readings can lead to wrong conclusions. If you are unfamiliar with the tool, consider asking a professional. They can ensure accurate diagnostics and prevent costly mistakes.
Persistent Issues Despite Diy Efforts
Sometimes, attempts to fix alternator issues at home don’t work. If problems persist after using a multimeter, it’s wise to consult a professional. Continuous issues might indicate a larger problem needing advanced tools and knowledge.
Frequently Asked Questions
How Do You Test An Alternator With A Multimeter?
Testing an alternator with a multimeter involves checking voltage output. Set the multimeter to DC volts. Connect the probes to the battery terminals. Start the engine and observe the voltage reading. A healthy alternator typically shows 13. 8 to 14.
4 volts. If below this range, the alternator may need repair.
What Is The Multimeter Setting For Alternator Testing?
Use the DC voltage setting on your multimeter for alternator testing. This setting allows you to measure the output voltage. Ensure your multimeter is correctly calibrated. Connect the probes to the battery terminals. Start the engine to get an accurate voltage reading.
Proper voltage indicates a functional alternator.
Can A Multimeter Diagnose Alternator Problems?
Yes, a multimeter can diagnose alternator problems by measuring voltage output. Connect the multimeter probes to the battery terminals. Start the engine and check the voltage reading. A low voltage reading may indicate alternator issues. Consistent readings below 13. 8 volts suggest a failing alternator needing attention.
What Voltage Indicates A Bad Alternator?
A voltage reading below 13. 8 volts usually indicates a failing alternator. Connect the multimeter to the battery terminals and start the engine. If the voltage remains consistently low, it suggests alternator problems. A healthy alternator typically shows a voltage between 13.
8 and 14. 4 volts.
Conclusion
Checking your alternator with a multimeter is simple. Follow the steps above. It’s crucial for car health. Regular checks prevent battery issues. Avoid unexpected breakdowns. Multimeters are handy tools. They show voltage clearly. Always keep safety in mind. Ensure connections are secure.
This helps get accurate readings. Remember to turn off the engine. It’s safer this way. Understanding your car’s alternator boosts confidence. You can spot problems early. Save time and money. Feel empowered to maintain your car. It’s easy with practice.
Keep your multimeter ready. Your alternator depends on it. Happy testing!


