
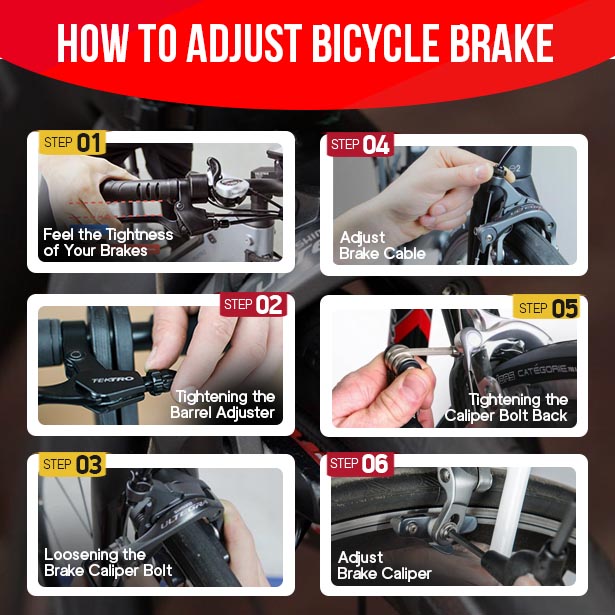
Are your bike rides feeling less smooth lately? Maybe your caliper brakes are not performing at their best.
Properly adjusted brakes are crucial for your safety and riding experience. When your brakes are too loose, stopping can become a nerve-wracking game of chance. Too tight, and you might find yourself battling unnecessary friction. But don’t worry, adjusting your bike caliper brakes is simpler than you think, and you can do it yourself with a few basic tools.
In this guide, we’ll walk you through the process step-by-step, so you can get back on the road with confidence and peace of mind. Ready to enhance your biking adventures with optimal brake performance? Let’s dive in.
Tools Required
Adjusting bike caliper brakes requires a few essential tools. A hex wrench, screwdriver, and an adjustable wrench are needed. These tools help ensure precise adjustments for smooth braking.
Adjusting bike caliper brakes might seem daunting at first, but with the right tools, it becomes a straightforward task. Whether you’re a seasoned cyclist or just starting out, knowing how to adjust these brakes ensures a safer and smoother ride. Before diving into the adjustment process, let’s first gather the essential tools you’ll need.
Hex Wrenches
Hex wrenches, also known as Allen keys, are indispensable when working with bike brakes. Most caliper brakes require a 5mm or 6mm hex wrench for adjustments. Keep a set handy in various sizes to ensure you’re prepared for any unexpected tweaks.
Screwdriver
A simple screwdriver can be a lifesaver. You’ll often need a Phillips or flathead screwdriver to adjust the brake pads. This helps in aligning them correctly with the rims, ensuring optimal performance.
Adjustable Wrench
The adjustable wrench is perfect for loosening and tightening bolts. It’s particularly useful if you’re dealing with older bikes that might have different bolt sizes. Having one can save you from the frustration of incompatible tools.
Cable Puller
A cable puller, or third hand tool, can make adjusting brake cables much easier. It holds the cable taut while you tighten the caliper bolt. This ensures your brake cables are neither too tight nor too loose, providing just the right amount of tension.
Ruler Or Caliper
Precision is key in brake adjustments. A ruler or caliper helps you measure the distance between the brake pads and the rim. Ensuring this gap is consistent on both sides can dramatically improve brake performance. — Think about the last time you adjusted your bike brakes. Did you have all these tools ready, or were you scrambling to find the right one? Having these tools organized and within reach can turn a potentially frustrating experience into a quick and efficient process. Are there any tools you’ve found particularly useful that aren’t listed here? Let us know in the comments!
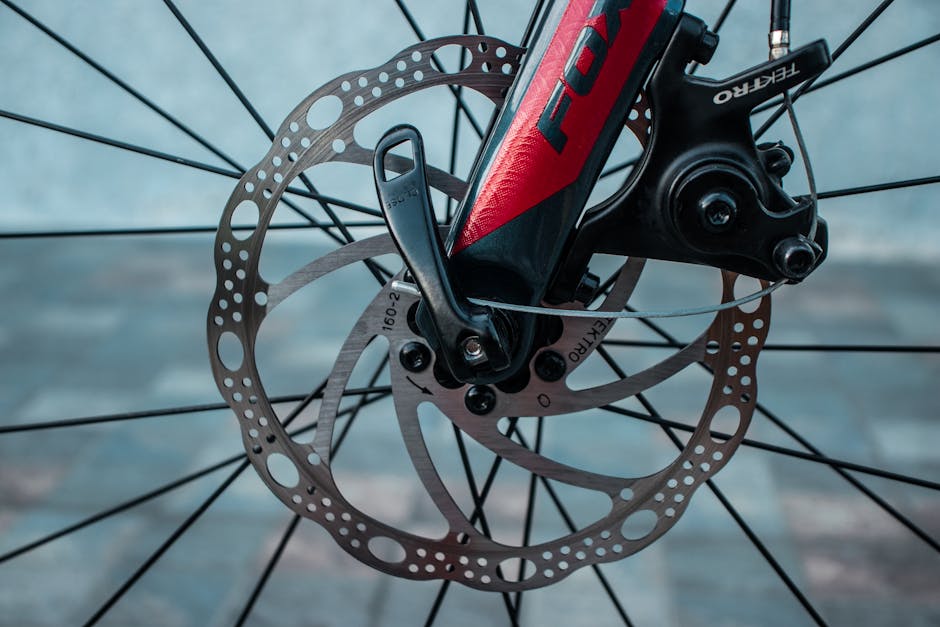
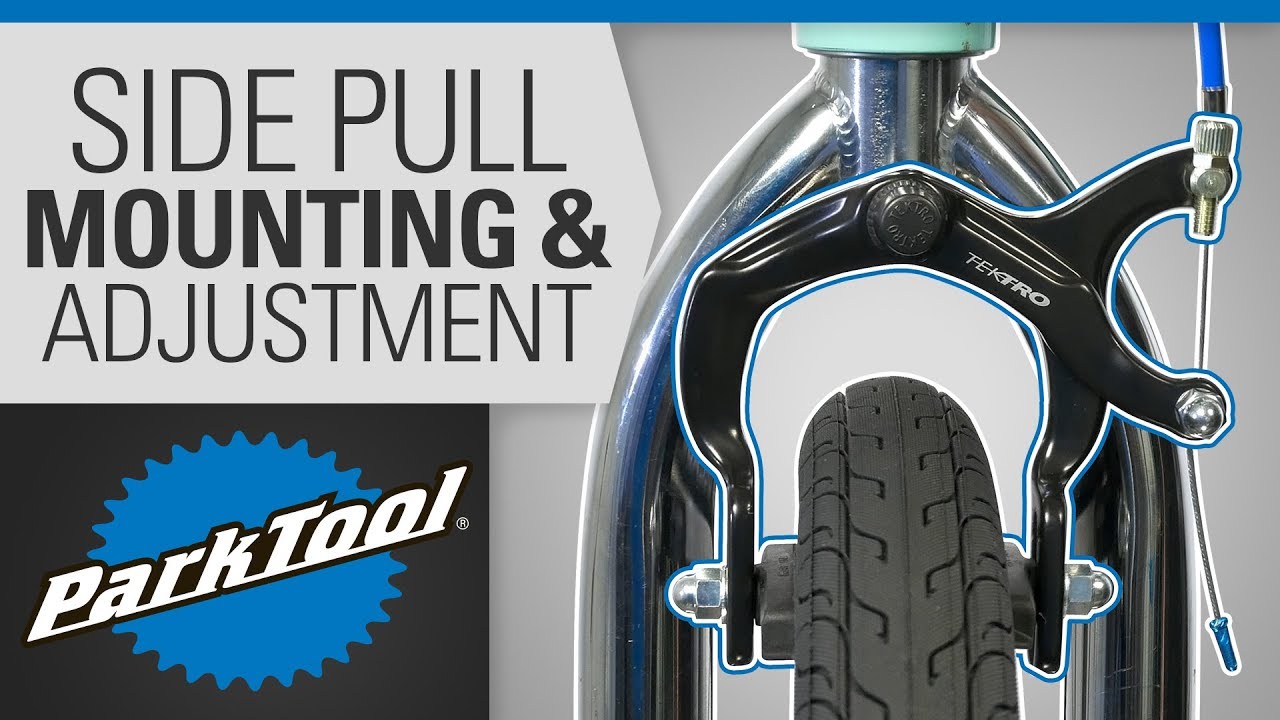
Understanding Caliper Brakes
Caliper brakes are essential for safe cycling. They are mounted over the wheel rim. Their function is to squeeze the rim to slow down the bike. Knowing how they work helps maintain them better. Let’s explore their parts and operation.
What Are Caliper Brakes?
Caliper brakes are a type of rim brake. They are commonly used on road bikes. They consist of two arms and brake pads. The arms are connected by a bolt. When you pull the brake lever, the arms close in. This action presses the brake pads against the wheel rim. The friction slows down the bike.
Parts Of Caliper Brakes
Caliper brakes have several key components. The main parts include the caliper arms, brake pads, and cable. The caliper arms hold the brake pads. The pads press against the rim to stop the bike. The cable connects the brake lever to the caliper. It transmits force when you pull the lever.
How Caliper Brakes Work
Caliper brakes operate through a simple mechanism. Pulling the brake lever tightens the cable. This pulls the caliper arms together. The brake pads then make contact with the wheel rim. This contact generates friction, slowing the bike down.
Benefits Of Caliper Brakes
Caliper brakes are lightweight and efficient. They offer good stopping power on dry surfaces. They are also easy to adjust and maintain. Their simple design makes them a popular choice for road cyclists.
Identifying Common Issues
Adjusting bike caliper brakes can be a straightforward task once you identify common issues that might be affecting your bike’s performance. Understanding these issues is crucial for ensuring smooth rides and maintaining your bike’s safety. Let’s dive into what could be causing your brakes to act up and how you can fix them.
Misalignment Of Brake Pads
One of the most frequent problems is brake pad misalignment. If your brakes squeak or struggle to stop your bike, the pads might not be hitting the rim correctly. You can fix this by adjusting their position. Ensure they contact the rim evenly and don’t rub against the tire.
Loose Brake Cables
Another common issue is loose brake cables. If you notice your brake lever feels too soft or doesn’t engage the brakes fully, the cables might need tightening. This adjustment is simple. Tighten the cable at the caliper until the lever feels firm. Test it to ensure you have optimal braking power.
Damaged Brake Pads
Damaged or worn-out brake pads can severely affect braking efficiency. Check them regularly for signs of wear or damage. If they’re thin or uneven, it’s time to replace them. Fresh pads can drastically improve your bike’s stopping power.
Dirty Or Greasy Components
Dirt or grease on brake components can lead to poor performance. Clean the pads and rims with a mild detergent and water. This ensures they grip well and function smoothly. Regular cleaning can prevent long-term damage and improve overall performance.
Excessive Brake Pad Wear
Excessive wear can be due to aggressive braking or poor quality pads. Monitor the pad thickness regularly. If they wear down quickly, consider replacing them with higher-quality options. This not only enhances safety but also prolongs your bike’s lifespan.
Have you faced any of these issues while riding your bike? Understanding and addressing these problems can transform your cycling experience. Remember, regular maintenance is key to avoiding unexpected challenges on your rides. Could a simple adjustment be what your bike needs for a smoother ride?
Credit: www.youtube.com
Preparing Your Bike
Adjusting bike caliper brakes ensures safe stops and smooth rides. Start by loosening the brake cable. Align pads evenly with the wheel rim. Tighten bolts. Check for even gap between pads and rim. Test the brakes by squeezing the lever.
Make minor tweaks for perfect contact.
Preparing your bike before adjusting the caliper brakes is crucial for a smooth and hassle-free process. You want to ensure everything is set up correctly to avoid unnecessary frustration and ensure safety. Imagine the satisfaction of riding a bike with perfectly adjusted brakes—let’s get there together.
Check Tire Pressure
Before adjusting the caliper brakes, make sure your tires are properly inflated. Low tire pressure can affect the brake’s performance. A quick check can save you a lot of trouble on the road. Grab a tire pressure gauge and verify the pressure matches the recommended PSI printed on your tire’s sidewall. Properly inflated tires not only make brake adjustments easier but also improve your overall ride quality.
Inspect The Brake Pads
Are your brake pads in good condition? Worn-out pads can render your adjustments useless. If they look thin or uneven, consider replacing them before moving forward. Think about the last time you had a sudden stop. Worn brake pads might not have been as effective. Good brake pads ensure your safety, giving you peace of mind.
Clean The Bike Frame And Rims
A clean bike is a happy bike. Dust and grime can affect brake performance. A quick wipe-down can make a huge difference. Use a soft cloth and some mild detergent to clean the rims and frame. This simple step can make your brake adjustments more accurate and efficient.
Gather The Right Tools
Having the right tools at hand is essential. You don’t want to start the process only to realize you’re missing something crucial. Ensure you have an Allen wrench, screwdriver, and a spanner. These tools are generally needed for caliper brake adjustments. Consider keeping a small toolbox nearby—it’s a small investment that can save you time and effort.
Secure Your Bike
A stable bike is easier to work on. Consider using a bike stand or position your bike against a sturdy surface. Think about the last time you tried to fix something that kept moving around. Frustrating, right? Securing your bike will make the task at hand much simpler and more efficient.
As you prepare your bike, remember that these small steps can make a big difference in the overall adjustment process. Are you ready to experience a safer and more enjoyable ride?
Aligning Brake Pads
Adjusting bike caliper brakes involves aligning brake pads for optimal performance. Ensure pads touch the rim evenly without rubbing. Tighten bolts securely to maintain proper alignment and enhance braking efficiency.
Aligning your bike’s brake pads is crucial for safe and efficient riding. Misaligned pads can lead to uneven wear, decreased stopping power, and annoying squeaks. Knowing how to align them properly ensures not only your safety but also extends the life of your brake pads. Let’s dive into the steps that will help you align your brake pads like a pro.
Understanding The Basics Of Brake Pad Alignment
Before you start, familiarize yourself with the brake pads and their position in relation to the wheel rim. The pads should be parallel to the rim and make contact evenly. Notice if they touch the rim fully or just the edges; this indicates misalignment.
Gathering Your Tools
You’ll need a few basic tools: an Allen wrench, a flashlight, and possibly a bike stand. The Allen wrench will help you adjust the brake pad positioning screws. A flashlight can make it easier to see what you’re doing, especially if you’re working in a dimly lit area. Having a bike stand isn’t necessary but can make the process more comfortable.
Loosening The Brake Pads
Start by loosening the bolt that holds the brake pad in place using the Allen wrench. Be careful not to remove it entirely; just enough so the pad can move. This step is essential as it allows you to reposition the pad without any restrictions.
Positioning The Brake Pads
Position the pad so that its entire surface will contact the rim when the brake is applied. The pad should not touch the tire or hang below the rim. A common mistake is aligning the pad too high, which can lead to tire damage.
Checking Pad Alignment
Once positioned, spin the wheel and apply the brakes to check the alignment. Ensure that the pad makes contact with the rim evenly across its surface. If you notice any part of the pad missing the rim, make the necessary adjustments.
Tightening The Brake Pads
After confirming the alignment, tighten the bolt securely with the Allen wrench. Make sure the pad doesn’t move as you tighten. A loose pad can shift during braking, leading to potential accidents.
Testing Your Work
Finally, take your bike for a short test ride. Pay attention to how the brakes feel and listen for any unusual noises. If you hear squeaking or if the brakes feel uneven, revisit the alignment process. Aligning brake pads might seem like a small detail, but it makes a significant difference in your biking experience. Have you ever had a close call because of poorly aligned brakes? Share your experiences and tips in the comments!
Credit: www.youtube.com
Adjusting Brake Tension
Adjusting brake tension ensures effective stopping power for bike caliper brakes. Loosen the brake cable bolt, then gently pull the cable to increase tension. Tighten the bolt securely. Test the brakes by squeezing the brake levers. Adjust as needed for smooth operation.
This process enhances safety and brake performance.
Adjusting brake tension is a crucial part of maintaining your bike’s safety and performance. This process ensures your brakes are responsive and efficient, making your rides smoother and more enjoyable. You don’t need to be a bike mechanic to adjust brake tension; with some basic tools and patience, you can do it yourself. When I first adjusted my bike’s brakes, I was surprised at how much of a difference it made. Suddenly, stopping was easier and more reliable. This experience taught me that even small tweaks can lead to big improvements.
Understanding Brake Tension
Brake tension refers to how tightly the brake pads press against the wheel rims. Too loose, and your bike won’t stop effectively. Too tight, and they might rub against the rims, slowing you down. You can assess the brake tension by squeezing the brake levers. Ideally, they should stop about halfway to the handlebars. If they touch the handlebars, the tension is too loose.
Tools You Will Need
Before diving into the adjustment, gather these tools: – A 5mm Allen wrench – A Phillips screwdriver – A pair of pliers Having these on hand will make the process smoother. Remember, using the right tool is half the job done.
Steps To Adjust Brake Tension
1. Position the Bike Correctly: Secure your bike on a stand or flip it upside down. This gives you easy access to the brakes. 2. Loosen the Cable Bolt: Use the 5mm Allen wrench to loosen the bolt that holds the brake cable. This step is crucial for making any adjustments. 3. Adjust the Tension: Pull the brake cable through the caliper to increase tension or release it slightly to decrease tension. Use pliers if needed. 4. Tighten the Cable Bolt: Once adjusted, retighten the bolt to secure the cable in place. This ensures your settings stay in place. 5. Test the Brakes: Squeeze the brake levers to check the tension. Adjust again if needed, until they feel just right.
Common Mistakes To Avoid
Rushing through the process can lead to improper adjustments. Ensure the cable is not twisted before tightening the bolt. Check both front and rear brakes; they may require different adjustments. Ignoring brake pad alignment can also cause issues. Make sure pads are aligned with the rims to prevent uneven wear.
Why Regular Adjustment Matters
Regularly adjusting your brake tension is essential for safe cycling. It can prevent accidents, especially in wet or hilly conditions. By keeping your brakes in top condition, you’re also extending their lifespan. This saves you money on replacements in the long run. How often do you check your bike brakes? Consider setting a regular schedule for maintenance. It can make all the difference in your cycling experience.
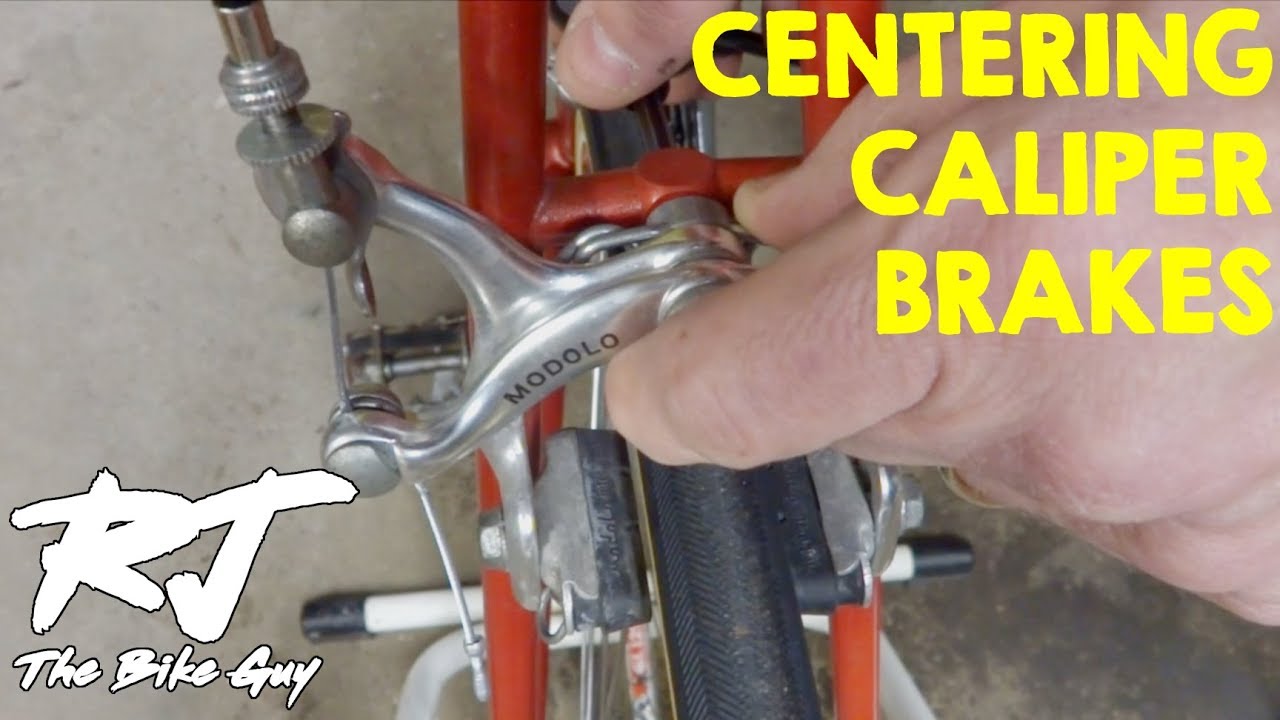
Centering The Brake Caliper
Centering the brake caliper is crucial for effective bike braking. Proper alignment ensures smooth and consistent stopping power. This process can be simple with the right approach. Begin by understanding the basics of caliper positioning. A centered caliper prevents uneven wear on brake pads. It also avoids unwanted friction and noise.
Loosen The Caliper Bolts
Start by loosening the caliper bolts. Use a hex wrench for this task. Loosen both bolts slightly. This allows the caliper to move freely. Be careful not to remove the bolts completely. Keeping them in place helps maintain control.
Align The Caliper
Align the caliper with the wheel rim. Ensure the brake pads are parallel to the rim. The pads should touch the rim evenly. Adjust the caliper position until both sides are symmetrical. This ensures equal pressure during braking.
Secure The Caliper In Place
Tighten the caliper bolts after alignment. Use the hex wrench again. Tighten gradually and evenly. Check the alignment as you tighten. Ensure the caliper remains centered. Firmly securing the bolts prevents movement.
Test The Brake Function
Test the brakes by squeezing the levers. Check for smooth operation. Listen for any unusual sounds. The brake pads should grip the rim evenly. Adjust if necessary for optimal performance. A few tests ensure the brakes are ready.
Check For Clearance
Inspect the clearance between the caliper and wheel. Ensure no parts are touching unnecessarily. Proper clearance prevents damage. Adjust if needed for safety. This final check confirms successful centering.
Testing Brake Performance
Adjusting bike caliper brakes ensures safe and efficient stopping. Tighten the brake cable for immediate response. Align calipers so pads touch the rim evenly.
Testing the performance of your bike caliper brakes is a crucial step to ensure your safety on the road. A well-adjusted brake can be the difference between a smooth stop and an unexpected skid. By taking the time to test, you not only guarantee your ride is safe but also enhance your overall biking experience. So, how do you effectively test your brakes after making adjustments?
Engage The Brake Levers
Squeeze the brake levers firmly. Are they responsive? Ideally, they should engage the brakes before the lever touches the handlebar. If the lever requires excessive force or reaches the handlebar, further adjustments are necessary. This simple test can reveal a lot about the effectiveness of your brake adjustments.
Check The Brake Pads
Inspect the brake pads as they press against the wheel rim. Do they make full contact, or are they misaligned? Proper contact ensures optimal stopping power. Misaligned pads can cause uneven wear and reduced braking efficiency. Adjust the pads so they align perfectly with the rim, ensuring maximum grip.
Roll And Stop
Take your bike for a slow roll. Gently apply the brakes to see how quickly and smoothly your bike comes to a stop. Does your bike stop straight, or does it veer to one side? A straight stop indicates balanced brakes, while veering may suggest uneven tension or alignment issues. You want your bike to halt smoothly and predictably every time.
Listen For Unusual Sounds
As you test your brakes, keep an ear out for any unusual sounds like squealing or grinding. These sounds could indicate dirt on the brake pads or misalignment. Clean the pads and readjust if necessary. Silent brakes are usually a sign of well-maintained systems.
Assess Brake Sensitivity
How sensitive are your brakes? Do they stop the bike too abruptly, or is there a delay? You should feel confident that your bike will respond to your commands without any surprises. Adjust the tension if the brakes feel too tight or too loose. Finding the right balance can significantly enhance your riding experience. By thoroughly testing your bike caliper brakes, you ensure not only your safety but also your peace of mind. What steps do you take to guarantee your bike is in top shape? Share your experiences and tips to help fellow riders stay safe and enjoy the ride.
Maintenance Tips
Proper maintenance of bike caliper brakes ensures smooth and safe rides. Regular upkeep prevents unexpected issues and prolongs brake life. Understanding basic maintenance tips can make this task easier.
Check Brake Pads Regularly
Inspect brake pads for wear and tear. Thin or uneven pads need replacement. Check alignment with the wheel rim for effective braking. Well-aligned pads stop the bike smoothly.
Clean Brake Components
Dirt affects brake performance. Clean calipers, rims, and pads with a damp cloth. Remove debris and grime. This enhances braking efficiency.
Lubricate Moving Parts
Lubrication reduces friction in moving parts. Apply lubricant to pivot points and cable housing. Use bike-specific lubricants for best results. Avoid oils that attract dust.
Adjust Cable Tension
Correct cable tension ensures responsive braking. Check tension by squeezing brake levers. Adjust using barrel adjusters on the brake calipers. Proper tension keeps brakes firm.
Inspect For Loose Components
Loose components affect braking. Tighten bolts and nuts on calipers. Ensure cables are secure. Regular checks prevent brake failure.
Test Brake Functionality
Test brakes before rides. Ensure levers engage smoothly. Listen for unusual noises. Prompt action prevents potential issues.
Troubleshooting Common Problems
Adjusting bike caliper brakes can seem tricky. Sometimes, issues arise that make it challenging. This section helps you tackle common brake problems. These tips ensure your ride stays smooth and safe.
Uneven Brake Pad Wear
Uneven wear is a frequent issue. Check both brake pads for signs of uneven wear. If one pad is thinner, adjust it. Loosen the caliper bolt slightly. Position the caliper until both pads touch the rim equally. Tighten the bolt securely. This simple fix ensures even wear.
Squeaky Brakes
Squeaky brakes can be annoying. Dirt or oil on the rims may cause this. Clean the rims with rubbing alcohol. Check the alignment of the brake pads. Misaligned pads can also squeak. Adjust the pad angle slightly. Ensure they hit the rim squarely.
Sticky Brakes
Sticky brakes hinder smooth riding. Check the brake cable tension first. It might be too tight. Loosen the barrel adjuster a bit. If the brake still sticks, inspect the cable housing. Replace it if it’s damaged or worn. Regular maintenance prevents this issue.
Brake Lever Too Loose
A loose lever is a common concern. It affects braking efficiency. Tighten the brake cable by turning the barrel adjuster. If the lever still feels loose, check the cable anchor bolt. Ensure it’s tightened correctly. Adjust until the lever feels firm.
Poor Braking Performance
Poor performance could be due to worn brake pads. Inspect the pads for thinning or damage. Replace them if necessary. Check cable tension and alignment. Correct any misalignments. A well-maintained brake system ensures effective stopping power.
Credit: blog.rodalink.com
Frequently Asked Questions
How Do I Know If My Caliper Brakes Need Adjusting?
Caliper brakes need adjusting if you notice uneven braking or squeaking. Also, check if the brake pads are too close or too far from the rim. Regularly inspect your brakes to ensure they function properly, ensuring a safe and smooth ride.
What Tools Are Needed To Adjust Caliper Brakes?
To adjust caliper brakes, you’ll need a screwdriver and an Allen wrench. These tools help you loosen and tighten bolts on the brake caliper. Having these handy ensures you can make necessary adjustments quickly and efficiently.
How Can I Stop Caliper Brake Squeaking?
To stop caliper brake squeaking, clean the rim and brake pads. Ensure proper alignment and check for wear. Applying a small amount of lubricant can also help. Regular maintenance keeps brakes quiet and functional.
What Is The Correct Brake Pad Alignment?
Correct brake pad alignment means the pads contact the rim evenly during braking. Ensure they don’t touch the tire. Misalignment can lead to uneven wear and poor braking performance. Adjust the pads using an Allen wrench for optimal function.
Conclusion
Adjusting bike caliper brakes can enhance your cycling experience. Proper brake alignment ensures safe rides. Regular checks maintain brake efficiency. Tighten bolts securely to avoid issues. Keep brake pads well-positioned. Clean brake surfaces for smooth performance. Test brakes before every ride.
This ensures reliability. Simple tools make adjustments easy. No need for expert skills. Follow these steps for confidence on the road. Enjoy smoother rides with properly adjusted brakes. Your bike becomes safer, more responsive. Take time to adjust and test.
Feel the difference in control and safety. Happy cycling!


