
Are you struggling to remove drawers from your Craftsman tool chest? Whether you’re reorganizing your workspace or performing maintenance, getting those drawers out can feel like a mystery.
The good news is, you’re in the right place. In this guide, we’ll reveal the secrets to effortlessly removing drawers from your Craftsman tool chest. Imagine finally having easy access to your tools, or the satisfaction of knowing your tool chest is operating smoothly.
With clear, simple steps, you’ll feel empowered and in control. Dive in, and discover how a few easy adjustments can transform your tool chest experience. Let’s get started!

Credit: www.reddit.com
Preparing For Drawer Removal
Removing drawers from a Craftsman tool chest requires careful preparation. Begin by clearing out tools to prevent damage. Next, locate and release the catch mechanism, usually found on the sides of the drawer.
Preparing to remove drawers from your Craftsman tool chest might seem straightforward, but a few smart steps can make the process much smoother. Taking the time to prepare ensures that you avoid any unnecessary frustration or damage to your tools and equipment. Let’s dive into the essential steps you need to take before you get started.
Gather Necessary Tools
First things first, make sure you have all the tools you need. A screwdriver set is essential, as most drawers are held in place with screws. Depending on your tool chest model, a flathead or Phillips screwdriver might be needed. A flashlight can be handy, especially if you’re working in a dimly lit garage or workshop. Consider keeping a small container nearby to hold screws and other small parts. This prevents them from getting lost, saving you time and hassle later.
Ensure Safety Measures
Safety should always be a priority. Wear gloves to protect your hands from sharp edges or any unexpected surprises inside the drawers. If your tool chest is heavy, consider asking a friend or family member to assist. A second pair of hands can make the process safer and more efficient. Ensure the tool chest is stable and won’t tip over while you’re working. A wobbly chest can lead to accidents, so check its stability before starting. Have you ever struggled with a stuck drawer and ended up with a pinched finger? Taking a moment to prepare can prevent these common mishaps. By organizing your tools and ensuring safety, you set yourself up for a hassle-free drawer removal experience. What other steps do you take to prepare for DIY tasks? Share your thoughts in the comments!

Credit: www.youtube.com
Identifying Drawer Type
Understanding how to remove drawers from your Craftsman tool chest starts with identifying the drawer type. Each type has its unique mechanism, influencing the removal process. Knowing the difference can save you time and prevent damage to your tool chest. You might have found yourself frustrated with drawers that just won’t budge. The key is recognizing whether you’re dealing with ball-bearing slides or friction slides.
Ball-bearing Slides
Ball-bearing slides are common in higher-end tool chests. They offer smooth operation, often gliding like butter when you open or close them. Look for a small lever or tab on the slide, usually found on the side of the drawer. This lever releases the drawer, letting you pull it out completely.
Have you ever noticed the satisfying glide of a drawer that seems to float out effortlessly? That’s the beauty of ball-bearing slides. To remove these drawers, simply locate the lever, press it, and gently pull the drawer towards you.
Before you start, make sure your tool chest is stable. You wouldn’t want it tipping over when you remove a heavy drawer. Safety first! Once you’re sure of the setup, go ahead and test the lever mechanism. Feel the click and the smooth transition as the drawer comes free.
Friction Slides
Friction slides, on the other hand, rely on a simpler design. They’re often found in more economical tool chests. These slides depend on the force applied to move the drawer in and out. You may need to apply a bit of pressure to release them.
Removing a drawer with friction slides can feel like a workout. You might find yourself pushing and pulling with determination. These drawers require you to lift slightly and pull with a firm grip. It’s a straightforward method that rewards persistence.
Is your tool chest a little older? Chances are you’re dealing with friction slides. Remember, a firm, steady pull usually does the trick. If you’re struggling, check if any screws or bolts are holding the drawer in place. Sometimes, the simplest solution is the one you overlooked.
Which type do you have in your tool chest? Understanding these mechanisms not only helps in removing drawers but also gives you insight into maintaining your tool chest for years to come. Identifying the drawer type is the first step in mastering your Craftsman tool chest.
Removing Ball-bearing Slide Drawers
Removing drawers from a Craftsman tool chest involves releasing the ball-bearing slides. Start by fully extending the drawer. Locate the tabs or levers on each slide and press them to release. Carefully pull the drawer out, ensuring you support its weight.
Removing ball-bearing slide drawers from your Craftsman tool chest might seem daunting at first, but with the right approach, it’s a straightforward task. These drawers are designed for smooth operation, thanks to their ball-bearing slides. Knowing how to remove them properly can save you time and prevent damage. Whether you’re reorganizing your workspace or performing maintenance, understanding the process is crucial. Let’s dive into the step-by-step method to ensure a hassle-free experience.
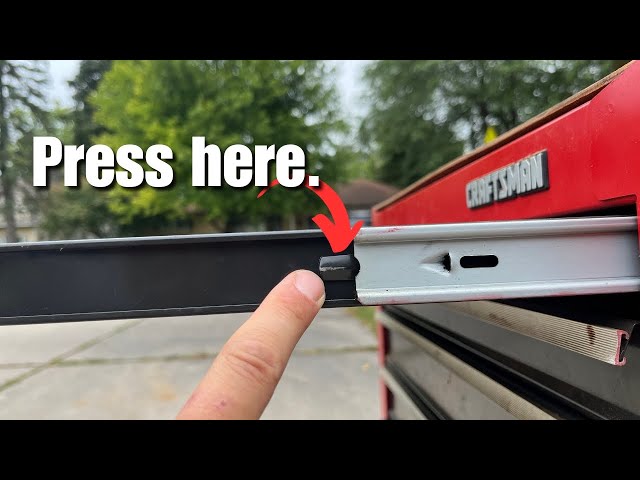
Locate The Release Mechanism
First, identify the release mechanism of the ball-bearing slide. It’s often a lever or a button located along the slide rails. Take a closer look inside the tool chest. You’ll notice these mechanisms on both sides of the drawer. These mechanisms are crucial for a smooth removal process. Have you ever struggled with a drawer that wouldn’t budge? Locating this release is key to avoiding such frustration.
Detach The Drawer
Once you’ve found the release mechanism, it’s time to detach the drawer. Press or lift the release levers on both sides simultaneously. This action disengages the ball-bearing slides, freeing the drawer. Now, with a firm grip, pull the drawer out smoothly. Have you ever wondered why some drawers feel stuck? It’s all about applying even pressure while utilizing the release mechanism. Removing these drawers can be a satisfying task, especially when everything goes as planned. You might even find it strangely therapeutic. Are you ready to give it a try and transform your workspace?

Credit: dfarq.homeip.net
Removing Friction Slide Drawers
Removing friction slide drawers from a Craftsman tool chest can seem daunting at first. But with a little guidance, you’ll find it’s a straightforward task. Whether you’re reorganizing your tools or performing maintenance, knowing how to efficiently remove these drawers can make your life easier.
Pull Out The Drawer
Start by pulling the drawer out as far as it will go. You might feel some resistance, but this is normal. The friction slides are designed to keep the drawer steady and secure.
Keep your hands steady and use a firm grip. You don’t want the drawer slipping out unexpectedly. Can you imagine the mess of tools everywhere?
Lift And Release
Once the drawer is fully extended, you’ll need to lift it slightly. This motion helps release the drawer from the friction slides. It’s a bit like opening a stubborn jar, but less frustrating.
As you lift, feel for the moment when the drawer becomes free. It’s a small shift, but you’ll notice it. Have you ever had that “aha” moment when something finally clicks?
Carefully pull the drawer away from the tool chest. Set it aside safely to avoid any accidents. Remember, safety first—those heavy drawers can pack a punch!
Have you ever considered how a small task like this can improve your workspace efficiency? By mastering the art of drawer removal, you enhance your tool chest’s functionality, making it easier to access and organize your tools.
Troubleshooting Common Issues
Removing drawers from a Craftsman tool chest involves a simple process. Start by fully extending the drawer. Locate and press the release tabs on both sides, then lift the drawer out carefully.
Troubleshooting common issues with your Craftsman tool chest can be a real game-changer, especially when it comes to removing drawers. We’ve all been there—standing in front of a stubborn drawer that refuses to budge. Understanding the typical problems can save you time and frustration. Let’s dive into some practical solutions for stuck drawers and damaged slides, ensuring your tool chest operates smoothly and efficiently.
Stuck Drawers
Stuck drawers are more than just an annoyance; they can disrupt your workflow. The first thing to check is if there’s something obstructing the drawer’s path. Maybe a tool slipped out of its spot. Carefully inspect the inside of the drawer, ensuring nothing is blocking the slides. Another common reason drawers get stuck is dirt and debris buildup. Over time, dust and grime can clog the rails, making it hard for the drawers to glide smoothly. Use a damp cloth to wipe down the slides, and consider applying a bit of lubricant to ease their movement. Have you ever noticed your drawer getting stuck only on humid days? Humidity can cause wood and some materials to expand. This slight change might be enough to make a tight fit. If this is the case, consider adjusting the drawer’s alignment or sanding down the edges slightly for a better fit.
Damaged Slides
Damaged slides can make drawer removal a nightmare. Check for visible signs of damage like bends or breaks in the slides. Such damage often requires replacing the slides entirely. You can find replacement slides at most hardware stores, and they are relatively easy to install. Sometimes, the issue might be less obvious. Misaligned slides can cause the drawer to jam or fall off track. Ensure that both sides of the slide are parallel and securely fixed to the chest and drawer. Tighten any loose screws and check the alignment. In some cases, slides might have worn down over time, impacting their functionality. If you notice excessive wear, it might be time to upgrade to more durable slides. Investing in quality slides can prevent future issues and keep your tool chest in top condition. Have you encountered these challenges with your Craftsman tool chest? Addressing them not only saves time but also prolongs the life of your tool storage system. What other solutions have you tried that worked wonders?
Reinstalling Drawers
Removing drawers from a Craftsman tool chest requires simple steps. Begin by pulling the drawer out fully. Locate the levers on both sides of the rails, then depress them simultaneously. Slide the drawer free from the cabinet, ensuring careful alignment to prevent damage.
Reinstalling drawers into a Craftsman tool chest might seem straightforward, but getting it right ensures your tools are stored securely. Whether you’re organizing your garage or simply tidying up your workspace, proper installation is key. Imagine the frustration of a drawer that won’t close properly or constantly gets stuck. Avoid these hassles by following a few simple steps. Let’s dive into how you can reinstall your drawers with ease.
Align Slides Properly
Proper alignment of the slides is the first step to success. Check both the drawer and the chest for any misaligned or bent slides. Gently adjust them with your hands, ensuring they run parallel to each other. It’s like ensuring a train is on its tracks. This might seem trivial, but it’s vital for smooth operation. Slide the drawer in slowly to see if it’s catching on anything. If it feels off, pull it out, and check again. A little patience here can save you a lot of frustration later.
Test Drawer Functionality
Once the drawer is aligned, test its functionality. Slide it in and out several times. Does it glide smoothly? If not, double-check the alignment. Sometimes a small obstruction or a misalignment can cause issues. Consider the weight of the tools you’ll be storing. A heavily loaded drawer might behave differently. Is it supporting the weight without wobbling or sagging? If not, you might need to adjust or reinforce it. Engage with your tool chest as if you’re preparing for a project. How does it feel? If everything seems right, you’ve successfully reinstalled your drawers. Feeling accomplished yet? Remember, a well-organized workspace is not just about cleanliness—it’s about efficiency and ease of access.
Maintenance Tips
Maintaining your Craftsman tool chest is essential for its longevity. Regular upkeep ensures smooth operation and prevents damage. Following these maintenance tips will keep your tool chest in prime condition.
Regular Lubrication
Lubricate the drawer slides every six months. Use a silicone-based spray for best results. This prevents rust and ensures smooth movement. Wipe off any excess lubricant to avoid attracting dust.
Inspecting For Wear And Tear
Check the drawers for signs of wear and tear. Look for dents, scratches, or loose screws. Tighten screws with a screwdriver if needed. Replace damaged parts to prevent further issues.
Frequently Asked Questions
How To Remove Drawers With No Metal Glides And No Levers?
To remove drawers without metal glides or levers, slightly lift the drawer and pull it straight out. If resistance occurs, tilt the drawer upward or downward to disengage it from the frame. Carefully continue pulling until fully removed.
How To Unlock Craftsman Tool Chest Drawers?
To unlock Craftsman tool chest drawers, insert the key into the lock and turn it clockwise. If there’s no key, apply upward pressure on the drawer while pulling it out gently. Ensure all locks are disengaged to access all drawers smoothly.
How To Remove Drawers That Don’t Come Out?
Check for safety latches or tabs inside the drawer. Tilt or lift the drawer slightly and pull gently. If stuck, inspect for hidden screws or clips. Remove these carefully. Always consult the manufacturer’s instructions if unsure.
How To Remove Drawers With Hidden Glides?
To remove drawers with hidden glides, fully extend the drawer. Press the release tabs or levers on the glide sides. Slide the drawer out carefully while supporting its weight. Ensure both sides release before pulling completely out.
Conclusion
Removing drawers from a Craftsman tool chest is simple. Follow these steps for success. First, gather necessary tools and ensure safety. Next, locate the drawer’s release mechanism. Carefully disengage it to free the drawer. Finally, lift the drawer out smoothly.
Reassemble with care when done. This process keeps your tool chest in top shape. Regular maintenance extends its life. Enjoy organized tools and easy access. Your workspace will thank you. Happy organizing!


