
Imagine reaching for a screwdriver in your tool box, only to spend precious minutes digging through a chaotic jumble of misplaced tools. Frustrating, isn’t it?
Whether you’re a seasoned DIY enthusiast or a casual fixer-upper, having an organized tool box can make all the difference. It saves you time, reduces stress, and boosts your productivity. But how do you achieve that perfect order? In this guide, you’ll discover simple, effective strategies to transform your tool box into a neatly arranged haven.
You’ll learn how to categorize, store, and maintain your tools in a way that makes them easy to find and use. Stick around, because by the end of this article, you’ll have all the tips you need to turn your cluttered tool chaos into a streamlined masterpiece.

Credit: www.creativesafetysupply.com
Choosing The Right Tool Box
Organize tools efficiently by grouping similar items together. Use dividers or small containers for tiny parts. Label each section for easy access. A well-structured tool box saves time and reduces frustration during projects. Keep frequently used tools at the top for quick reach.
Finding the right tool box can transform your tool organization game. It’s like finding the perfect pair of shoes—comfort and functionality are key. A well-chosen tool box not only holds your tools but also makes them easily accessible, ensuring you’re always ready for the task at hand.
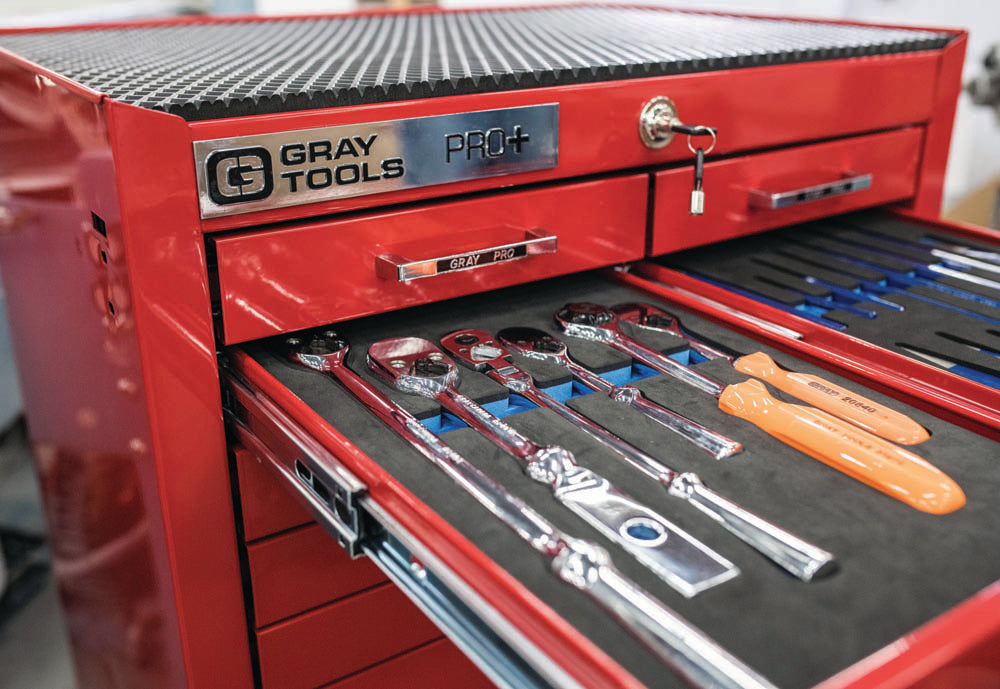
Types Of Tool Boxes
Tool boxes come in various styles and materials, each suited to different needs. – Plastic Tool Boxes: Lightweight and often more affordable. They’re great for hobbyists or those who need a portable solution. However, they might not withstand heavy-duty use. – Metal Tool Boxes: These are durable and often have a classic look. They’re perfect for professionals who require a sturdy storage option. The downside? They can be heavy. – Rolling Tool Boxes: Ideal for those with a larger tool collection. They offer mobility and typically have more storage compartments. Perfect if you find yourself moving around a lot. – Wall-Mounted Tool Boxes: Excellent for maximizing space in a workshop. These keep your tools organized and within arm’s reach. You might have noticed how the right type can depend on your specific needs. Think about how often you’ll use your tools and where you’ll store them.
Factors To Consider
Choosing a tool box isn’t just about style; several factors can influence your decision. – Size and Capacity: Assess how many tools you currently own and anticipate future needs. A compact box might save space, but a larger box offers room to grow. – Material: Consider the environment where you’ll use the tool box. For a damp garage, a rust-resistant material like plastic might be more suitable. – Portability: If you’re someone who frequently moves your tools between locations, opt for a lightweight or rolling option. – Security: Some tool boxes come with locking mechanisms. If you’re concerned about tool theft, this might be a feature worth investing in. Personal experience taught me the importance of portability. I once lugged a heavy metal tool box up three flights of stairs, wishing I had chosen a rolling one. It’s these little insights that can save you from future headaches. Do you find yourself overwhelmed by choices or unsure of what you truly need? Remember, the right tool box is one that makes your life easier, not more complicated. Evaluate what suits your lifestyle and work habits best. Your tools deserve a home that reflects your needs.

Credit: home.howstuffworks.com
Sorting And Categorizing Tools
Efficiently organize your tool box by sorting and categorizing each tool. Group similar items together for easy access. Use compartments and labels to maintain order and save time during projects.
Organizing your toolbox effectively can save you time and frustration. Proper sorting and categorizing of tools is the first step toward a clutter-free and efficient workspace. Imagine opening your toolbox and knowing exactly where each tool is, rather than rummaging around and wasting precious minutes. Let’s dive into some practical ways to sort and categorize tools.
Grouping Similar Tools
Start by identifying tools that share a common function. This could be anything from screwdrivers to pliers. Grouping them together will simplify your search when you need them. Think about the tasks you frequently perform. Do you often find yourself fixing bikes or assembling furniture? Keep those tools together so you can grab them quickly. Use dividers or small boxes within your toolbox to separate these groups. This not only keeps them organized but also prevents them from jostling around.
Prioritizing Frequently Used Items
Consider the tools you reach for most often. These should be easily accessible. If you constantly dig for your favorite wrench, it’s time to prioritize its placement. Place frequently used tools on the top layer of your toolbox. This saves you from having to unpack layers of items just to find what you need. Ask yourself, “What tools do I use daily?” These should be front and center. This approach not only speeds up your workflow but also minimizes frustration. Why not create a dedicated spot for your go-to items? You’ll be surprised at how much time you save when everything is in its rightful place. Organizing your toolbox is more than just tidying up—it’s about enhancing your productivity and making your projects more enjoyable.
Efficient Tool Arrangement
Organizing tools in a toolbox might seem straightforward, but doing it efficiently can save you time and frustration. Imagine reaching for a wrench in the middle of a project and finding it right where you expected. This is the magic of efficient tool arrangement. It’s not just about putting tools away; it’s about creating a system that works seamlessly every time you reach for a hammer or a screwdriver.
Utilizing Compartments
Compartments are your best friends when organizing a toolbox. They help keep similar tools together, so you know exactly where everything is. For example, keep all your screwdrivers in one compartment and your wrenches in another. This way, you won’t have to sift through a pile of tools to find what you need.
Consider using small boxes or containers for tiny items like screws and nails. Label these compartments clearly. This small step can significantly reduce the time spent searching for the right size or type of fastener. Have you ever spent ten minutes looking for a specific size of screw? A well-labeled compartment eliminates this hassle.
Layering Techniques
Layering your tools is another effective strategy. Place the most frequently used tools on the top layer of your toolbox. This ensures easy access and saves you the trouble of digging through less-used tools.
Think of layering like packing a suitcase. Heavy and less frequently used items can go at the bottom, while the tools you use daily should be within easy reach. This prevents the toolbox from becoming a jumbled mess.
Consider how you can arrange tools based on your personal workflow. If you often use a certain set of tools together, place them close to each other. This intuitive setup can improve efficiency and streamline your projects. Does your toolbox work for you, or do you work for your toolbox?
Efficient tool arrangement isn’t just for professionals. It’s a practical approach for anyone who wants to make their DIY projects smoother and more enjoyable. By utilizing compartments and layering techniques, you’ll find yourself working more efficiently and with less frustration. Isn’t it time your toolbox worked as hard as you do?
Maximizing Space
Efficient tool organization saves time and reduces stress. A well-organized toolbox means easy access to tools. It also maximizes the available space, allowing more tools to fit neatly. This section explores practical strategies for making the most of your toolbox space.
Using Inserts And Dividers
Inserts and dividers help organize tools in separate sections. This prevents tools from cluttering together. Use foam inserts to keep tools from shifting. These inserts protect and hold tools in place. Dividers separate different tool types, making them easy to find. Adjust dividers to fit various tool sizes and shapes.
Compact Storage Solutions
Compact storage solutions maximize the available toolbox space. Consider stackable trays for smaller tools. These trays make it easy to access items without digging through layers. Folding or collapsible organizers save space and keep tools tidy. Use magnetic strips for holding metal tools securely. This method frees up drawer space and keeps tools within reach.
Labeling And Identification
Organizing tools in a toolbox starts with labeling. Clear labels help you find each tool quickly. Use stickers or permanent markers for easy identification.
Organizing tools in a toolbox can be a game-changer for anyone who loves DIY projects or works in a trade. One essential aspect of tool organization is labeling and identification. Clear labels not only save time but also reduce frustration when searching for a specific tool. Imagine never having to rummage through a pile of wrenches again! The following tips will guide you in creating a toolbox that’s efficient and easy to navigate.
Creating Easy-to-read Labels
Start by choosing labels that are simple and legible. A clear font in a contrasting color can make a huge difference. Consider using a label maker for consistent results. It’s a small investment that pays off in saved time and reduced stress. Think about the size of your labels. They should be large enough to read at a glance but not so big that they clutter your toolbox.
Color-coding Systems
Introduce color-coding to your labeling system. Different colors can represent different categories of tools. For example, you could use red for electrical tools, blue for plumbing, and green for woodworking. This visual system simplifies identification. What if you’re a bit color-blind? Consider using patterns or symbols alongside colors to enhance the system’s effectiveness. Imagine opening your toolbox and instantly knowing where your tools are. How much time would that save you each week? By implementing these labeling strategies, you create a toolbox that works for you, not against you. Every time you reach for a tool, you’ll appreciate the effort you put into organizing it.
Maintaining Tool Organization
Organizing tools in a toolbox boosts efficiency and saves time. Start by grouping similar tools together. Use dividers or trays to keep everything neat and accessible. Label sections for easy finding. Regularly clean and rearrange to ensure a tidy and functional toolbox.
Maintaining tool organization in your toolbox is crucial for efficiency. A well-organized toolbox saves time and reduces frustration. It ensures you always know where each tool is. Keeping it organized requires routine care and attention. Here’s how to maintain that organization effectively.
Routine Checks And Adjustments
Regular checks keep your toolbox in order. Open your toolbox weekly to review its contents. Ensure each tool is in its designated spot. This helps you notice missing or misplaced tools. Adjust tool placements as needed. Sometimes, a different layout works better. Make changes to fit your current needs. Keep your toolbox layout flexible and practical.
Cleaning And Upkeep
Clean tools last longer and work better. Wipe them down after each use. Remove dirt, oil, and grime. A clean toolbox is easier to organize. Dust can collect inside the toolbox. Wipe the interior regularly with a damp cloth. This prevents rust and damage. Ensure tools are dry before storing. Moisture can lead to corrosion. Use anti-rust liners if needed. Keep your toolbox and tools in top condition.

Credit: artmanofficial.com
Frequently Asked Questions
How Do I Organize My Tools In My Tool Box?
Organize tools by grouping similar items together. Use dividers for separation. Label compartments for easy identification. Place frequently used tools on top for quick access. Ensure sharp or dangerous tools are stored securely. Regularly check and update the arrangement to maintain efficiency.
How Should A Toolbox Be Set Up?
Organize tools by type and size for easy access. Use compartments and trays to separate items. Label sections for quick identification. Keep frequently used tools on top. Regularly clean and maintain your toolbox for efficiency.
What Should Every Tool Box Have?
Every toolbox should include a hammer, screwdrivers, pliers, adjustable wrench, measuring tape, utility knife, and level. Keep nails, screws, and a flashlight handy. Having these essentials ensures you’re prepared for most basic repairs and DIY projects. Always choose quality tools for durability and efficiency.
What Is The Most Important Tool In A Toolbox?
The hammer is often the most important tool in a toolbox. It provides versatility and essential functionality. Whether you’re driving nails or making adjustments, its usefulness is unmatched. A reliable hammer ensures you can handle a wide range of tasks effectively, making it indispensable in any toolbox.
Conclusion
Organizing tools in a toolbox saves time and frustration. A neat toolbox means easy access to every tool. Sort tools by type or size for quick finding. Use dividers or pouches for better order. Label sections to avoid confusion. Keep frequently used tools on top for convenience.
Regularly clean and reassess the arrangement. A tidy toolbox boosts efficiency and productivity. Start organizing today, and experience a smoother workflow. Your tools deserve a good home. Happy organizing!


