Are you eager to master the art of using crimping pliers? Whether you’re a DIY enthusiast or someone looking to refine your tool skills, understanding how to use crimping pliers effectively can open up a world of possibilities.
Imagine effortlessly creating secure connections in wires and cables, ensuring your projects are both safe and efficient. With the right techniques, you can transform the way you work with electrical components and make your tasks more manageable. In this guide, you’ll discover straightforward instructions and tips on how to harness the full potential of crimping pliers.
No more struggling with unclear tutorials or feeling unsure about your tool skills. By the end of this article, you’ll feel confident in your ability to tackle projects with precision. So, why wait? Dive in to enhance your skills and see the difference it makes in your work.
Choosing The Right Crimping Pliers
Using crimping pliers efficiently begins with selecting the right tool. The right choice ensures a secure fit and prolongs the lifespan of your wires. This section guides you in identifying the best crimping pliers for your needs.
Types Of Crimping Pliers
Crimping pliers come in various types. These include ratchet, hydraulic, and hand-held models. Ratchet pliers provide consistent pressure. Hydraulic pliers offer power for heavy-duty tasks. Hand-held models are perfect for small jobs.
Materials And Durability
Consider the material of your crimping pliers. Stainless steel offers resistance to rust and corrosion. Alloy steel ensures strength and durability. Choose materials that suit your work environment.
Size And Compatibility
Size matters when selecting crimping pliers. Check the compatibility with your wires and connectors. Smaller pliers work well with delicate tasks. Larger pliers handle bigger wires efficiently.

Credit: www.youtube.com
Preparing Your Workspace
Organize your workspace for easy access to crimping pliers and materials. Ensure adequate lighting and a clean surface. Arrange tools neatly to streamline the crimping process, enhancing efficiency and precision.
Preparing your workspace is a crucial step when learning how to use crimping pliers effectively. A well-organized area not only increases your efficiency but also ensures your safety. Let’s dive into the essentials of setting up a workspace that supports your crimping projects.
Essential Tools And Materials
Start by gathering all the tools you need. Crimping pliers are just one part of the puzzle. You’ll also need the correct size of connectors, wires, and a wire stripper. Having a small toolbox or container to hold these items can be a lifesaver. Don’t forget to include a magnifying glass if you’re working with small components. It can make a big difference in precision. Consider keeping a notepad nearby for jotting down measurements or notes.
Organizing Your Work Area
An organized workspace helps you find what you need without a hassle. Clear off your table and ensure you have a flat surface to work on. Arrange your tools within arm’s reach. Label containers or drawers to quickly locate connectors or other materials. This saves time and reduces frustration when you’re in the middle of a task. A clutter-free area can also enhance your focus and creativity.
Safety Precautions
Safety should be your top priority. Ensure your workspace is well-lit. Good lighting helps avoid mistakes and potential injuries. Wear safety goggles to protect your eyes from wire fragments. Keep a first-aid kit nearby. You never know when a small cut or scratch might happen. Make sure your workspace is free from any flammable materials if you’re working with electrical components. How do you feel when you work in a space that’s messy or poorly lit? Taking these simple steps can transform your crimping experience.
Identifying The Correct Terminal
Identifying the correct terminal is crucial when using crimping pliers. A mismatch can lead to poor connections or damage to your wires. You might be wondering how to ensure you’re choosing the right one. This process involves understanding different types of terminals, matching them accurately to wires, and inspecting their quality.
Types Of Terminals
Terminals come in various shapes and sizes, each suited for specific applications. Common types include ring terminals, spade terminals, and butt connectors. Ring terminals are perfect for securing wires with bolts, while spade terminals offer easy connections and disconnections. Butt connectors join two wires, making them ideal for repairs.
Have you ever struggled to find the right terminal for a specific task? Knowing these types helps streamline your work, ensuring efficient and safe connections. Consider keeping a variety of terminals in your toolbox for different scenarios.
Matching Terminals To Wires
Ensuring compatibility between terminals and wires is vital. You need to consider wire gauge and terminal size. A mismatch could result in loose connections or compromised safety. Use a wire gauge tool if you’re unsure about your wire’s size.
Think about the last time you encountered connection issues. Was it due to incorrect terminal matching? Learning how to match correctly saves you time and prevents frustration. When in doubt, consult a guide or ask a knowledgeable friend.
Inspecting Terminal Quality
Quality matters in terminals. Look for terminals that are made from durable materials, like copper or brass. These materials resist corrosion and conduct electricity efficiently. Avoid terminals that seem flimsy or poorly constructed.
Have you ever noticed a terminal that just didn’t feel right? Inspecting quality not only ensures reliability but also enhances safety. Ask yourself: Does the terminal feel solid? Is the coating intact? These checks can prevent future failures.

Credit: www.youtube.com
Stripping The Wire
Crimping pliers simplify wire connections with precision. Begin by stripping the wire to expose clean metal. Next, place the connector and squeeze firmly, ensuring a secure fit.
Stripping the wire is a crucial step when using crimping pliers. It ensures a clean connection and efficient electrical conductivity. Understanding how to strip the wire properly can make a big difference in the quality of your work. Follow these steps to achieve the best results.
Selecting The Right Wire Stripper
Choosing the right wire stripper is essential. Different wires require different tools. Check the wire gauge before starting. Use a stripper that matches the wire size. This prevents damage to the wire. A good fit ensures a clean strip. Avoid using makeshift tools. They can damage the wire.
Measuring And Marking The Wire
Accurate measurement is key. Measure the length of wire needed for stripping. Use a ruler for precision. Mark the spot with a marker. This ensures consistent results. Keep the mark visible while you work. It guides you during the stripping process.
Proper Stripping Technique
Grip the wire firmly with the stripper. Align the marked spot with the stripping notch. Squeeze the handles gently. Rotate the stripper around the wire. This cuts the insulation cleanly. Pull the stripper away to remove the insulation. Check the wire for damage. Ensure the copper is intact. Proper technique prevents wire breakage.
Inserting The Wire Into The Terminal
Inserting the wire into the terminal is a crucial step in crimping. A proper fit ensures the connection is secure and efficient. Understanding this process helps avoid errors that can lead to poor performance. Let’s explore how to position the wire, ensure a secure fit, and avoid common mistakes.
Positioning The Wire
Begin by stripping the wire’s insulation. Expose enough copper to fit snugly into the terminal. Align the wire with the terminal opening. Make sure the exposed copper is visible. This ensures full contact and a stable connection.
Ensuring A Secure Fit
Slide the wire into the terminal until it stops. Check for gaps between the wire and terminal. A tight fit is necessary for conductivity. Press firmly but gently. Avoid damaging the wire’s strands.
Avoiding Common Mistakes
Do not strip too much insulation. Exposed wire can cause shorts. Ensure the wire is centered in the terminal. Misalignment leads to weak connections. Avoid using excessive force. Force can damage the wire or terminal.

Credit: wirefyshop.com
Using The Crimping Pliers
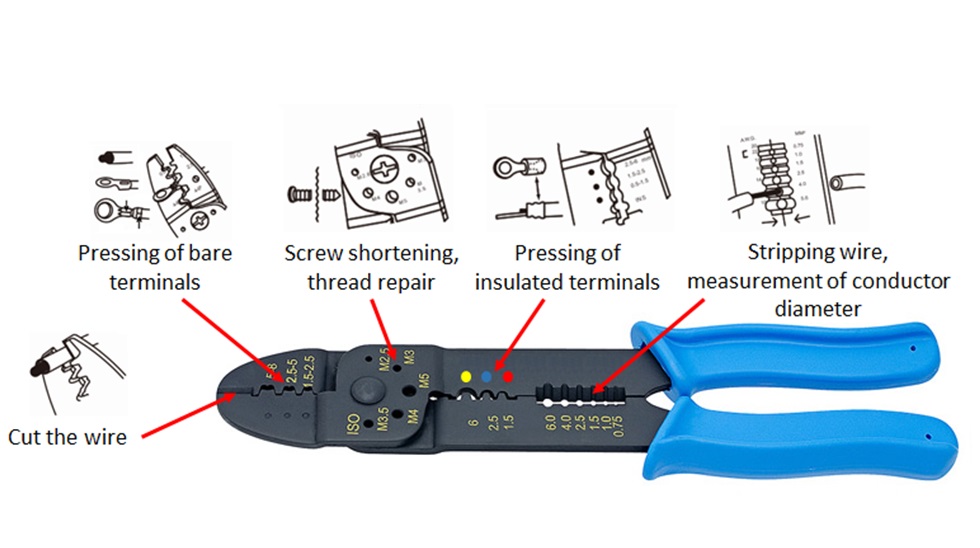
Crimping pliers are essential for securing electrical connections. Start by inserting the wire into the connector. Squeeze the pliers tightly around the connector to create a solid crimp. Ensure the wire is firmly held in place. Proper use guarantees strong, reliable connections in various projects.
Crimping pliers are essential tools for anyone working with electrical connections. Whether you’re an electrician, a DIY enthusiast, or someone who just likes to tinker around, mastering the use of crimping pliers can significantly improve the quality and reliability of your projects. But how do you get the perfect crimp every time? Let’s delve into the practical steps of using crimping pliers effectively.
Aligning The Terminal And Pliers
Start by choosing the right terminal for your wire size. Slide the terminal onto the wire’s stripped end. Hold the crimping pliers in your dominant hand and position the terminal within the correct slot of the pliers. Ensure the terminal is seated properly to avoid any uneven crimps. It might take a bit of practice, but you’ll soon get the hang of aligning them perfectly. Have you ever found yourself frustrated because the wire slipped out? This step is crucial in preventing that.
Applying Sufficient Pressure
Once aligned, it’s time to apply pressure. Grip the handles of the pliers firmly. Squeeze with steady pressure until the pliers close completely. The aim is to compress the terminal onto the wire without over-crimping. Have you noticed how some connections seem flimsy? That’s usually due to insufficient pressure. By ensuring a firm grip, you’re setting yourself up for success.
Checking The Crimp
After crimping, inspect your work. Gently pull on the wire to ensure it’s securely fastened to the terminal. If the wire slips out, the crimp wasn’t tight enough. A good crimp should withstand a moderate tug without budging. Ever had a connection fail in the middle of a project? A quick check can save you from future headaches. Always double-check your crimps to ensure they meet your standards. Incorporating these steps into your routine will make using crimping pliers second nature. Every successful connection is a testament to your growing skills. Keep practicing, and soon, you’ll be crimping like a pro.
Testing The Connection
Crimping pliers connect wires securely by pressing them together. Start by choosing the correct size for your wire. Then, place the wire in the crimp and squeeze the handles to create a tight connection.
Testing the connection is a crucial step after using crimping pliers. Ensuring your electrical connections are secure can prevent future mishaps. You wouldn’t want a loose wire causing trouble later on, right? Let’s dive into how you can verify your work with confidence.
Visual Inspection
Start by looking at the crimped connection closely. Make sure the wire is fully inserted into the connector. The wire should not be visible outside the crimping area. Check for any signs of damage or irregularities. If the connector is deformed, consider redoing the crimp. A solid visual inspection can save you time and effort down the line.
Conducting A Pull Test
Gently tug on the wire to see if it stays in place. This helps ensure the crimp is strong. If the wire slips out, the connection is not secure. Be firm but careful. You want to test the strength without damaging the wire. Is your connection holding up? If not, it’s time to re-crimp.
Troubleshooting Faulty Connections
Sometimes, despite your best efforts, connections can fail. Identify if the issue is with the crimp or the wire. Did you use the correct size of connector and pliers? Double-check these details to pinpoint the problem. Don’t get discouraged. Every mistake is a learning opportunity. Adjust your approach, and try again. Have you ever had a connection fail when you needed it most? Share your experiences in the comments. Your insights might just help someone else!
Maintaining Your Crimping Tools
Crimping pliers simplify the process of securing wires and connectors. Start by selecting the right connector for your wire. Insert the wire into the connector and place it in the crimping plier’s jaws. Squeeze the handles firmly to create a secure connection.
Regular cleaning ensures optimal performance.
Maintaining your crimping tools is crucial for ensuring their longevity and effectiveness. Whether you’re a seasoned professional or a DIY enthusiast, these tools are an investment. Proper care will enhance their performance and save you money in the long run. Imagine the frustration of a tool failing just when you need it most. By adhering to a few simple maintenance steps, you can avoid such setbacks and ensure your crimping pliers are always ready for action.
Cleaning The Pliers
Clean your crimping pliers regularly to prevent dirt and grime buildup. Use a soft cloth to wipe them down after each use. If you notice stubborn spots, a mild detergent can help. Pay attention to the moving parts. A toothbrush can reach into grooves and joints. This simple cleaning routine can keep your pliers in top condition.
Regular Calibration
Calibration ensures your crimping pliers apply the correct pressure. An incorrect calibration can damage wires and connectors. Check the calibration regularly, especially if you use them frequently. Test them on a spare wire to ensure accuracy. You’ll avoid costly mistakes and rework by keeping your tools precisely calibrated.
Storing Properly
Proper storage is vital for maintaining your crimping pliers. Keep them in a dry, cool place to avoid rust and corrosion. If your toolbox is crowded, consider a dedicated space for them. A small investment in a storage case can make a big difference. How often do you find yourself searching for misplaced tools? Organizing your workspace not only protects your tools but also saves you time and frustration. Taking these steps ensures that your crimping pliers are always ready when you are.
Frequently Asked Questions
How To Use A Crimping Plier?
To use crimping pliers, place the terminal in the jaws, then squeeze firmly. Ensure wires are inserted correctly. Confirm the connection is secure by gently tugging. Repeat the process for additional connections. Always check the manufacturer’s guidelines for specific instructions.
How To Use Crimping Tool Step By Step?
Use a crimping tool by stripping wire insulation, inserting the wire into the connector, and positioning the connector in the tool. Squeeze the handles firmly to crimp. Ensure the connection is tight by gently pulling the wire. Repeat as needed for additional connections.
Always follow the tool’s specific instructions.
What Is The Proper Way To Crimp Wire?
Strip insulation from the wire end. Insert the wire into the crimp connector. Use a crimping tool to compress the connector firmly. Ensure the wire is secure by tugging lightly. Verify a tight connection to avoid electrical issues.
How To Use The Rj45 Crimping Pliers?
Strip the cable to expose wires. Arrange wires by color code. Insert wires into the RJ45 connector. Place connector in crimping tool. Squeeze handles firmly until you hear a click.
Conclusion
Crimping pliers simplify wire connections. Easy to use with practice. Start with small projects. Gradually move to more complex tasks. Always ensure safety first. Wear protective gear. Double-check your connections. This prevents future issues. With patience, you get better. Each attempt improves your skills.
Understanding their use opens up possibilities. You can fix broken wires. Create secure connections. Explore new projects with confidence. Remember to keep learning. Stay curious about techniques. Your DIY skills will grow. Enjoy the process of discovery. Crimping pliers are handy tools.
They empower your creativity and efficiency.

