
Imagine slicing through a ripe tomato with the precision of a professional chef, thanks to your perfectly sharpened knife. The secret behind achieving such sharpness lies in understanding the grit of your sharpening stone.
Whether you’re a culinary enthusiast or someone keen on maintaining your tools, knowing the right grit for your sharpening stone can make all the difference. This guide is designed to help you navigate the world of sharpening stone grits, ensuring your knives and tools are always at their best.
Dive in to discover how you can effortlessly enhance your sharpening skills and elevate your everyday cooking experience.
Credit: blog.fendrihan.com
Types Of Sharpening Stones
Sharpening stones come in various types, each suited for specific needs. Understanding these types helps in choosing the right stone for effective sharpening. Explore the different types to find the best match for your tools.
Natural Stones
Natural stones have been used for centuries. They are often quarried and cut into usable shapes. These stones offer a unique feel and finish. Arkansas stones are a popular choice among natural stones. They provide a fine grit suitable for polishing edges. Users often appreciate the smooth texture and consistent results.
Synthetic Stones
Synthetic stones are man-made and often more affordable. They are crafted from abrasive materials like aluminum oxide. These stones can offer a range of grit levels. They are reliable and consistent, making them ideal for beginners. Synthetic stones are versatile and widely available. They work well for sharpening various tools.
Diamond Stones
Diamond stones are renowned for their durability. They consist of diamond particles bonded to a flat surface. These stones are effective for hard steel and ceramic blades. Diamond stones maintain their flatness over time. They are quick and efficient, reducing sharpening time. Despite their higher cost, many users find them worth the investment.

Credit: cooking.stackexchange.com
Understanding Grit Levels
Explore the basics of sharpening stone grit levels for effective tool sharpening. Different grit levels affect the sharpness and smoothness of blades. Understanding these levels helps achieve desired results for knives and tools.
Understanding the grit levels of sharpening stones can significantly enhance your sharpening skills. Whether you’re a seasoned chef or a DIY enthusiast, knowing which grit to use can make all the difference. This guide will break down the different grit levels, helping you choose the right one for your needs.
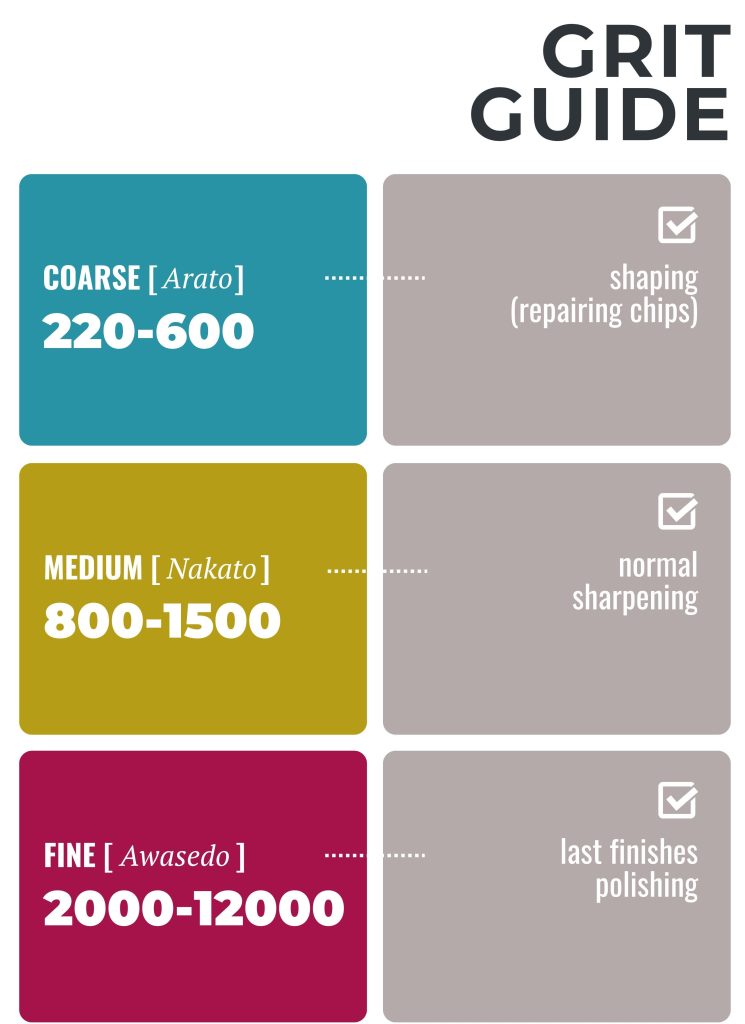
Coarse Grit
Coarse grit stones are like your go-to tool for heavy lifting. They are perfect for fixing chips and reshaping the edges of a dull knife. You might remember the first time you tried to sharpen a severely dull knife, and it felt like you were getting nowhere. Using a coarse grit stone can save you time and frustration. Typically ranging from 200 to 600 grit, these stones remove material quickly. Think of them as the foundation of your sharpening process. Have you ever wondered why your knife still struggles to cut even after sharpening? It might be because you skipped this essential step.
Medium Grit
Medium grit stones are the middle ground, offering a balance between speed and refinement. They are ideal for regular maintenance and touch-ups. When you notice your knife is starting to struggle with basic tasks like slicing tomatoes, a medium grit stone can bring it back to life. These stones usually range from 800 to 2000 grit. They help refine the edge without removing too much material. Imagine sharpening a pencil just enough to write smoothly without breaking the lead—that’s what medium grit stones do for your blades. Do you maintain your kitchen knives regularly? If not, a medium grit stone might be the missing piece in your routine.
Fine Grit
Fine grit stones are all about precision and polish. They are used for honing and finishing, providing a razor-sharp edge. If you’ve ever tried shaving with a perfectly sharpened razor, you know the level of sharpness a fine grit stone can achieve. These stones typically range from 3000 to 8000 grit. They refine the edge to a mirror finish, enhancing both performance and aesthetics. Have you ever noticed how professional chefs glide through ingredients with ease? A fine grit stone is often the secret behind that effortless cut. Understanding these grit levels can transform your sharpening routine. Whether you’re repairing a chipped blade or refining an edge, using the right grit can make the process more efficient and enjoyable. Are you ready to take your sharpening skills to the next level?
Selecting The Right Grit
Choosing the right grit for your sharpening stone can significantly impact the effectiveness of your sharpening process. It’s not just about the numbers; it’s about understanding what those numbers mean for your specific tools and their current condition. Whether you’re restoring a dull blade or maintaining an already sharp one, the grit level you choose can make all the difference. Let’s dive into how to select the best grit for your needs.
Matching Grit To Tool Type
Different tools require different grit levels for optimal sharpening. Imagine you’re working with kitchen knives versus woodworking chisels. Kitchen knives benefit from a finer grit, around 1000 to 3000, for a razor-sharp edge. Woodworking chisels, however, often need a coarser grit, starting at 400, to effectively shape and refine the edge. Consider the tool’s purpose and material when deciding on the grit. Are you sharpening delicate blades or robust chisels? Your choice should reflect the demands of the tool.
Choosing Grit Based On Edge Condition
The current state of your tool’s edge is crucial in selecting the right grit. If the edge is damaged or extremely dull, start with a coarse grit like 200 to quickly reshape it. A moderately dull edge might only need a medium grit, around 1000, to restore its sharpness. If the edge is in good condition, a fine grit between 3000 to 8000 can help maintain and polish it. How does your tool’s edge look right now? Assess it carefully to choose the grit that best fits its condition.
Next time you’re deciding on grit, ask yourself these questions: What type of tool am I sharpening, and what is the condition of its edge? By tailoring your choice to these factors, you can ensure your tools perform at their best.
Techniques For Precision Sharpening
Sharpening a blade requires precision and skill. Understanding the right techniques is crucial. This ensures the blade is sharpened effectively. Using a sharpening stone with the correct grit helps. It can make your sharpening efforts more effective. Below, we explore key techniques to achieve precision. These methods are easy to follow and understand.
Setting The Correct Angle
Setting the right angle is vital for sharpening. Most blades need a 15 to 20-degree angle. This angle provides a sharp and durable edge. Use a guide to maintain this angle consistently. Consistency ensures the blade is evenly sharpened. Without it, the edge may become uneven and dull.
Maintaining Consistent Pressure
Consistent pressure is key in sharpening. Apply even pressure along the blade’s length. This prevents uneven sharpening. Uneven pressure can damage the blade. It can also cause an irregular edge. Practice applying consistent pressure. It ensures a smooth and sharp edge every time.
Maintaining Sharpening Stones
Sharpening stones come in different grit levels, crucial for effective blade sharpening. Lower grit stones remove more material, ideal for dull blades. Higher grit stones refine edges, perfect for achieving sharpness. Regular maintenance ensures optimal performance and longevity of sharpening stones.
Maintaining sharpening stones is crucial if you want them to last and function effectively. Like any tool, they require regular upkeep to ensure optimal performance. Neglecting maintenance could lead to uneven sharpening and even damage your blades. This section will offer practical tips on cleaning, flattening, and storing your sharpening stones.
Cleaning And Flattening
Keeping your sharpening stones clean is essential. After each use, rinse them with water to remove any metal particles. This prevents buildup and keeps the surface ready for the next sharpening session. A toothbrush can be handy for scrubbing away stubborn debris. If your stone is particularly dirty, a mild detergent can help break down residues. Flattening your stone is equally important. Over time, sharpening stones can develop grooves and uneven surfaces. This affects their performance. Use a flattening stone or sandpaper on a flat surface to restore its level. Check regularly for unevenness. A flat stone gives you consistent results. Wouldn’t it be frustrating to invest time in sharpening, only to find your tool isn’t as sharp as it should be?
Storage Tips
Proper storage extends the life of your sharpening stones. Keep them in a dry environment to prevent moisture damage. Use a dedicated box or case to protect them from dust and accidental knocks. This also keeps them organized and ready for use. Separate different grit stones to avoid contamination. Mixing grits can lead to uneven sharpening. Think about it: would you mix paints and expect the same color? Consider labeling your stones with their grit size. This ensures you grab the right one for the job. It’s a simple trick that saves time and confusion. What other tools do you store with such care? Treat your sharpening stones with the same respect, and they will serve you well for years.
Common Mistakes To Avoid
Understanding sharpening stone grit is crucial for effective blade maintenance. Choosing the wrong grit can damage the blade or prolong sharpening time. Always match the grit to the blade’s condition for optimal results.
Sharpening stones are an essential tool for maintaining your knives, but missteps in their use can lead to poor results. Understanding common mistakes can save time and improve the effectiveness of your sharpening efforts. Have you ever wondered why your knife isn’t getting as sharp as you’d like? Let’s dive into some pitfalls you might be experiencing.
Overusing A Single Grit
Many people make the mistake of using only one grit size for their sharpening needs. This approach can limit the sharpness you achieve. Each grit size serves a specific purpose. Starting with a coarse grit helps to reshape or repair the edge, while a finer grit polishes and refines the blade. Relying on a single grit can leave your knife partially sharpened. Try using a progression of grits to achieve a razor-sharp finish.
Ignoring Stone Maintenance
Neglecting the upkeep of your sharpening stones can drastically reduce their lifespan and efficiency. Stones can become uneven or clogged with metal particles over time. Regular cleaning and flattening help maintain their effectiveness. Have you ever tried to sharpen a knife on a clogged stone? It’s like trying to clean a window with a dirty cloth. Clean your stones with water or a stone cleaning solution after each use. Periodically check for flatness and use a lapping plate if needed. Regular maintenance ensures your stones work optimally and deliver consistent results. By avoiding these common mistakes, you can significantly enhance your sharpening skills. Are there any other mistakes you think are crucial to avoid? Share your thoughts and let’s sharpen our skills together!
Benefits Of Mastering Sharpening Techniques
Sharpening stone grit knowledge enhances tool performance and precision. It prolongs blade life and ensures smoother cuts. Better efficiency and less effort result from properly sharpened tools.
Mastering sharpening techniques can transform the way you use your tools. Not only does it improve your efficiency, but it also enhances the quality of your work. Let’s delve into the specific benefits that come from honing these skills.
Enhanced Cutting Performance
A sharp tool cuts with precision and ease. Whether you’re slicing vegetables in the kitchen or crafting wood in your workshop, a well-sharpened blade makes the task smoother. Imagine cutting through a ripe tomato with a dull knife versus a sharp one—you’ll notice the difference instantly. With enhanced cutting performance, your efforts are minimized. You exert less force, which reduces fatigue. This allows you to work for longer periods without tiring quickly. Moreover, accurate cuts result in cleaner finishes. This is crucial in professional settings where quality matters. Wouldn’t you prefer a polished edge over a jagged one?
Extended Tool Lifespan
Regularly sharpening your tools not only improves performance but also extends their lifespan. Dull edges lead to excessive wear and tear. This shortens the life of your tools, requiring frequent replacements. By maintaining a sharp edge, you prevent unnecessary stress on the material. This keeps your tools in optimal condition for a longer period. You also save money in the long run. Investing time in sharpening reduces the need for new tools and repairs. Isn’t it satisfying to prolong the life of something you’ve invested in? Consider the pride and satisfaction of maintaining your tools in peak condition. It reflects a level of care and professionalism that sets you apart. Incorporating regular sharpening into your routine can lead to better results and greater satisfaction in your work. What sharpening techniques have you mastered that make your tasks easier?

Credit: www.cuisinebeats.com
Frequently Asked Questions
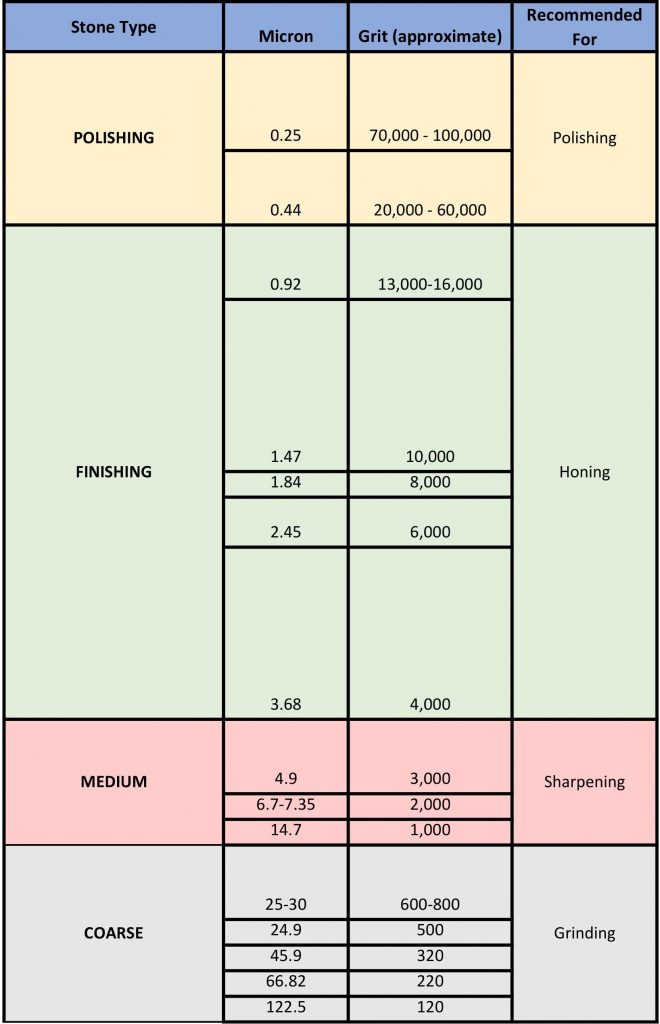
Which Grit Is Finer, 1000 Or 6000?
6000 grit is finer than 1000 grit. Higher grit numbers mean smaller abrasive particles for a smoother finish. Use 6000 grit for polishing and finishing tasks requiring precision. 1000 grit is coarser and suitable for initial sharpening or smoothing surfaces before finer polishing.
What Grit Should A Sharpening Stone Be?
Select a grit based on your sharpening needs. Use 1000-3000 grit for sharpening, 4000-8000 grit for refining, and 10000+ grit for polishing. Lower grits remove material quickly, while higher grits offer finer finishes. Choose the right stone for your tool’s condition and desired sharpness.
Should I Start With 6000 Or 1000 Whetstone First?
Start with a 1000 whetstone for dull knives to establish the edge. Use a 6000 whetstone for fine polishing and sharpening. This two-step process ensures optimal sharpness and longevity for your blades. Proper technique enhances results.
What Is A 400 Grit Sharpening Stone Used For?
A 400 grit sharpening stone is used for repairing and reshaping dull or damaged blades. It effectively removes nicks and chips, creating a new edge. This coarse grit is ideal for initial sharpening stages, preparing the blade for finer grits.
Suitable for kitchen knives, scissors, and tools.
Conclusion
Choosing the right sharpening stone grit is crucial. It affects your tool’s performance. Start with coarse grit for dull blades. Move to medium grit for regular sharpening. Finish with fine grit for a polished edge. Each grit serves a specific purpose.
Understanding them helps maintain your tools. Proper care extends their life. So, invest time in choosing wisely. Your tools will perform better and last longer. Always match grit to your task. This ensures optimal results. Happy sharpening, and may your blades stay sharp!


