
Are you looking to unravel the mysteries of electrical circuits or simply want to fix that stubborn appliance at home? Knowing how to test resistance using a multimeter might be the key to solving your problem.
Imagine being equipped with the skills to diagnose electrical issues effortlessly, saving you time and money on repairs. It’s simpler than you think, and once you grasp the basics, you’ll wonder how you ever managed without this handy tool. Ready to empower yourself with this essential knowledge?
Let’s dive in and explore the step-by-step process that will make you a confident multimeter user in no time!
Essential Tools And Safety Tips
Testing resistance with a multimeter involves setting it to the resistance mode. Essential tools include a reliable multimeter and insulated probes. Safety tips include ensuring the multimeter is off before connecting the probes to avoid electrical shock or damage. Always consult the multimeter’s manual for proper guidance.
Testing resistance using a multimeter is essential for anyone dealing with electronics, whether you’re a professional technician or a DIY enthusiast. But before diving into the process, let’s focus on the essential tools and safety tips that will ensure your testing is accurate and safe. Having the right tools not only makes the job easier but also prevents damage to your equipment and keeps you safe.
Required Tools
For testing resistance, you need a reliable multimeter. Choose one with a clear display and a resistance setting. Make sure it includes probes, which are necessary for contact with the circuit or component you’re testing. A good multimeter often has additional features like auto-ranging, which simplifies the process by automatically selecting the correct range of resistance. This can be particularly useful if you’re testing a variety of components. Consider having a small set of alligator clips. These can be attached to your probes and allow for hands-free testing, which is especially handy if you’re working with multiple components or need to hold the component steady.
Safety Precautions
Safety is paramount when testing resistance. Before you begin, ensure that the device or circuit is powered off. This prevents any accidental shorts or shocks. Always check the condition of your multimeter and its probes. Look for any cracks or exposed wires, as these can lead to inaccurate readings or cause harm. Wear protective eyewear. Even if you’re just testing a simple circuit, unexpected sparks or other mishaps can occur. Protecting your eyes is a simple yet crucial step. Have you ever been surprised by a sudden spark during testing? It’s a stark reminder of why safety measures matter. Think of safety as your first line of defense. It’s not just about avoiding accidents; it’s about being able to work confidently and efficiently. Finally, keep your workspace organized. A clutter-free area reduces the risk of errors and ensures you have easy access to your tools. Have you ever spent more time looking for a misplaced tool than actually testing? Keeping your tools in order can save you time and frustration. Are you ready to test resistance safely and accurately? With the right tools and precautions, you can approach your work with confidence and precision.
Understanding Resistance And Its Importance
Understanding resistance is crucial in the world of electronics. It plays a key role in how circuits function. Without resistance, electronic devices wouldn’t work properly. Let’s dive into what electrical resistance is and why it’s important in circuits.
What Is Electrical Resistance?
Electrical resistance is a measure of how a material opposes electric current. It determines how much current can flow through a component. High resistance means less current flows. Low resistance allows more current. Resistance is measured in ohms, represented by the symbol Ω. Materials like copper have low resistance. Insulators like rubber have high resistance.
Importance In Electrical Circuits
Resistance controls the current flow in circuits. It protects sensitive components from damage. Without proper resistance, circuits can overheat. This can lead to failures or even fires. Resistors are often used to manage current levels. They ensure devices operate safely and efficiently. Understanding resistance helps in designing safe circuits. It also aids in troubleshooting electrical problems.
Preparing The Multimeter For Use
Begin by ensuring the multimeter is off before connecting the probes. Set the dial to the resistance setting, usually marked with the ohm symbol (Ω). Adjust the range if necessary, based on the expected resistance value.
Preparing a multimeter for use is crucial for accurate resistance testing. This involves ensuring the multimeter is correctly set up and functional. A few preliminary steps can make your testing more effective and reliable. Follow these guidelines to get your multimeter ready for action.
Setting The Multimeter To Ohms
First, locate the dial on your multimeter. Turn it to the ohms setting, often symbolized by the Greek letter Omega (Ω). This setting measures resistance. Ensure the probes are connected properly. The black probe goes into the common port, marked “COM.” The red probe should be in the port labeled “Ω” or “VΩ.” Double-check that the dial is not on another setting like volts or amps.
Checking The Battery Status
A functional battery ensures accurate readings. Inspect the battery status before proceeding. Many multimeters have a battery indicator on the display. If the battery is low, replace it with a fresh one. It’s vital to use the correct battery type. A weak battery can lead to incorrect resistance readings. Always have spare batteries available. This guarantees your multimeter is always ready for use.
Steps To Test Resistance
Testing resistance using a multimeter might sound complicated, but it’s simpler than you think. Understanding this process is crucial if you’re working with electronic circuits. Whether you’re a hobbyist or a seasoned technician, knowing how to test resistance can save you from potential failures and frustrations.
Power Down The Circuit
The first step in testing resistance is to ensure the circuit is powered down. Never attempt to measure resistance with power on; it can damage your multimeter or give inaccurate readings. Unplug your device or turn off the power supply to ensure safety.
Imagine testing the resistance in a lamp. You wouldn’t want it plugged in while probing, would you? Always prioritize safety first.
Isolating The Component
Once the circuit is powered down, isolate the component you want to test. This means removing it from the circuit or ensuring no parallel paths affect the reading. Isolation prevents other elements from skewing your measurements.
Think of isolating a resistor in a complex circuit board. Disconnect one end to ensure the multimeter reads only its resistance. This approach ensures accuracy.
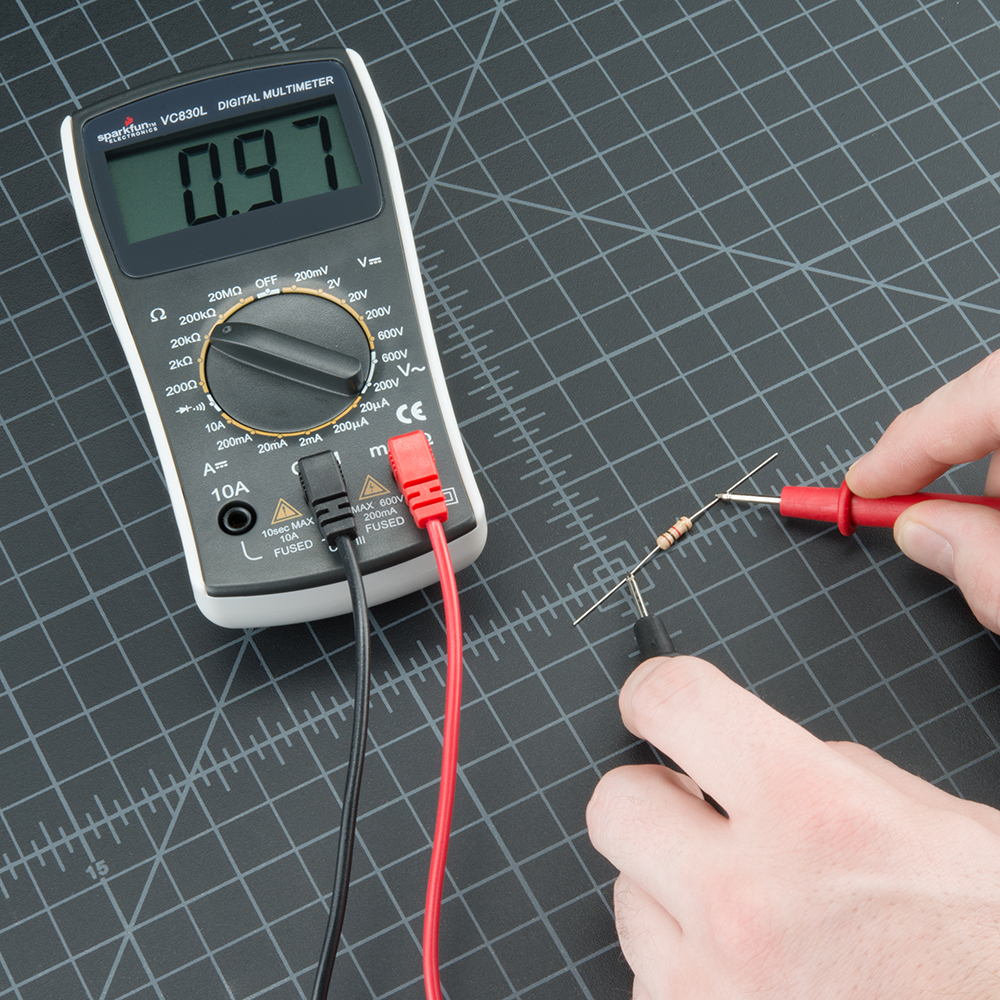
Connecting The Multimeter Probes
Now, it’s time to connect the multimeter probes. Set your multimeter to the resistance mode (often marked by the ohm symbol). Connect the red probe to one end of the component and the black probe to the other.
Watch the display for the resistance value. Ensure the probes have a firm contact to avoid fluctuating numbers. If you’re testing a resistor, compare the multimeter reading with the color code on the resistor to verify accuracy.
Testing resistance might initially feel daunting, but with these steps, you’re on your way to becoming proficient. Do you see how knowing these steps can enhance your troubleshooting skills?
Next time, when you face an electronic issue, remember these steps. The confidence you gain is empowering.
Reading And Interpreting Results
Reading and interpreting results when testing resistance with a multimeter can seem daunting, especially if you’re just starting out. But fear not! With a little practice and understanding, you’ll be reading ohm values like a pro. Imagine the satisfaction when you solve an electrical puzzle by understanding what those numbers mean.
Understanding Ohm Readings
Ohm readings are essentially the measurement of resistance in your circuit. You might see numbers like 10, 100, or even 1000 ohms. Each value tells a story about how easily electricity flows through your component.
If you’re testing a resistor, a reading near its rated value means it’s functioning correctly. But what if your reading doesn’t match the expected value? It could indicate a faulty resistor or perhaps an incorrect setting on your multimeter.
Ever wondered why the readings fluctuate? It could be due to poor connections or unstable components. Always ensure your probes have a good contact with the test points for accurate readings.
Troubleshooting Common Errors
Misreading resistance values can lead to confusion. Have you ever thought you had a broken component, only to realize later it was a multimeter setting error?
Check your multimeter’s settings first. Ensure it’s set to the correct range. For example, if you’re testing a 220-ohm resistor, set your multimeter to a range that covers this value comfortably.
Are you getting no reading? Make sure your multimeter is working properly. Verify the battery and check the leads for continuity. Sometimes, the simplest issues are the most overlooked.
Don’t let errors discourage you. What steps will you take to ensure accurate readings next time? If you’ve ever misread a value, share your experience in the comments below. Your insight might help someone else avoid the same mistake.
Credit: www.youtube.com
Practical Applications Of Resistance Testing
Resistance testing with a multimeter is not just a technical skill—it’s a doorway to understanding the inner workings of electronic devices. Whether you’re a hobbyist or a professional, knowing how to test resistance can save you time and money. This skill helps ensure the safety and functionality of your circuits. But how do you apply this in real-world situations? Let’s delve into some practical applications of resistance testing.
Testing Resistors
Resistors are the backbone of electronic circuits. They control the flow of current, ensuring components operate safely. But how can you be sure a resistor is functioning correctly? Using your multimeter, you can measure its resistance value directly. Compare this to the resistor’s labeled value. If the readings are off, it might be time to replace it.
Imagine working on a DIY project, and your circuit isn’t behaving as expected. Testing resistors can pinpoint the issue. Once, I was building a simple LED circuit and the light wouldn’t turn on. A quick resistance test revealed a faulty resistor. Swapping it out solved the problem instantly. Has this ever happened to you?
Checking Circuit Continuity
Circuit continuity testing is crucial for troubleshooting. It ensures that electrical paths are complete. Without continuity, your device won’t work. Use your multimeter to check if electricity flows freely through your circuit. This is especially useful in more complex systems like home wiring or automotive electronics.
Consider the frustration of a malfunctioning device. You’ve checked the power source, and everything seems in order. Testing continuity can identify broken connections or shorts. I once had a stubborn kitchen appliance that kept shutting off. A continuity test revealed a broken wire inside. Repairing it saved me from buying a new one. What hidden issues could you uncover with a simple test?
Embrace resistance testing as a fundamental skill in your toolkit. It not only empowers you to fix issues but also deepens your understanding of electronics. Whether you’re crafting gadgets or troubleshooting household devices, the ability to test resistance is invaluable. Are you ready to enhance your technical prowess?
Maintaining Your Multimeter
Keeping your multimeter in good shape ensures accurate readings. This tool needs care for long-term reliability. Proper maintenance extends its life. Let’s explore key practices to maintain your multimeter.
Regular Calibration
Calibration is essential for accurate results. Over time, multimeters can drift. Calibrate it regularly to ensure precision. Check the manufacturer’s guidelines for frequency. Typically, once a year is recommended. Use a standard reference for calibration. This guarantees your readings are correct.
Proper Storage Practices
Store your multimeter in a dry place. Moisture can damage its components. Use a protective case if possible. This prevents dust and physical damage. Keep it away from magnets and strong electrical fields. These can interfere with its functions. Ensure the batteries are removed if stored for long. This avoids leakage and corrosion.
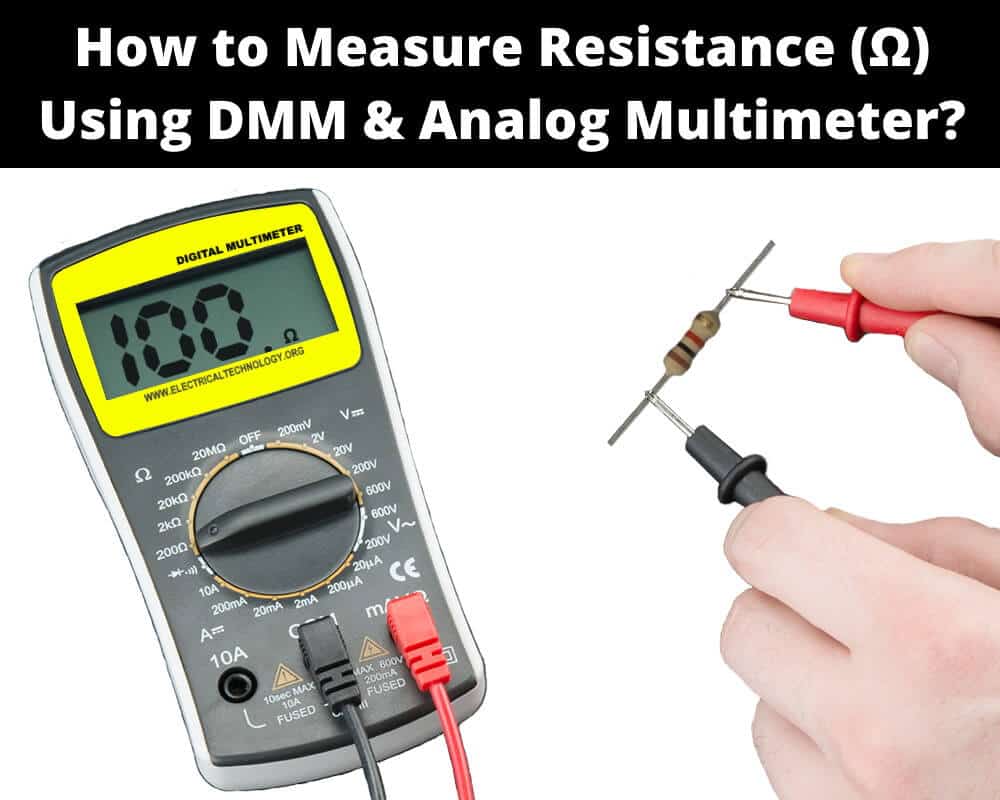
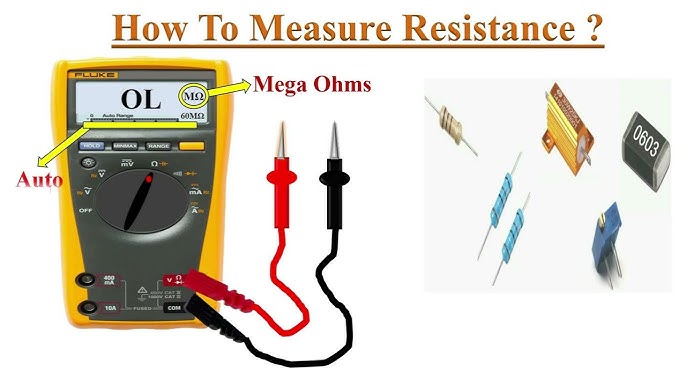
Credit: www.electricaltechnology.org

Credit: www.youtube.com
Frequently Asked Questions
How To Use A Multimeter For Resistance Testing?
To test resistance, set your multimeter to the resistance setting. Connect the probes to the circuit or component. Ensure the circuit is not powered. Read the resistance value displayed on the multimeter screen. Adjust the range setting if needed for a more accurate measurement.
What Does Multimeter Resistance Measurement Mean?
Multimeter resistance measurement indicates how much a material opposes electrical current. A higher resistance means less current flow. Resistance is measured in ohms, using the multimeter’s resistance setting. It’s crucial for assessing circuit functionality and diagnosing electrical issues.
Why Is My Multimeter Not Reading Resistance?
Check the multimeter’s settings and probe connections. Ensure the circuit is powered off. Verify the battery level in your multimeter. If the issue persists, consult the user manual or seek professional help. Faulty probes or settings can affect resistance readings.
Can Multimeter Measure Resistance Accurately?
Yes, multimeters measure resistance accurately when used correctly. Ensure the circuit is off and probes are properly connected. Calibration and quality of the multimeter impact accuracy. For precise readings, use a multimeter with an auto-range feature.
Conclusion
Testing resistance with a multimeter is simple and useful. Multimeters measure resistance in ohms, helping detect circuit issues. Always ensure the device is off before testing. Connect the probes to the component or circuit. Read the display for resistance values.
This method helps in troubleshooting electronics. Practice makes perfect. Regular use improves accuracy and confidence. Multimeters are essential tools for DIY enthusiasts and technicians. Understanding resistance testing saves time and effort. It enhances your skills in electronics. Keep experimenting and learning.
Soon, you’ll be a pro at using a multimeter.


