
Have you ever found yourself watering the far corners of your garden, only to be stopped short by the length of your hose? It’s a common problem, and the solution is simpler than you might think.
By learning how to connect two garden hoses, you can reach every plant, flower, and patch of grass in your yard with ease. Imagine the convenience and time saved when you no longer have to lug around heavy hoses or repeatedly move sprinklers.
In this guide, you’ll discover just how easy it is to extend your watering range, ensuring your garden thrives like never before. Stay with us and learn the straightforward steps to transform your gardening experience. Your plants will thank you!
Tools And Materials
Connecting two garden hoses can be a simple task. Having the right tools and materials makes it easier. This section covers essential tools for this process. Proper preparation ensures a strong connection.
Tools Needed
A few basic tools are necessary. You will need pliers. They help tighten the hose connectors. A wrench is useful too. It provides extra grip. Ensure you have a bucket of water. This helps check for leaks. A towel is handy for drying.
Essential Materials
The right materials are crucial. First, get two garden hoses. Ensure they are clean. Check for any damage. You will need a hose connector. This joins the hoses. Choose a brass or plastic one. Hose washers are important. They prevent leaks. Keep a few extra on hand.
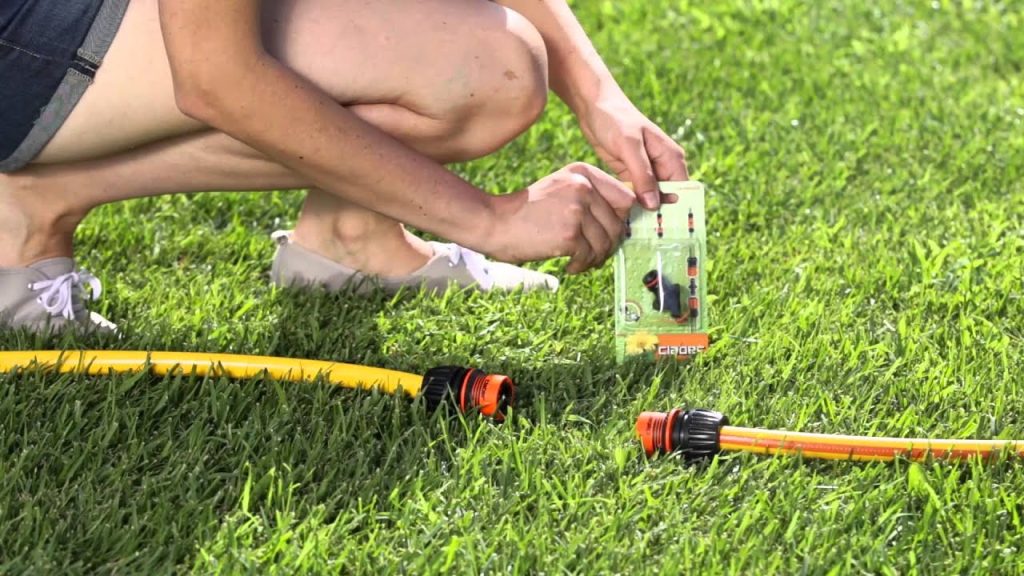
Choosing The Right Hose Connector
Selecting the correct connector matters. Brass connectors are durable. Plastic ones are lighter. Consider the hose diameter. Match it with the connector size. This ensures a snug fit. Proper fit avoids water wastage.
Quality Hose Washers
Washers ensure a leak-free connection. They are small but vital. Rubber washers are commonly used. Check their condition. Replace worn-out washers promptly. This prevents water loss.

Credit: www.homedepot.com
Choosing The Right Hose Connectors
Connecting two garden hoses requires choosing the right hose connectors. Ensure compatibility by matching the hose sizes. Push and twist connectors tightly to prevent leaks and maintain water flow.
When you’re ready to extend your garden hose reach, choosing the right connectors is crucial. It might seem simple, but the right connector can make your gardening life much easier. Imagine avoiding those annoying leaks and ensuring a smooth flow of water just by picking the right tool. Here, we’ll walk through the essentials of hose connectors to help you make an informed decision.
Types Of Hose Connectors
There are several types of hose connectors, each serving a unique purpose. Quick-connect fittings let you snap hoses together without twisting, perfect for those who frequently need to connect and disconnect hoses. Threaded connectors, on the other hand, screw onto the hose ends, offering a more secure and permanent fit. Y-shaped connectors are great if you want to split the water flow from one hose into two directions. Have you ever found yourself needing to water two areas of the garden simultaneously? This type of connector can solve that problem effortlessly.
Material Considerations
Selecting the right material for your hose connectors can impact their longevity and performance. Plastic connectors are lightweight and generally more affordable, but they might wear out quickly if exposed to harsh weather. Metal connectors, such as those made from brass or stainless steel, provide durability and can handle higher water pressure, but might be a bit heavier and pricier. Have you ever had a connector break just when you needed it most? Choosing a durable material can save you from unexpected breakdowns. Consider your garden’s needs and climate when deciding on the material, ensuring you get the most out of your investment. By understanding these key aspects, you can make the most informed choice for connecting your garden hoses. What will you prioritize when choosing your next connector—ease of use, durability, or perhaps both?
Preparing The Hoses
Connecting two garden hoses requires a simple twist of connectors. Align the threads of both hoses carefully. Ensure a tight seal to prevent leaks and maintain water flow.
Connecting two garden hoses might seem like a simple task, but preparing the hoses properly is crucial for a seamless experience. Imagine being in the middle of watering your garden only to find that your hoses aren’t working efficiently. This can be frustrating and time-consuming. The preparation phase ensures the hoses are ready for connection, saving you from the hassle of leaks and inefficiencies. Ready to dive into the nitty-gritty? Let’s get started with preparing your hoses!
Inspecting For Damage
Before you connect the hoses, take a moment to inspect them thoroughly. Look for any visible cracks, holes, or signs of wear. A small tear can lead to a big leak, wasting water and reducing pressure. Feel along the length of the hose with your fingers. This can help you detect any hidden damage that might not be obvious at first glance. If you find any damage, consider replacing the hose or repairing it with a hose mender. This proactive step can save you time and frustration later.
Cleaning The Hose Ends
Cleaning the hose ends is essential for a tight connection. Dirt and debris can prevent the hoses from sealing properly, leading to leaks. Use a damp cloth to wipe the hose ends thoroughly. This removes any accumulated dirt or grime. If you notice stubborn dirt, you might need a gentle scrub with a brush. This ensures the connectors are clean and ready for a tight fit. Have you ever wondered why some hose connections seem to leak no matter what? Often, it’s due to dirty hose ends. Keeping them clean can be the game-changer in achieving a leak-proof connection. By preparing your hoses properly, you set the stage for a hassle-free gardening experience. Are you ready to give your garden the attention it deserves without the interruptions of faulty equipment?
Credit: www.reddit.com
Attaching The Connectors
Connecting two garden hoses requires secure attachments. First, align the male and female connectors of each hose. Twist them together until firmly attached. Ensure no leaks by checking the seal. Properly attached connectors help maintain water flow and efficiency during gardening tasks.
Attaching connectors to garden hoses is a simple yet crucial task. This step ensures your hoses are seamlessly joined without leaks. Imagine trying to water your garden and ending up with soaked shoes instead. The right connector is your best friend in avoiding this mishap. Whether you’re a seasoned gardener or a weekend warrior, understanding how to properly attach connectors can save you both time and frustration.
Connecting With Screw-on Connectors
Screw-on connectors are straightforward and reliable. Start by ensuring both hose ends are clean and dry. Dirt and moisture can hinder a tight seal. Align the threads of the connector with those on the hose end. Twist the connector clockwise until it’s snug. You’ll feel it gradually tighten, and that’s a good sign. A little effort here means no leaks later. If you’re worried about the connector getting loose, consider using a wrench for the final turn. Just be cautious not to over-tighten, as this can damage the hose threads. Remember, snug is better than overly tight.
Using Quick-connect Fittings
Quick-connect fittings offer a hassle-free alternative. They’re perfect for those who often rearrange their garden setup. Simply push the male end into the female end until you hear a click. That click is your assurance that the connection is secure. It’s like snapping together Lego pieces, satisfying and efficient. These fittings are great for avoiding the repetitive twisting involved with screw-on connectors. If your garden demands versatility, quick-connect fittings are your best bet. Imagine easily switching between hoses without breaking a sweat. Have you ever struggled with connecting hoses? Quick-connect fittings might be your solution. They save time and keep your hands clean. What’s your preference, screw-on or quick-connect?
Testing The Connection
Connecting two garden hoses might seem straightforward, but ensuring a reliable connection requires a bit of diligence. Once you’ve hooked them up, the next step is to test the connection. This is crucial to prevent unexpected leaks that can disrupt your gardening plans or waste water. By checking for leaks and ensuring a secure fit, you can maintain a seamless flow between your hoses.
Checking For Leaks
Turn on the water and watch closely where the hoses connect. Are you seeing any drips or puddles forming? Even a slow leak can lead to bigger problems down the line.
Don’t ignore small leaks thinking they won’t matter. They can weaken the hose’s efficiency and increase your water bill.
If you notice any leaks, tighten the connection or adjust the washers. Sometimes, a simple twist can make all the difference.
Once you’ve addressed the leaks, run your hand along the connected area to feel for any dampness. This tactile check can confirm whether the issue is resolved.
Ensuring A Secure Fit
Feel the connection with your hands. Does it feel sturdy, or is it wobbling? A secure fit is essential to prevent disconnection during use.
Consider adding a hose clamp for extra security. They’re inexpensive and can provide peace of mind, especially if you plan to use your hoses extensively.
Remember that a snug fit isn’t just about the physical connection. It’s about ensuring water pressure remains optimal, allowing for efficient watering.
Ask yourself: How often do you check your hose connections? Regular checks can save you time and hassle in the long run.
By paying attention to these details, you ensure your garden remains lush and thriving. A well-connected hose is your ally in achieving gardening success.
Troubleshooting Common Issues
Easily connect two garden hoses by ensuring both ends are clean and free of debris. Attach a hose connector snugly to join them securely. Check for leaks and tighten if necessary for a smooth water flow.
Connecting two garden hoses seems easy. But problems arise. Small issues can disrupt your gardening. Understanding these problems helps. It saves time and effort. Let’s explore common issues. Learn how to solve them effectively.
Addressing Leak Problems
Leaky hoses waste water. They affect your garden’s health. First, check the connection points. Ensure they are tight. Loose fittings cause leaks. Inspect the rubber washers. They should be intact. Replace worn washers. This simple fix often solves leaks. Look for cracks in the hose. Small cracks cause big leaks. Use a hose repair kit. It’s an affordable solution.
Fixing Connector Misalignment
Misaligned connectors prevent a proper fit. They cause leaks and disconnections. Gently twist the hoses. Align the connectors properly. Check for dirt or debris. Clean them off. Dirt causes misalignment. Ensure the connectors are compatible. Different sizes won’t fit well. Use an adapter if needed. This ensures a snug connection. `
Maintaining Your Garden Hose Connection
Attaching two garden hoses is simple. Use a hose connector to join them securely. Ensure tight fitting for no leaks.
Maintaining your garden hose connection is essential for a thriving garden. Have you ever wondered why your garden hose leaks or the water pressure isn’t as strong as it should be? Often, the issue lies in how well you maintain the connection between your hoses. With a few simple steps, you can ensure that your garden remains lush and vibrant, while also extending the life of your hoses.
Storing Hoses Properly
Proper storage can significantly affect the longevity of your garden hoses. After each use, drain the hose completely to prevent water from freezing inside during colder months. Coil the hose loosely and hang it on a reel or hook to prevent kinks and cracks. Choose a shaded area for storage to minimize exposure to sunlight, which can weaken the hose material over time. If you live in a region with harsh winters, consider storing hoses indoors. This prevents damage from extreme temperatures and prolongs their usability.
Regular Inspection Tips
Regular inspections can catch minor issues before they become major headaches. Check the connections for signs of wear and tear, such as cracks or rust. Replace damaged washers to maintain a tight seal. Run water through the hose to ensure there are no leaks or blockages. If you notice a drop in water pressure, there might be a kink or a partial clog. Address these problems promptly to avoid further complications. Remember, a little maintenance goes a long way. By keeping your garden hose connections in top shape, you ensure efficient watering and a healthier garden. When was the last time you checked your garden hose? Perhaps it’s time for a quick inspection!
Frequently Asked Questions
How Do I Connect Two Garden Hoses Securely?
To connect two garden hoses securely, use a hose connector or coupler. Ensure both hose ends are clean and dry. Attach the connector by twisting it onto each hose end tightly. Check for leaks by running water through the hoses.
Adjust the connector if necessary to ensure a leak-free connection.
What Type Of Connector Is Best For Hoses?
Brass connectors are ideal for garden hoses due to their durability and corrosion resistance. They provide a secure, long-lasting connection. Plastic connectors are lightweight and affordable but may not be as durable. Quick-connect systems offer convenience, allowing for easy attachment and detachment of hoses.
Can I Connect Hoses Of Different Sizes?
Yes, you can connect hoses of different sizes using a hose adapter. Hose adapters are designed to bridge the size gap between two hoses. Ensure the adapter fits both hose diameters securely. Using the correct adapter prevents leaks and ensures optimal water flow through the connected hoses.
Do I Need Tools To Connect Garden Hoses?
Generally, you don’t need tools to connect garden hoses. Most hose connectors and couplers are designed for hand-tightening. However, if the connection leaks, a wrench can help secure the connection. Always ensure not to overtighten, as this might damage the hose or connector.
Conclusion
Connecting two garden hoses is simple with the right tools. Use a hose connector to join them securely. Make sure both hoses are clean and dry. Check for leaks by turning on the water. Tighten any loose connections for a better seal.
Enjoy a longer reach in your garden with connected hoses. This easy process makes watering more efficient. Save time and effort in your gardening tasks. Remember, regular checks ensure your hoses stay in good condition. Happy gardening with your extended hose setup!


